


Antimalware executable high CPU usage after Windows 11 update? The process makes your computer unstable, very slow or not responding. The AntiMalware service Executable, also known as MsMpEng.exe, is a critical process associated with Windows security (Windows Defender), the built-in antivirus solution in Windows 11. And the primary function of Antimalware executable is to safeguard your system by scanning for and protecting against malicious software, viruses, and other security threats. In this article, we will explore the reasons behind Antimalware service executable high CPU usage and solutions to fix the problem on Windows 11.
Antimalware service Executable (MsMpEng) is a Windows Security process that executes real-time protection against malware.
Why Antimalware executable high CPU usage?
The main purpose of this service is to safeguard your system again malicious software or virus malware infection. However sometimes antimalware service executable consume a significant portion of your CPU’s processing power.
The most common reason for high CPU usage by AntiMalware Executable is when it is actively scanning files and processes on your system. Scans can be triggered by real-time protection or scheduled scans.
Again Scanning large files or fragmented files can lead to increased CPU usage as the antivirus engine needs more resources to process them.
Outdated Windows versions, corrupted system files, third-party security software or other antivirus programs running alongside Windows security can cause conflicts, leading to increased CPU usage.
Windows 11 antimalware service executable high CPU usage
Well, Disabling the Real-Time Protection temporarily Disable Antimalware Service Executable and probably your PC back to normal. In addition, you need to ensure the latest Windows updates are installed. Prevent Antimalware Service Executable from Scanning its Own Folder is helpful for few users. Here few tested solutions apply to fix Antimalware service executable high CPU usage on Windows 11.
Check for Updates
Microsoft regularly releases updates that include bug fixes, performance improvements, and security patches. And Keeping your Windows Defender definitions and Windows 11 update is crucial for optimal performance and security.
- Click on the Start button and select “Settings” (the gear icon).
- Go to “Windows Update” in the left pane then Click on “Check for updates” in the right pane.
- If new updates are available or pending there, allow them to download and install on your Device.
- Once done reboot your computer to apply the changes.


Schedule Scans Wisely
By default, Windows Security (Defender) performs regular scans to ensure your system’s security. However, these scans might coincide with times when you’re actively using your computer. To change the scan schedule, do the following:
- Press the Windows key + R, type taskschd.msc and click ok to open task scheduler,
- Expand Task Scheduler Library > Microsoft > Windows -> windows defender.
- Double-click Windows Defender Scheduled Scan and Uncheck Run with the highest privileges.
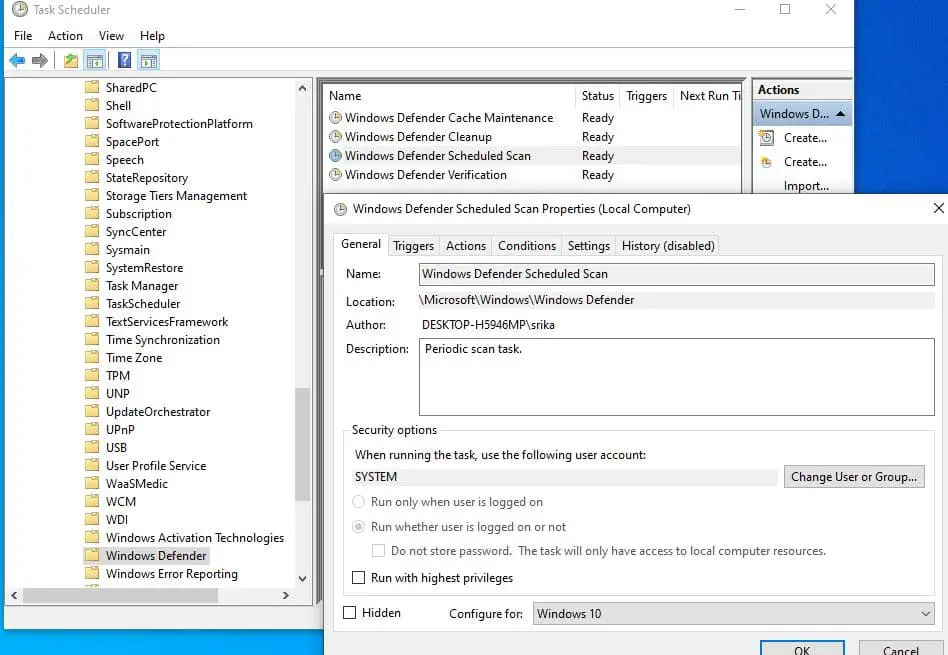

Next move to the conditions tab and uncheck all options there, click ok to save changes.


- Next schedule your own by going to the Triggers tab and select New
- Create the scan by selecting if you want it done once, daily, weekly, or monthly.
- You can also select the date and time, and when you want it to start.


Limit Real-Time Scanning
Real-time scanning is a critical feature of Windows Defender, as it actively monitors files and processes for potential threats in real time. However, it can sometimes lead to high CPU usage during resource-intensive tasks like gaming or video editing. Turn off Defender antivirus protection in Windows Security and check if this helps.
- Open Windows Security and go to “Virus & threat protection.”
- Under “Virus & threat protection settings,” click on “Manage settings.”
- Find the “Real-time protection” section and toggle the switch to turn it off temporarily.


Keep in mind that disabling real-time protection leaves your system vulnerable to new threats, so do this only when performing tasks that require significant CPU resources.
Disable Antimalware Service Executable
If you are using a third-party antivirus program and want to prevent any potential conflicts, you can consider disabling Windows Defender temporarily that Disable Antimalware Service Executable.
However, it’s important to note that third-party antivirus solutions might not offer the same level of integration and security as Windows Defender.
- Press Windows + I to open Settings, then click on “Privacy & Security” and “Windows Security” on the right


- Go to “Virus & threat protection” and click on “Manage settings” next to Virus & threat protection settings.

- Turn off the “Real-time protection,” “Cloud-delivered protection,” and “Automatic sample submission” options.


Add the process to the Exclusion List
Adding the Anti-Malware Executable process to the exclusion list can be helpful in reducing high CPU usage caused by Windows Defender’s scanning activities. Here’s how you can add the Anti-Malware Executable process to the exclusion list:
By excluding this process, Windows security won’t scan itself, leading to a reduction in CPU overhead.
- Press Windows key + S, type Windows security then select the first result,
- Go to “Virus & threat protection,” and click on “Manage settings.”
- Scroll down to the “Exclusions” section and click on “Add or remove exclusions.”
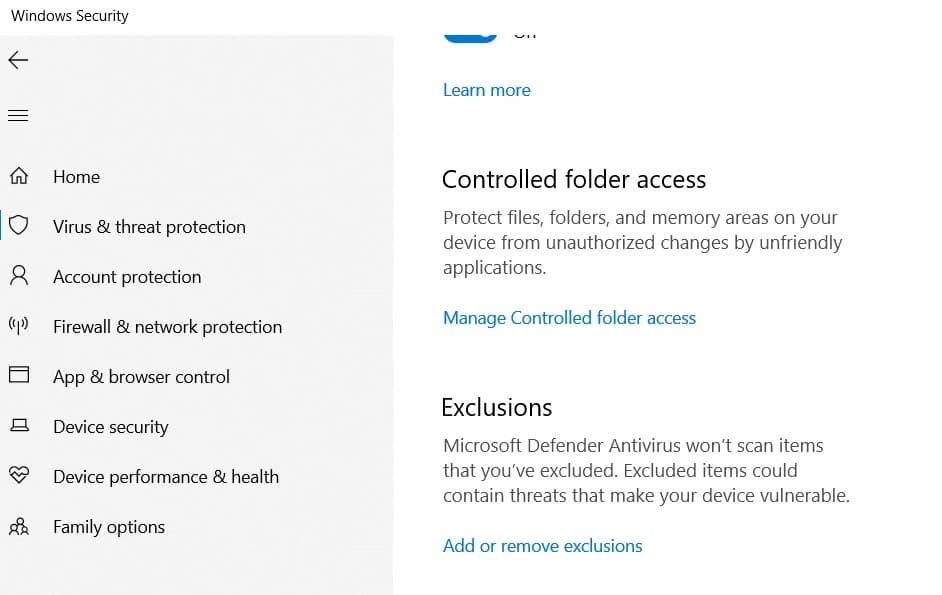

You can exclude specific files, folders, file types, or processes from being scanned by clicking on the “+ Add an exclusion” button and selecting the appropriate option.
Let’s click the + Add an exclusion -> file -> navigate C:\Program Files\Windows Defender and select MsMpEng option to add Antimalware Service Executable is now on the Exclusion List.
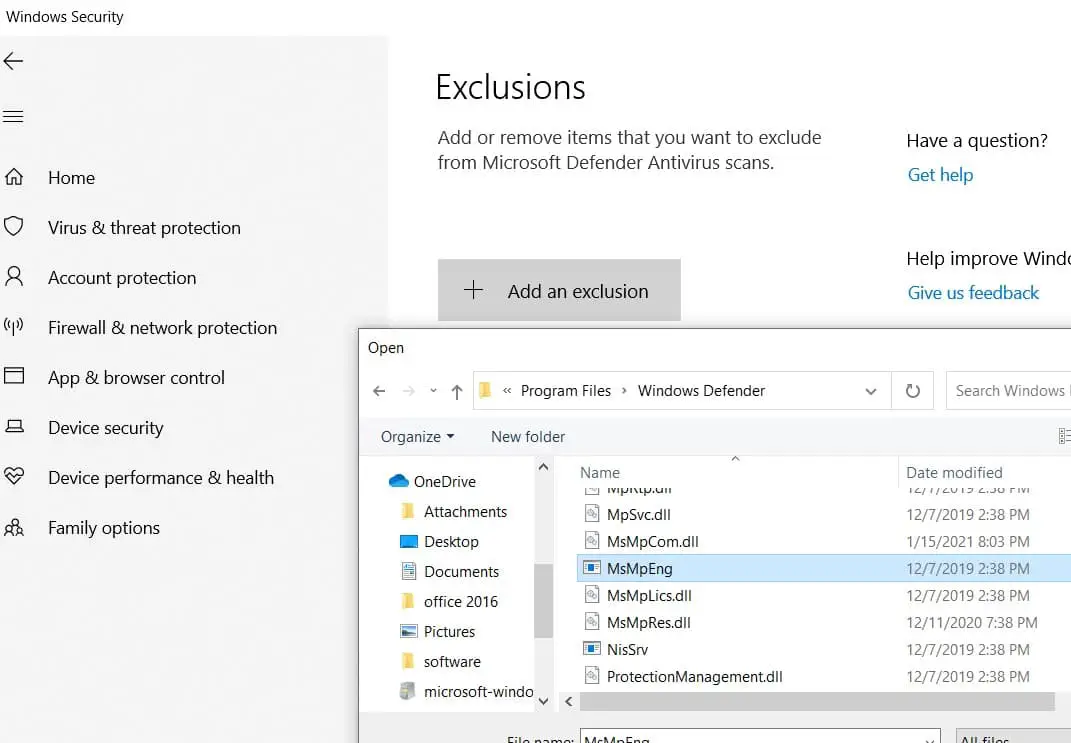

Note – To remove it from the list and the process, click on the exclusion arrow and select Remove.


Check for Malware
In some rare cases, malware infections can disguise themselves as legitimate processes, including the Anti-Malware Executable. Perform a thorough system scan using Windows Defender or your preferred antivirus software to ensure your system is clean and free from malware.
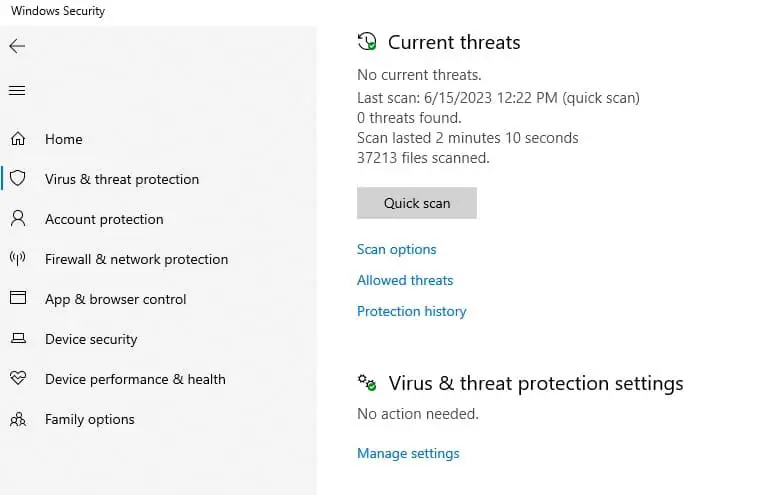
- Open Windows Security and go to “Virus & threat protection.”
- Under “Virus & threat protection,” click on “Scan options.”
- Choose “Full scan” and click on “Scan now.”
- The scan may take some time, depending on the size of your system and the number of files.
Run System File Checker
Running the System File Checker (SFC) is another useful step in troubleshooting and resolving issues related to high CPU usage or other system problems in Windows 11.
- Press Windows key + S and type cmd, right-click on the command prompt select run as administrator,
- Type Command sfc /scannow and press enter key


The SFC tool scans and verifies the integrity of protected system files and replaces any corrupted or missing files with cached copies from the Windows system folder.
Let the scanning complete 100%, once done restart your computer and check if the high CPU usage issue persists.
Also read:
- Antimalware service executable High disk usage Windows 10 [Solved]
- What is MsMpEng.exe, and how to disable it in Windows 11>
- Essential Security Tips for Windows 11 to Protect Your Device and Data
- How to uninstall apps from Microsoft store windows 11
- WIFI says connected But no internet Access on Windows 10 laptop (Solved)


%20is%20a%20Windows%20Security%20process%20that%20executes%20real-time%20protection%20against%20malware.)