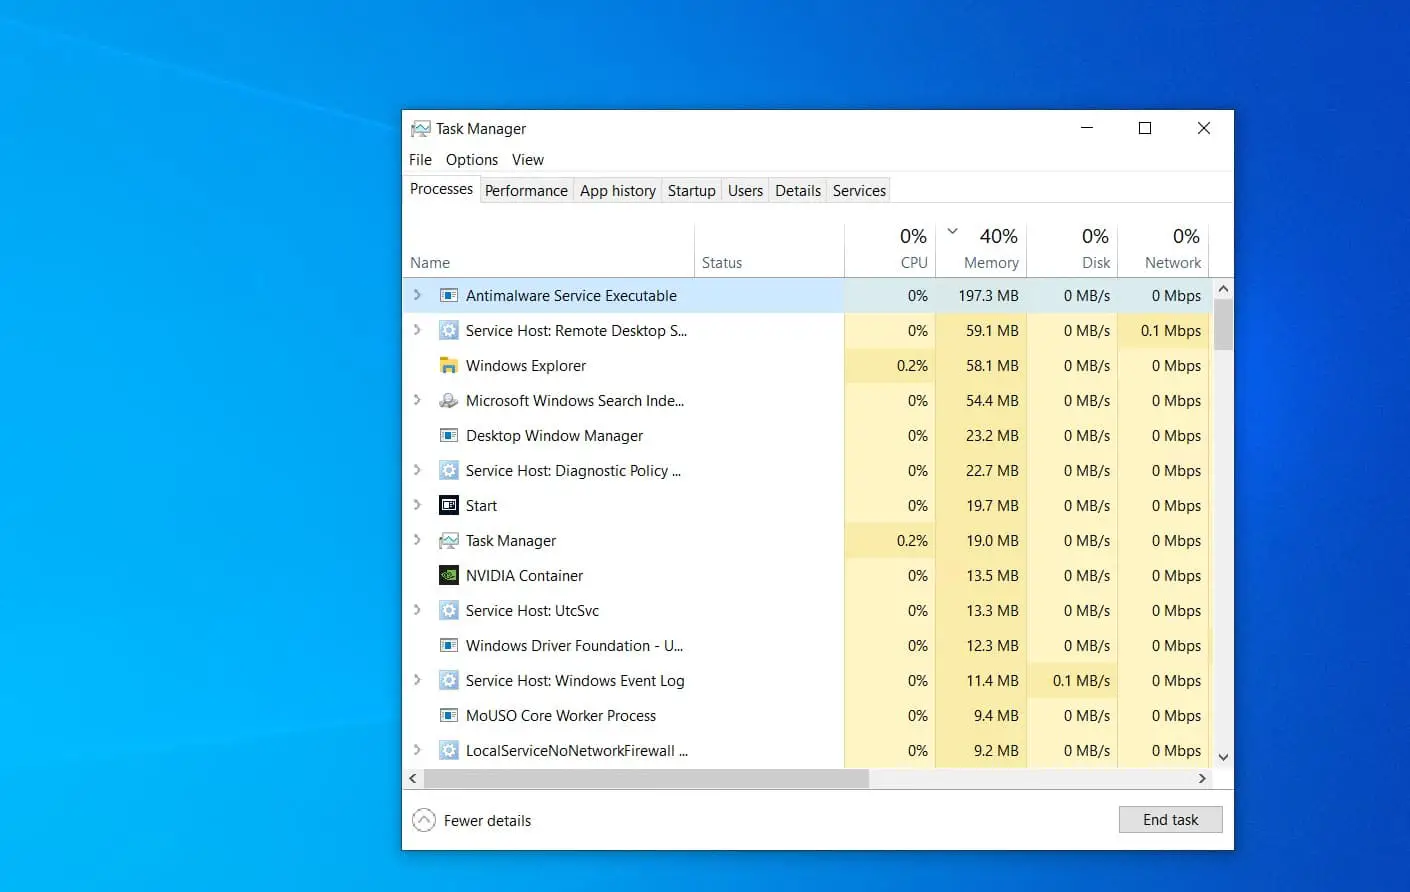
Sometimes you may experience Windows 11 computer being very slow after an update, and checking on Task Manager there is a process MsMpEng.exe or Antimalware Service Executable eating up almost 100 CPU on windows 11. So you may have a question on mind, What is Antimalware Service Executable? Why is it High CPU or disk usage, and How to Stop Antimalware Service Executable from using too much CPU or RAM on your computer? Here is a complete guide to answer your question Let’s start.
What is Antimalware Service Executable in windows 11?
Msmpeng.exe is short for Microsoft Malware Protection Engine or Some refer to it as Antimalware Service Executable. It’s a Legitimate windows security process that executes real-time protection against malware and ensures your computer is protected against threats. The antimalware service executable continuesly run on the background so it can scan files and programs or if detects a virus or malicious attacks it deletes them or quarantines them real-time.
Basically, it’s the built-in Windows 11 antivirus. (Windows Defender service)
Antimalware Service Executable High CPU
Usually, the Windows Malware Protection Engine runs in the background with a lower intensity so you keep using your PC without even noticing it. But some of the users reports, the antimalware service executable makes their PC unusable, which can be a frustrating problem. So why does Antimalware Service Executable use a lot of CPU? Its because the antimalware service executable scans its own folder – C:\Program Files\Windows Defender.
Again Malware or virus infection to Misconfigured or corrupt Windows system files or software conflicts to low hardware resources can also cause Antimalware Service Executable High CPU on windows 11.
How to Disable Antimalware Service Executable?
Usually, we don’t advise or recommend remove or disable the antimalware service executable on windows 11 as most of the issues with it are resolved in the later Windows updates. First, we recommend check for and install the latest windows updates, run a system file checker and perform a full system scan for virus malware infection. Also Installing a third-party antivirus bypass this problem altogether for a few users.
Well if still, the MsMpEng.exe or antimalware service uses too many resources, you can stop it using the Registry Editor or by performing a built-in command-line tool from your OS.
Update windows 11
- Press the Windows key + X and select settings,
- Go to windows update then hit the check for updates button,
- Allow the download and install if new or pending updates are there.
- And finally, you need to reboot your computer to apply the changes.
Installing the latest windows updates on your system not only fixes previous bugs and problems but also enhances the system’s performance as well.
Add Msmpeng.exe As An Exclusion In Microsoft Defender
As mentioned before sometimes antimalware service executable scans its own folder and that results high CPU usage on windows 11. Few users report, adding the msmpeng.exe as an exclusion in Microsoft Defender help them successfully prevent it from scanning itself.
Press the Windows key + S, type windows security, and then select the first result.
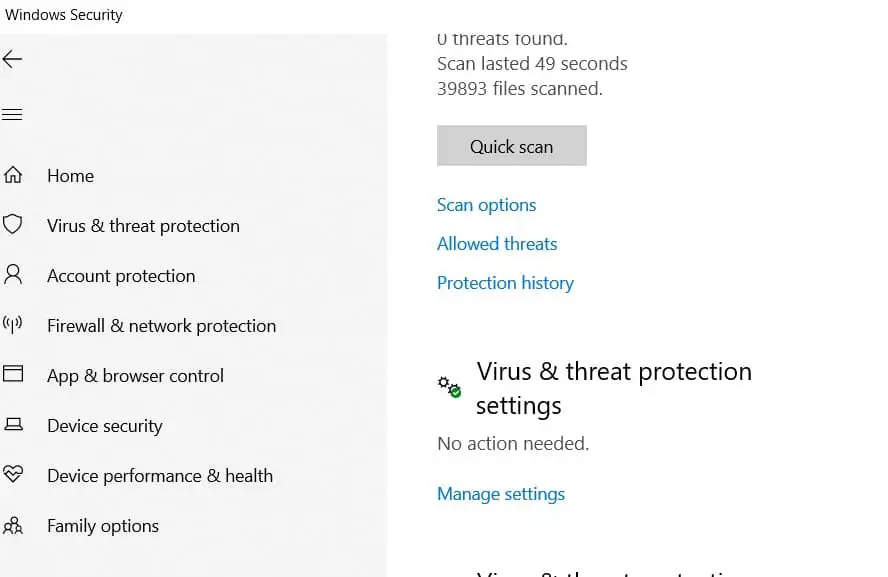
In the windows security panel, click on Virus and Threat Protection, And here under the “Virus & Threat Protection Settings” section, click on “Manage Settings.”
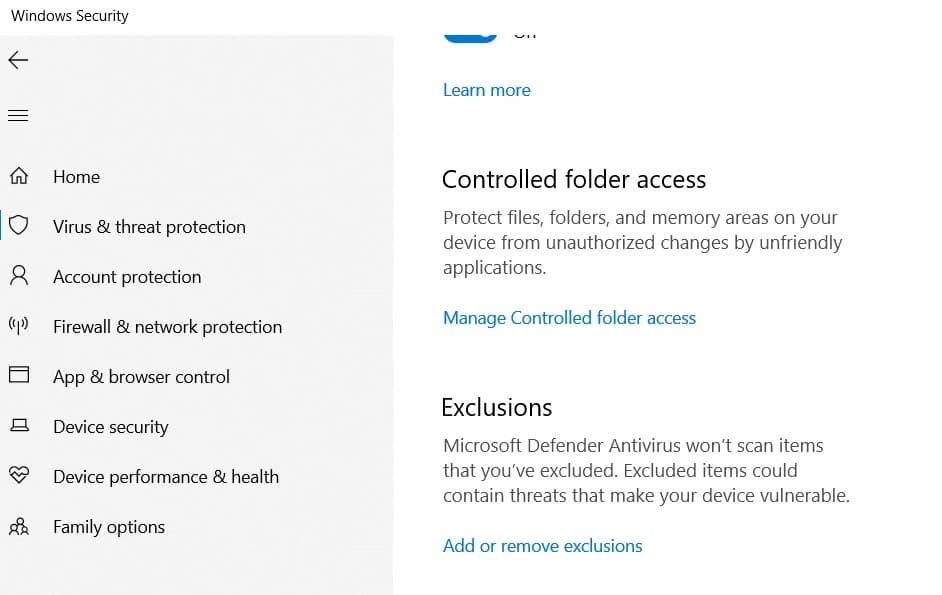
- Scroll down to locate “Exclusions” section, then click on “Add or Remove Exclusions.”
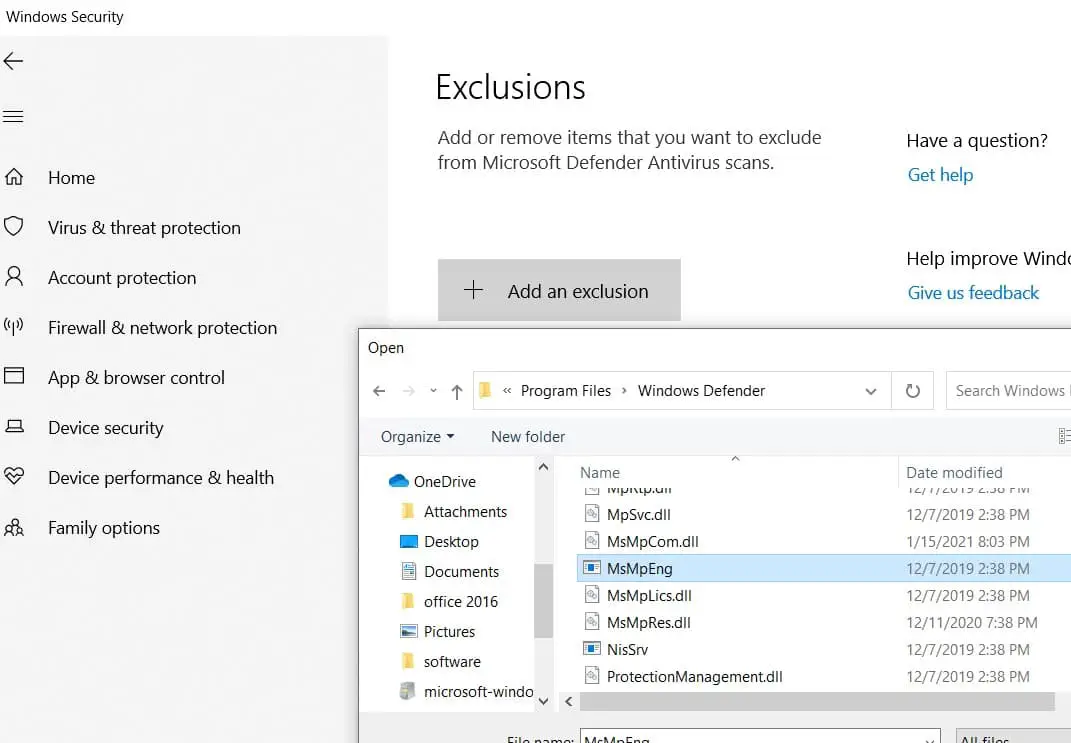
- Click on “Add an Exclusion,” then choose File, open the following path: C:\Program Files\Windows Defender\MsMpEng and choose the MsMpEng Application file.
That’s all, next time when the scan happens, you shouldn’t experience such high CPU usage problems that may be preventing you from using your computer normally.
Replacing Msmpeng.exe With A Third-Party Antivirus
Disable Antimalware Service Executable on windows 11 means stop the antivirus protection and leave your computer unprotected and it’s not a good idea. If you are looking to stop running msmpeng.exe on your computer then we recommend look for a replacement. And installing a third-party antivirus bypass this problem for a few users.
Installing a third-party antivirus, Microsoft Defender will automatically turn itself off, and your problem should be resolved.
There are many third-party antivirus solutions available on market, but we recommend choosing an antivirus that consumes low system resources. Installing such type of antivirus only protects you from virus malware infection but also reduces CPU load and helps your system achieve its best performance. Here we have collected some of best antivirus for windows 11.
Once an antivirus program is installed on your computer make sure its updated and then perform a full system scan for virus malware infection to check if it’s causing windows 11 high CPU usage problems.
Run system file checker
Sometimes due to corrupted system files, you may experience MsMpEng.exe high CPU usage problem on windows 11. Running DISM and sfc command help scan and replace corrupted system files with correct ones and resolve multiple problems with windows 11.
- Press Windows key + R and type cmd, right-click on the command prompt select run as administrator,
- First, run the DISM command DISM /Online /Cleanup-Image /RestoreHealth
- Next, run the system file checker command sfc /scannow
the above commands scan and fix corrupted or damaged Windows operating system files and features directly from Windows online servers. Also, SFC will scan the integrity of all protected operating system files and try to repair them with the correct one.
Disable Realtime Protection and Reschedule Scans
Disable the windows defender real-time scan or protection also fix such problems on windows 11.
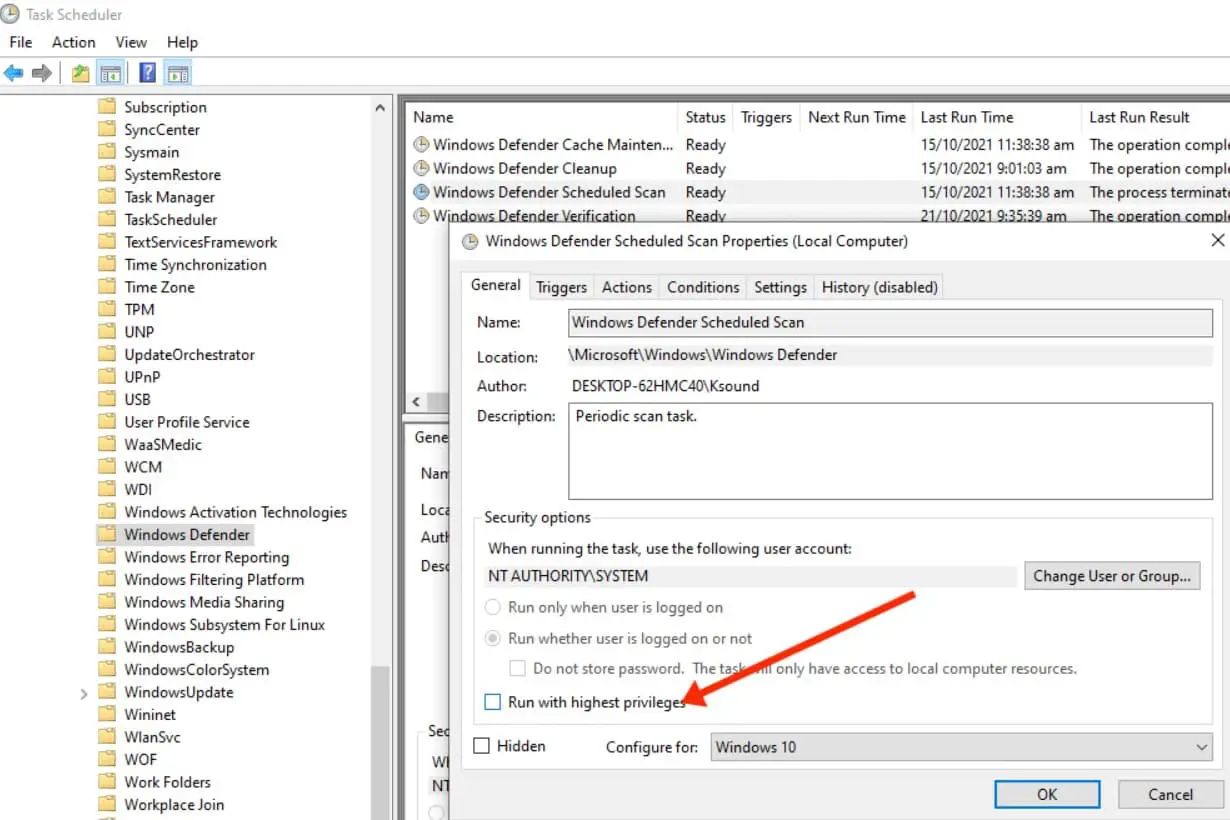
- Press Windows key + R, type taskschd.msc and click ok to open the task scheduler window,
- Here expand the task scheduler tab followed by Microsoft then windows, and scroll down to locate and select Windows Defender
- Right-click on “Windows Defender Scheduled Scan” then select “Properties and Uncheck “Run with highest privileges” in the general tab.
In addition, Go to the Conditions tab and uncheck everything there.
Now move to the Triggers tab and click “New”, Here Schedule the time you want Windows Defender to run scans. Choose the frequency, date, and time, then click “OK”. Click “OK” again.
Disable Antimalware Service Executable permanently
solution 01: Registry editor
- Press the Windows key + R, type Regedit and click ok to open the windows registry editor,
- Here Navigate to the following key:
HKEY_LOCAL_MACHINE/SOFTWARE/Policies/Microsoft/Windows Defender - Right-click on Windows Defender, select New and choose DWORD, name it DisableAntiSpyware, and set the value to 1.
Solution 02 : command line
In addition, you can open the command prompt as administrator and perform the command below to disable Antimalware Service Executable permanently on windows 11.
REG ADD “hklm\software\policies\microsoft\windows defender” /v DisableAntiSpyware /t REG_DWORD /d 1 /f
Solution 03: Group policy
- Press the Windows key + R, and type gpedit.msc and click ok to open group policy editor,
- Navigate to the following key: Computer Configuration/Administrative Templates/Windows Components/Microsoft Defender Antivirus/Real-time Protection
- In the right pane, double-click on Turn off real-time protection, then Select Enabled and click on Apply and OK to save the changes.
Did the above solution help stop Antimalware Service Executable permanently on windows 11? Let us know in the comments below.
Also read:
- Solved: “COM Surrogate has stopped working” in windows 10, 8.1 and 7
- Windows 11 Update Failed or stuck? Here’s How to Fix That
- Windows 10 Search not working after update? Apply these solutions
- Solved : Page fault in nonpaged area error on windows 10
- Windows 11 Photos App not opening or Not working? Try these solutions
