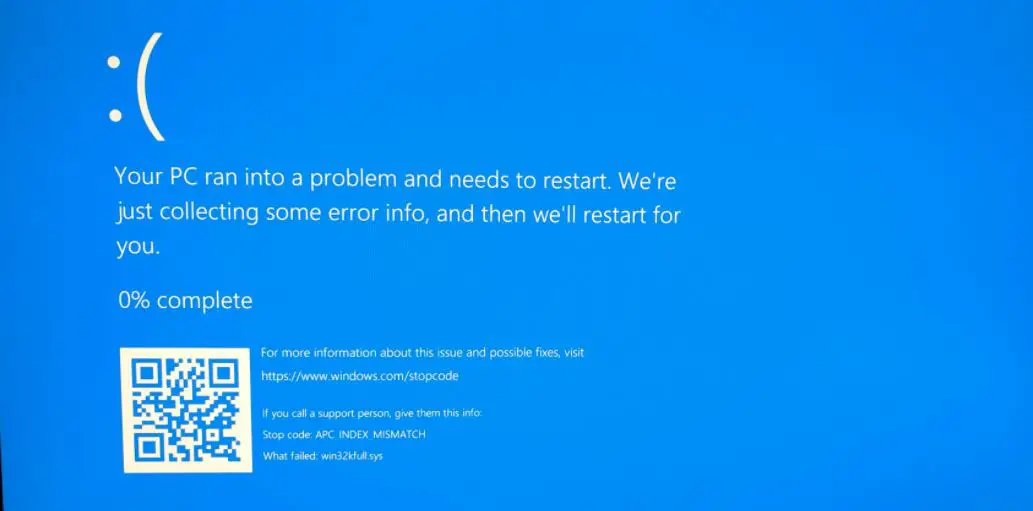
Getting blue screen error apc index mismatch (win32kfull.sys) after install Windows 10 update? Due To this APC_INDEX_MISMATCH BSOD windows unable to start normally to perform Troubleshooting steps. Mostly this Blue Screen occurs because of the incompatible system driver. Especially corrupted, outdated or incompatible Graphics drivers. If you are also struggling with similar blue screen error, apply the solutions listed below to eliminate this APC INDEX MISMATCH Error.
Fix APC_INDEX_MISMATCH Windows 10
Note: If the problem started only after installing the latest Windows update KB5000802, Microsoft has acknowledged the issue and a fix coming up on the upcoming Windows update.
For time being you can uninstall the update KB5000802 to get rid of this issue. To do this
- Open the command prompt as administrator,
- Type command wusa /uninstall /kb:5000802 and press enter key to uninstall the update.
First, remove all external devices and restart Windows check start normally. If yes, then any external devices cause this issue, attach one by one and check after attach which drive blue screen started.
Also, sometimes A simple restart resolves the BSOD error,
If due to this blue Screen Error windows frequently Restarts didn’t allow login to perform Troubleshooting steps then we need to access advanced options to perform startup repair or boot into safe mode.
Access Advanced option
To access the advanced option, we need to boot from installation media if you don’t have then create one following link.
- When you are ready to change the BIOS setup, boot from the installation media.
- Then skip the first screen and on the next screen click on Repair computer.
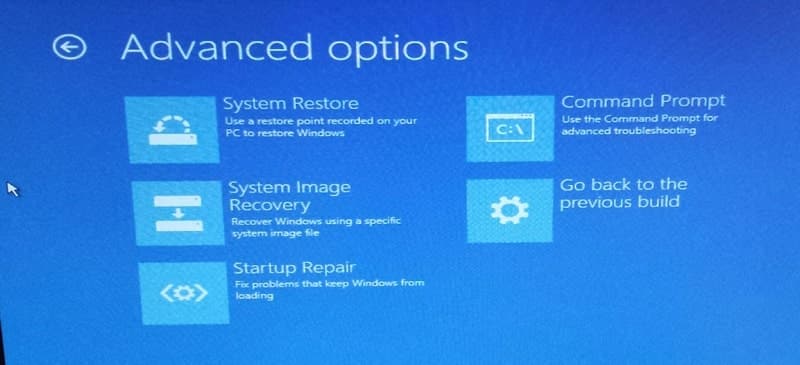
- Now click on Troubleshooting then Advanced options.
Perform Startup Repair
Here on Advanced options, click on Startup Repair, This will restart windows and start the diagnostic process. Analyze the various settings, configuration options, and system files Especially look for :
- Missing/corrupt/incompatible drivers
- Missing/corrupt system files
- Missing/corrupt boot configuration settings
- Corrupt registry settings
- Corrupt disk metadata (master boot record, partition table, or boot sector)
- Problematic update installation
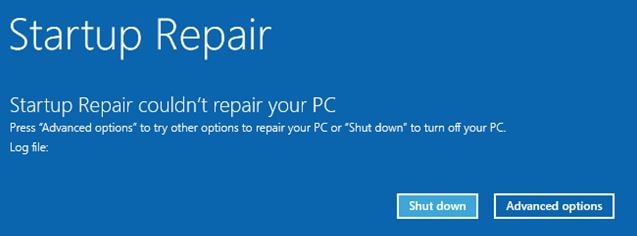
After completing the repair process, this will restart Windows and start normally. Now follow the below steps to avoid APC_INDEX_MISMATCH BSOD in the feature. If the repair process results startup repair couldn’t repair your PC or automatic repair couldn’t repair, we need to boot in safe mode.
Boot into safe mode with networking
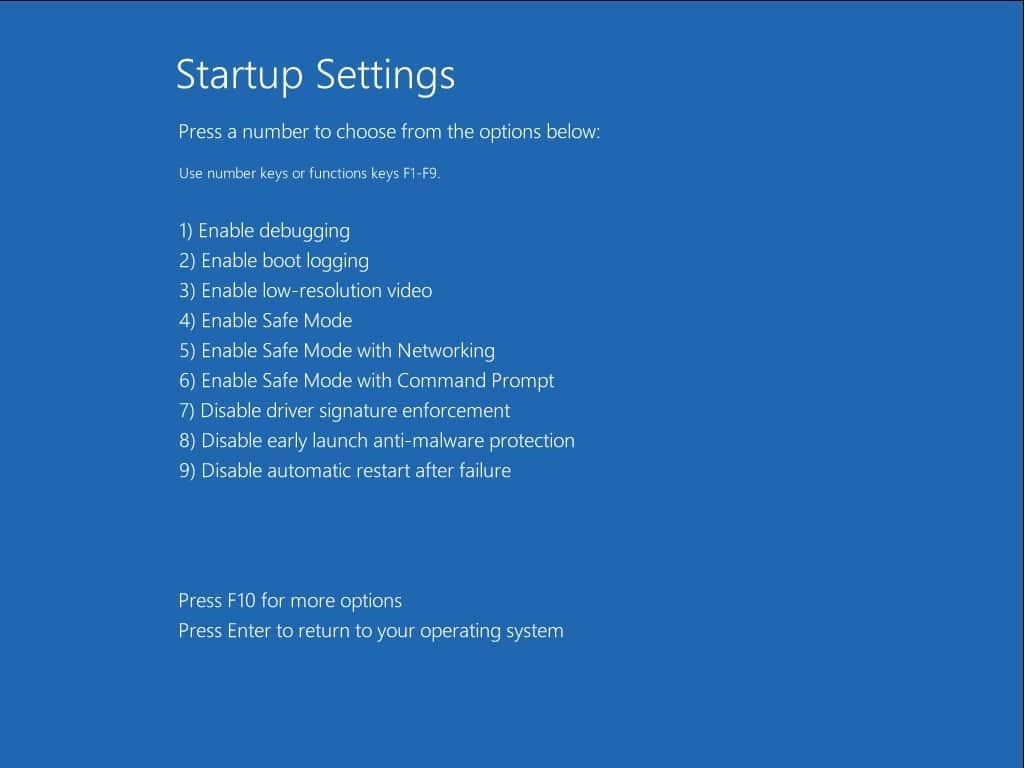
If startup repair fails then boot into safe mode, where windows start with minimal system requirement and allow to perform troubleshooting steps. You can do this by click on Advanced options -> Troubleshoot -> Advanced options -> Startup Settings -> Click on Restart -> Then press F4 To access safe mode and F5 To access safe mode with networking.
Now windows allow you to log in to safe mode. Let’s perform troubleshooting steps such as update / Rollback / Rollback Driver, Scan and repair corrupted system files, Run DISM Tool to repair the system image etc to fix and avoid APC_INDEX_MISMATCH BSOD error.
Update Device Driver
As discussed, this BSOD error mostly occurs due to a corrupted, outdated driver issue. So first find out and Try to Update or Re-install problematic drivers, especially the Display graphic Driver, Audio sound and Network adapter driver.
Update Driver
- Press Windows + R, type devmgmt.msc and hit the enter key.
- This will open the Device Manager and list all installed drivers list.
- Here check any driver with a yellow triangle with an exclamation mark,
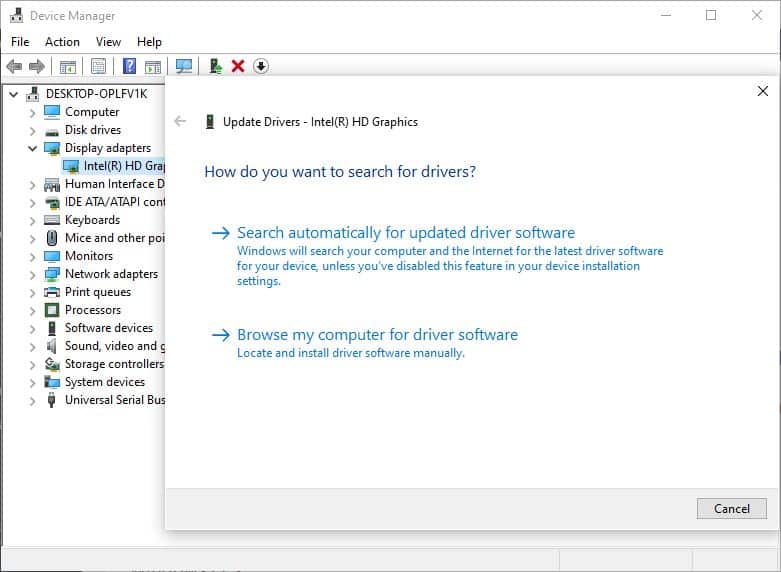
- Right-click on it and select update.
- Follow the on-screen instructions to update the driver.
- Do the same, especially for the Display graphics driver, Audio sound, and network adapter driver.
Roll Back Driver option
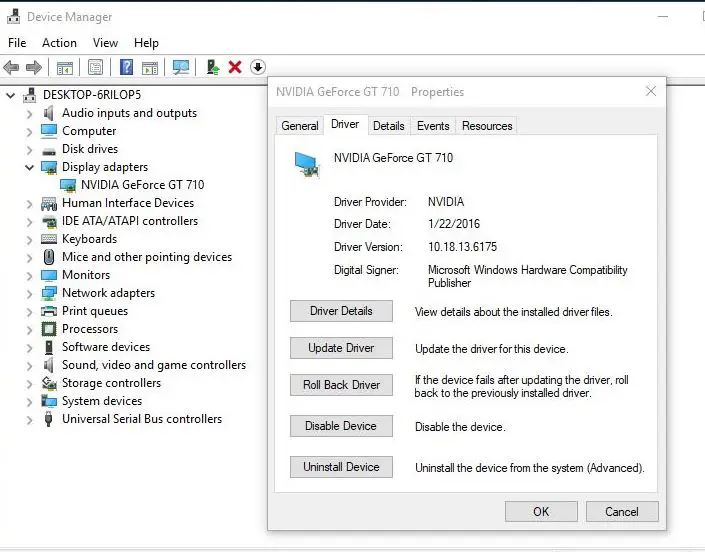
Again if you notice the problem started after the recent driver update, you can use the Roll Back Driver option to revert the current driver to the previous version. Perform the Rollback Driver option to remove the current driver and install the previous driver version.
- Open Device Manager using devmgmt.msc command.
- Now expand and double-click on the problematic driver.
- For example, Right-click on the display driver and move to the Driver tab.
- Here you will see the Rollback driver option.
- Click on it, select why you roll back the driver and click yes to revert the driver version.
- Restart windows and check windows start normally.
Re-Install Driver Software
If the driver update fails and there is no Roll back driver option, That causes you need to perform Re-install the problematic driver by the following below. Visit the Device manufacturer’s website and download the latest available driver (especially the display driver, network adapter driver, and Audio sound driver ).
- Then open Device Manager.
- Now expend the problematic driver ( for ex: Display driver ),
- Right-click on it and select the option to uninstall the driver.
- When asking for confirmation click yes, follow the on-screen instructions to remove the driver and Restart windows.
On the next Start window automatically install the driver software which you removed before. If Windows didn’t install then you can manually install them.
To do this open Device Manager, click Action and select Scan for hardware changes.
This will scan and try to install the driver.
If driver installation fails with a yellow triangle mark then right-click on it -> Update driver -> Browse my computer for driver software and set the driver path you downloaded from the manufacturer website. Click next and follow the on-screen instructions. After that Restart Windows to take a fresh start and check Windows starts normally without any BSOD errors.
Run System File Checker
Also, most of the time corrupted system files cause Different Startup Errors include the APC_INDEX_MISMATCH BSOD error. Run the System file checker Utility to repair corrupted, damaged system files and make Sure any corrupted, missing system file not causing the issue.
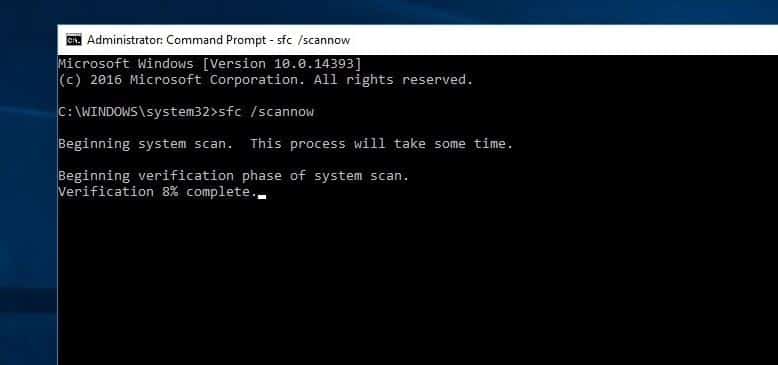
- To Run the SFC utility open the command prompt as administrator,
- Then type sfc /scannow and hit the enter key.
- This will start scanning for missing, damaged or corrupted system files.
- If found any the utility will restore them from a compressed folder located on %WinDir%\System32\dllcache.
- Wait until 100% complete the process after that Restart windows and check there are no more startup BSOD errors.
Also, if SFC utility Results windows resource protection found corrupt files but was unable to fix some of them, Then run the DISM Tool which Repairs the System image and enables sfc to do its job.
Check for Hard Drive Corruption
Sometimes Disk Drive Errors, bad Sectors, Faulty HDD cause Different Startup Errors and windows failed to start with different BSOD errors. Run the Disk Check Utility CHKDSK to fix disk errors that may cause this apc index mismatch Blue Screen error.
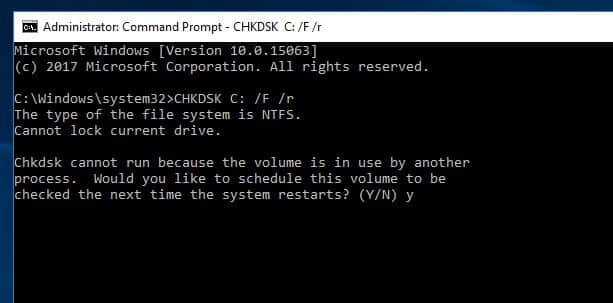
- To Check and fix disk Drive errors open command prompt as administrator,
- Then type the command chkdsk c: /f /r and hit the enter key.
Here command CHKDSK is the short of Check Disk, C: is the drive letter you want to check, /F means fix disk errors and /R stands for recover information from bad sectors.
When it prompts, “Would you like to schedule this volume to be checked the next time the system restarts? Press Y and Restart your computer. This will scan and repair the disk drive errors wait 100% complete after that windows start normally.
Check Faulty RAM and run the Memory Diagnostic Tool
Also, sometimes the Faulty memory module (RAM) causes different Blue Screen errors. Suppose all the above methods failed to fix APC_INDEX_MISMATCH BSOD error. Then check your RAM, simply remove your computer’s RAM clean it and reinsert it perfectly after few seconds. You have to make sure that you unplug all the power cords. And also have to remove the battery before you attempt to remove the RAM. Restart your PC after doing that Also Run The memory Diagnostic Tool to Check and Fix Memory Related Errors.
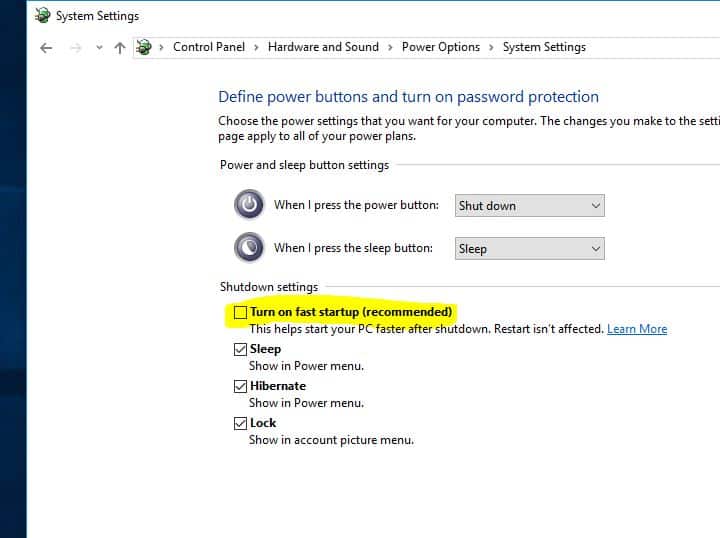
Disable Fast Startup Feature
This step is applicable for Windows 10 users only! With Windows 10 Microsoft Add Fast Startup Feature (Hybrid shutdown) which reduces the Startup time and makes Windows 10 start very fast. However some users Report the disadvantages of Fast startup feature and Disable this Feature helps them to fix most startup problems including Different Blue Screen errors.
You can also disable the Fast startup feature by following steps below and check APC_INDEX_MISMATCH BSOD is resolved for you.
- To Disable the Fast startup Feature open the Control panel.
- Search for and select power options
- Choose What the power buttons do.
- Click on Change Settings that are Currently Unavailable.
- Then under Shutdown Settings, Uncheck the option Turn on Fast Startup (Recommended) Click Save Changes.
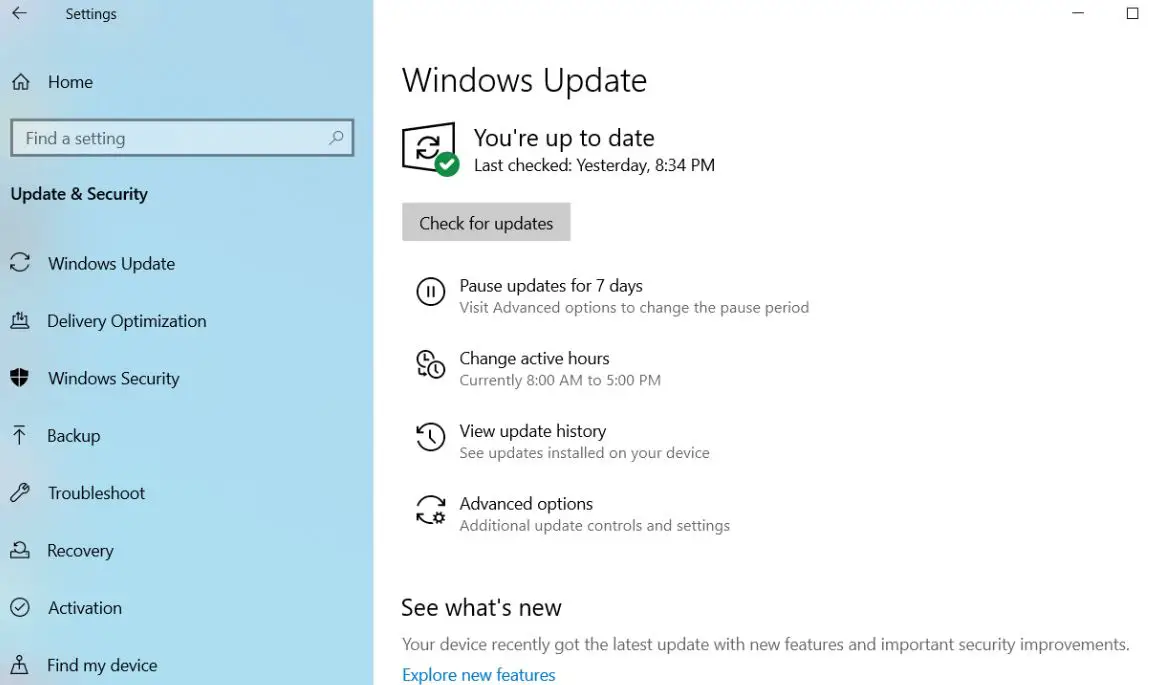
Make Sure Your System is Updated
Microsoft Regularly drops Updates with new features, security improvements, and bug fixes to patch the holes created by third-party applications. May these bug fixes help to resolve the apc index mismatch error, So make sure your Windows computer is updated and have the latest updates installed.
Recently Microsoft has released Windows 10 KB5001567 with bug fixes for blue screen error APC_INDEX_MISMATCH.
Addresses an issue that might cause a blue screen when attempting to print to certain printers using some apps and might generate the error, APC_INDEX_MISMATCH. Microsoft support site
Windows is set to install updates automatically but you can manually check and install the latest updates by pressing Win + I to open settings -> Update & security -> Windows update -> check for updates.
Some Other Solutions To apply
Make Sure your computer is not infected with any virus or malware infection, which may cause Different Startup errors include Blue Screen errors. We recommend install a good antivirus / antimalware application with the latest updates and perform a full system scan.
Also, Install free system optimizer like CCleaner to clean junk, cache, System error, memory dump files etc. And fix broken, missing registry Errors.
If You notice after installing a certain Third-party application/Game or Cracked nulled software, the APC_INDEX_MISMATCH blue screen error started. Then may the application is not compatible with the current Windows version, which may cause the issue. That causes you need to uninstall the application. To do this press Win + R, type appwiz.cpl and hit the enter key. Then right-click on the problematic application and select uninstall.
Did these solutions help to fix apc index mismatch Bug Check 0x00000001 on Windows 10? Let us know in the comments below.
Also read:
- How to fix DNS Server not Responding On Windows 10/8.1/7
- Fix Windows 10 Inaccessible Boot Device BSOD ( 5 Working solutions)
- Windows 10 Version 1903 Freezes frequently while playing Games.
- Fix Computer Sound Volume Too Low in Windows 10, 8.1 and 7
- How To Fix if Windows 10 Stuck on Welcome Screen After login
