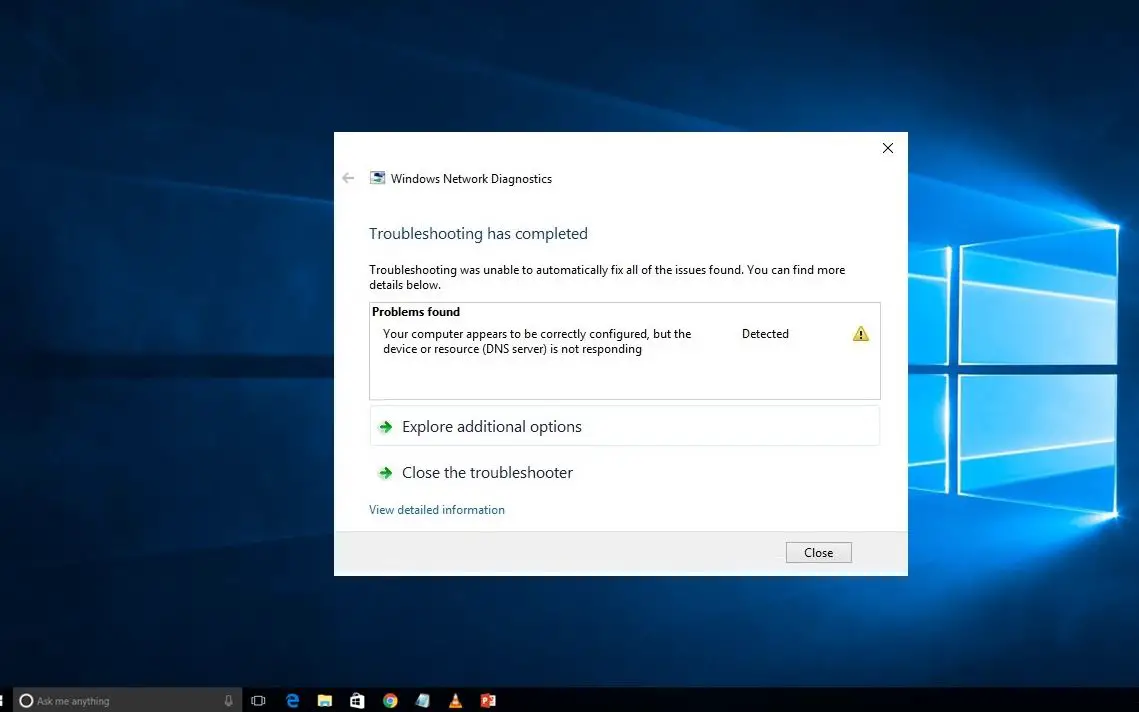
DNS stands for Domain name server is an end-to-end service that translates web addresses so that you can access and browse the internet. If the DNS server stops working or responding it might result from Server DNS Address Could Not be Found and prevent browsing webpages. And you might see DNS Server not Responding while running the Internet troubleshooter.
Well if you are encountering a DNS server that is not responding chances are that the default DNS server of your ISP might be temporarily down. Again incorrect network configuration, the problem with a network adapter or firewall protection also causes this problem. And the quick solution to fix the problem is to check DNS client service running, change the DNS server settings, reset DNS cache, disable your firewall, and more.
DNS server not responding
First of all restart, all network devices, router, modem, switch even your PC that fixes the problem if a temporary glitch causing the issue.
Disable the antivirus firewall and disconnect From VPN if configured.
Open the command prompt as administrator and run the command ipconfig /flushdns that clears DNS cache and fix if the DNS server became unresponsive or gets corrupted.
Restart DNS client service
If the DNS client service is not started or stopped responding you might face DNS problems on your PC. Let’s check and start the service first.
- Press Windows + R keyboard short, type services.msc and click ok
- This will open the Windows service console,
- Scroll down and locate DNS client service,
- Right-click on DNS client service select restart,
- If the service is not started then right-click on DNS client service select properties
- Here change the startup type automatic and start the service next to service status.
- Click apply and ok to make save changes.
Correct your DNS server address
Again incorrect DNS server address also prevents browse web pages, let’s check and correct the DNS server address.
- Press Windows + R, type ncpa.cpl and click ok
- This will open the network configuration window,
- Right-click on active network adapter select properties,
- Double click on Internet Protocol Version 4(TCP/IPv4),
- Here select the radio button Obtain an IP address automatically and Obtain DNS server address automatically.
- Click ok and apply to make save changes, and restart your PC
- Now open a web browser and visit any web pages, check if the problem is solved.
Flush DNS and Reset TCP/IP configuration
Still need help, let’s reset TCP/IP configuration the probably help if any wrong network configuration causing the issue.
Open the command prompt as administrator and perform the following commands one by one.
- ipconfig /release (This command release the current IP address)
- ipconfig /flushdns (This command flush the DNS address)
- ipconfig /renew (This command Renew or ask DHCP server for new Ipaddress)
- netsh winsock reset (This command reset Winsock catalog back to default setting or clean state.)
Finally, type exit to close the command prompt and restart your PC to take effect the changes.
Switch to Google DNS
If the above methods have not worked still getting Server DNS Address Could Not be Found or DNS server not responding then switch to Google public DNS following steps below.
- On keyboard press Windows + R, type ncpa.cpl and click on ok
- This will open network connections windows,
- Right-click on the active network adapter, select properties,
- Here double click on Internet Protocol Version 4 (TCP/IPv4).
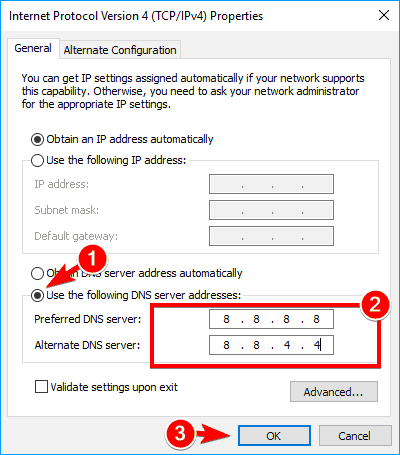
- Select the ‘Use the following DNS address’ option. Now fill the following fields as given here.
Preferred DNS server: 8.8.8.8
Alternate DNS server: 8.8.4.4
- Tick mark on Validate settings upon exit and click ok
- Now check if this helps resolve the problem.
Set Physical (MAC) Address as Network Address:
Open command prompt as administrator
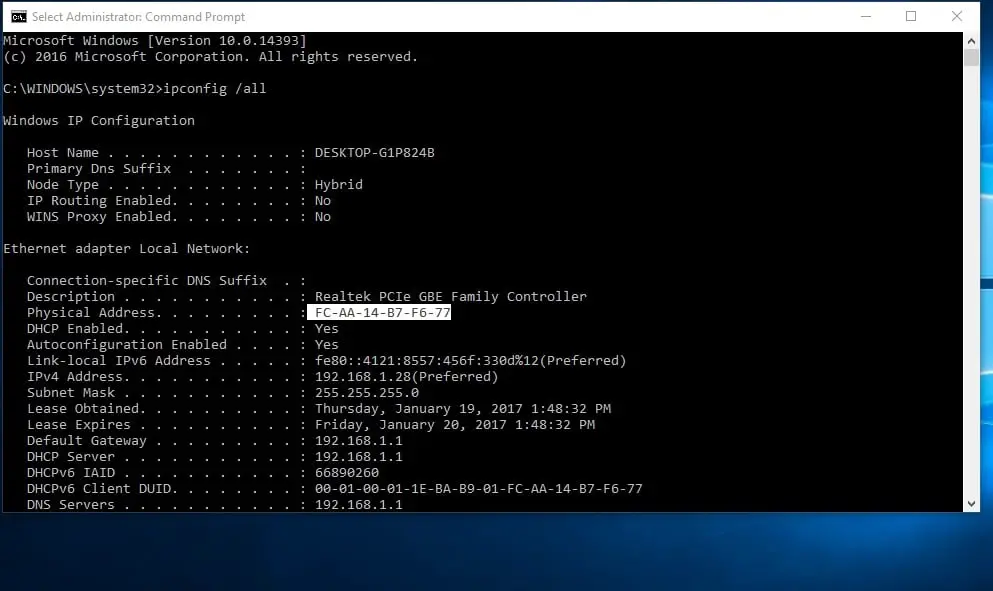
- Type command ipconfig /all and press enter key
- This will display IP configuration details of your computer
- Here look for and note down the physical address of your computer (refer to image below)
For me its FC-AA-14-B7-F6-77
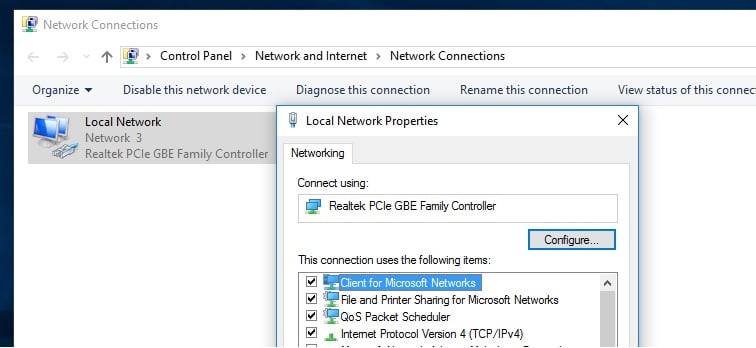
Now open the network connections window using ncpa.cpl
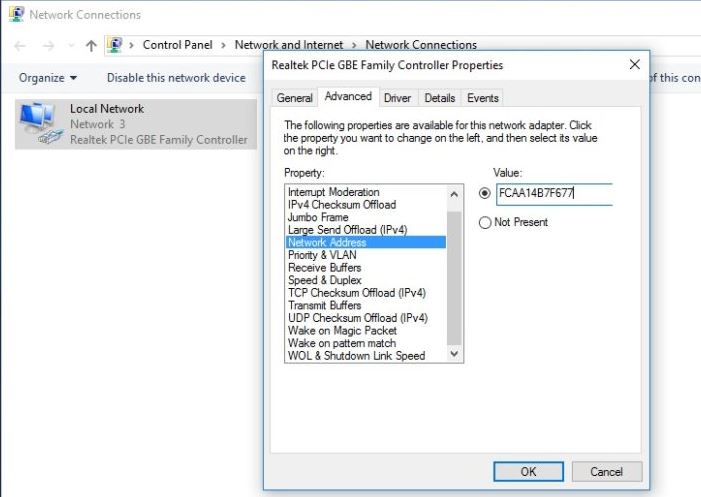
Go to your network adapter properties. Click on Configure
- Next move to Advance Tab on Realtek PCIe Controller Properties.
- Find Network Address in the property section and select it.
- Now mark on value and type your physical address without dashes.
Example: My physical address is FC-AA-14-B7-F6-77. So I’ll type FCAA14B7F677.
- Click ok to make save changes.
- Close all open windows and restart your PC, now check if the problem is solved or not.
Install the latest drivers
Again a problem with the network adapter drive also causes the DNS server is not responding an error. visit your network adapter manufacturer’s website, download the latest drivers and install them on your PC. As you don’t have internet access download the drivers on a different device and install them on your PC following the steps below.
- Press Windows + R, type devmgmt.msc, and click ok
- This will open the device manager and display all installed driver lists,
- Here locate your network adapter, right-click it and choose Uninstall.
- A confirmation dialog will now appear. If available, check to Delete the driver software for this device and click Uninstall.
- Restart your PC to completely remove the network driver,
- On the next start, the default network driver will be installed automatically. Check if the problem is resolved.
- If not, install the latest drivers for your network device download from the manufacturer’s website and check if that solves the issue.
Boot your PC in Safe Mode Networking
Sometimes third-party applications such as antivirus or VPN tools can interfere with your Internet connection and show DNS server is not responding messages on your PC. For this, you can simply Start windows into safe mode with Networking and check the internet network working without any problem. If yes then Due to any third-party applications this error happened simply find and remove it from your windows.
Did these solutions fix the DNS server not responding to Windows 10? Let us know in the comments below.
Also read:
- Solved: This Site can’t be reached error in Google Chrome, Windows 10
- 5 Tweaks to fix Slow Boot Times in Windows 10 (Updated )
- Solved: DNS_probe_finished_no_internet Windows 10 Google Chrome
- Solved: Windows 10 start menu search not working after update
- Can’t connect to this network error on Windows 10
