


Are you looking for solutions to fix the Windows 10 black screen problem that started after installing the latest Windows update? You are not alone a number of users can’t use their computer normally after Upgrading to Windows 10 version 21H2 Because of the black screen with a cursor, black screen with a spinning circle, or black screen of death issue. And most probably this issue causes Because by the Display Driver, may the current Display Driver is not compatible with the new Windows 10 version 22H2 or the Driver is get corrupted. Again hardware performance issue or system file corruption also results in Windows black screen with a cursor after login or before login.
windows black screen with cursor after login
Every time I enter my password a black screen with only a cursor appears. I am unable to access anything on my computer besides task manager.
Laptop black screen with cursor Windows 10
If you are also Suddenly seeing nothing but a black screen and your mouse pointer after login to your Windows 10 PC Here different solutions apply to solve this problem, whether you have access to the desktop or not.
Check if there is a connection problem between the display and the computer.
Remove all external devices, such as a printer, SD card, or external device.
Pro tip: If you have a graphics card installed on your PC make sure to display the VGS cable connected to the graphics VGA socket.


Use the keyboard shortcut Windows key + Ctrl + Shift + B, to restart the video driver and refreshes the connection with the monitor.
Start Windows Explorer
- Open Task Manager using the keyboard shortcut Ctrl + Alt + Del or Ctrl + Shift + Esc,
- Click on File, then Run New Task,
- Type Explorer.exe Checkmark on Create this task with Administrative privileges And click OK.
- This Starts the Stuck Windows Explorer and you get back to the normal screen.


Power Reset Laptop
- If you are having a Black Screen Issue on your Laptop Simply Press The power button to shut it down Completely.
- Remove the Battery, (Also remove If any external Device Keyboard, Mouse, USB Drive, etc attached)
- Now Press and hold the power button for 30 sec.
- Attach the Battery again And Try to start the windows again.
- If you have a Desktop computer shutdown computer press the power button,
- Remove all external devices include the Power code and VGA cable.
- Press and hold the Power button for 30 sec,
- Then only attach the power cable, VGA cable, Keyboard & mouse and start windows normally.
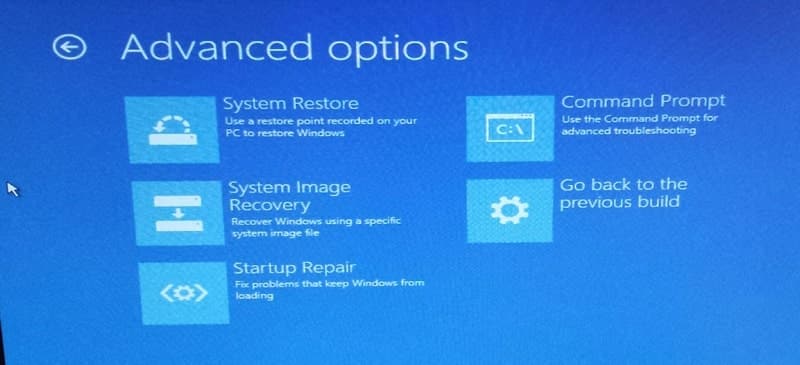
Startup Repair
Boot Windows from an installation media To Access Advanced Boot options.
Where you will get the Startup repair option that helps to diagnose and fix startup problems that cause, Prevent Windows to Start normally.

Start into Safe mode
If after performing the above steps Get back to the normal Screen? Then try the steps below to avoid the back screen problem on the next Boot. Or If didn’t get back to the normal screen then try to Boot into safe mode. Start windows with minimal system resources so that you can perform troubleshooting steps normally.
To boot into safe mode:
- Boot from installation media,
- Skip the first screen (click next)
- Click the Repair your Computer link in the bottom-left corner.


- Next, you need to click the Troubleshoot option
- then click on the Advanced options button and Startup Settings option.
Click the Restart button, While in the “Startup Settings,” press the 5 or F5 key to select the Safe Mode with Networking option.


Disable Fast Startup
With Windows 10 Microsoft added a Fast startup feature (Hybrid Shutdown) To Reduce the startup Time but This Feature has some disadvantages that cause Different problems on the Windows computer. The Number of users who disable fast startup features helps to fix Windows 10 startup problems include Black Screen with a cursor Stuck, Blue Screen of Death, etc.
To disable fast startup on Windows 10:
- Open the Control panel,
- Search for and select Power Options.
- Click on Choose what the power button does
- Next, click on Change settings that are currently unavailable.
- Here Under “Shutdown settings”, uncheck Turn on fast startup (recommended)
- Click Save Changes.
- Now Restart windows to check if Windows start normally or is Stuck again on Black Screen.


Update Graphics Driver
As discussed Before A missing or outdated device driver in your computer can cause your computer to have a black screen. Especial if the problem started after the Recent windows upgrade, Then may the Display driver is older, Corrupted, or not compatible with the current windows version. This causes you to need to update the Display driver with the latest version.
Update Display Driver
To Update the Current display Driver (Graphics Driver) to the latest version simply Visit the Device manufacturer’s website, ( if you have a laptop visit Dell, HP, Lenovo, Asus, etc. for desktop users visit the Motherboard manufacturer or if you using External Graphic Card visit NVIDIA, AMD, Intel Etc. ) And download the latest available Display Driver and save it.
- Now press Win + R, type devmgmt.msc, and hit the enter key.
- This will open the device manager and display All installed driver list
- Here expand Display Adapters.
- Right-click on the integrated graphics card (usually an Intel or AMD graphics card),
- Tick mark on Delete the Driver Software for this device and confirm by click on uninstall.


Then Restart your PC This time windows start normally,
- Again open the Device manager
- Expand display driver, you find Windows installed the basic Display driver
- If not then click Action and select hardware changes.
- Right-click on it, select update driver,
- Next, select Browse my computer for Driver software
- Let me pick from A list of available drivers on my computer –
- Click on Have Disk -> Click Browse and Set the Driver path which you downloaded before from the manufacturer’s website.
- Click next and wait for Windows to install the driver.
- Again Restart windows and check Black Screen Issue Solved.


Roll Back Graphics Driver
If the problem started after the Recent Display (Graphic) driver update, Then may the new version display driver is not compatible with your current Windows version. That causes the Roll Back Driver option to be very helpful, Which reverts the current driver version to the previously installed version.
Note: Roll Back Driver option is only Applicable if you recently upgrade your display Driver.
To perform the RollBack Driver option:
- Open Device Manager by Right click on the Windows 10 start menu and select device manager.
- Expand Display Driver, Right-click on Installed display (Graphics) Driver then Select properties.
- Here move to Driver Tab you will get the Rollback Driver option,
- Click on it select the reason why you going back to the previous version and click next.
- This will roll back the current driver to the previous version,
- Simply Restart and check this time windows started normally without any Black screen stuck at startup.


Run System File Checker Tool
Also, there are chances some system files missing or get corrupted While Upgrading to the recent Windows 10 version 22H2 which causes Black Screen at startup. Windows have a handy tool System file checker Utility Which helps to Scan And restore missing damaged system files from a special cache folder located on %WinDir%\System32\dllcache.
- Simply open the command prompt as administrator,
- Type sfc /scannow and hit the enter key.
- Wait until 100% complete the scanning process.


If the System file checker Tool Fails Run The DISM Tool Which enables the system file checker to do its job.
Create a New User Account
Also, Problems with the user account / User account profile can also cause black screen issues (profile not load properly) etc. You Can create a new user account and check the account load properly without any black screen stuck etc.
To create a new user account
- Open Command prompt as administrator
- Type net user username password/add
Remember To change the name and password in the command for the name of the account and password you want.


Now Logoff from safe mode, Restart windows, and try to login with a new user account check user profile is loaded completely without any black screen stuck.
Registry Tweak To fix Black Screen
If all the above methods fail to fix then, You can tweak the Windows registry by following the steps below to fix the black screen with cursor issue on Windows 10.
- Press Windows + R, type regedit, and click ok,
- Backup registry database then navigate the following key,
- HKEY_Local_MACHINE\Software\Microsoft\WindowsNT\CurrentVersion\Winlogon
- Here highlight Winlogon
- Double-click the value Shell showing on the right side to make sure the Value data is explorer.exe.
- If not change it to explorer.exe click ok,
- Close the Windows registry, and Restart windows.
- Check if the problem is solved, Next time windows start normally without any black screen stuck.


These are some of the recommended solutions to fix the Windows 10 black screen with the cursor after the update problem. Which option worked for you? Let us know in the comments below.
Also, Read

