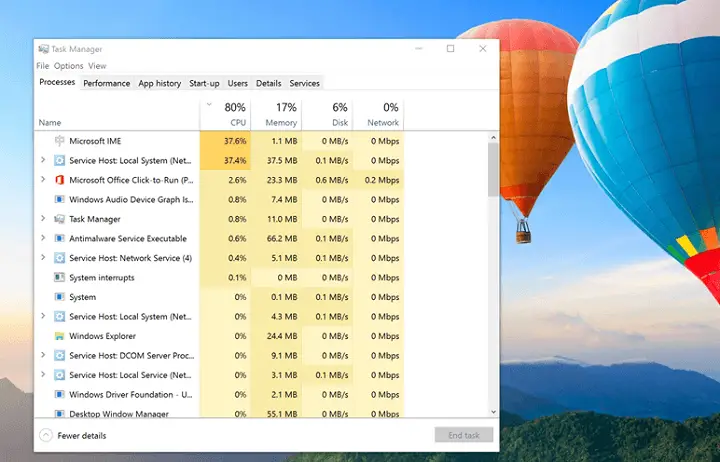
Did you notice the Laptop running very slow after Windows 10 22H2 upgrade? The system not respond and freezes at startup, and even windows didn’t recognize mouse clicks and check on Taskmanager System Idle Processes continuously using up to 100% of CPU even though there is no program running on Laptop. If you are struggling with this problem, Here 5 effective solutions to help fix System idle process High CPU usage on Windows 10, 8.1 and 7.
What is the System idle process?
The System Idle Process is a system process that tells you the percentage of time your CPU is idle. If you see system idle process High CPU usage (usually 98% and 99%), don’t panic. It is not a problem If your PC runs normally, just leave it. The process runs in the background and would measure how much idle capacity that has at any given time. And the High percentage of CPU indicates that a large amount of processor power is not being used.
But If your PC is running slowly, it could be a problem. Something is wrong with the background process, any open programs are locked up or not responding. It could be a lower level incomputable driver software, third party application, Virus malware infection, or registry errors, causing System Idle Process High CPU usage.
Windows 10 High CPU usage
System idle processes can be frustrating as they utilize the majority of your resources within the CPU, Make windows unusable with Freezes continuously If you also Suffering from This Problem Don’t Worry Here is how to get rid of System Idle Process High CPU usage on Windows 10.
Disable startup apps and services
There are various apps and services that start running in the background, as soon as we start up the computer. Or Due to incompatible startup items, You may experience High System Resources usage by windows. For this, Cause You should disable recently added or updated startup programs and services so that Windows will run smoothly.
To Disable startup programs:
- For Windows 10, 8, and 8.1, Right-click on Taskbar and choose Task Manager.
- Click on the Startup tab and then disable the programs from the list.
- Earlier windows users can press Windows + R type msconfig and hit Enter.
- Then click on Startup and click on Open Task Manager.
- Here you will find the Startup programs, right-click, and select disable to disable startup programs.
Note: Make sure to only disable third-party apps and services because there might be apps & services that are part of Windows and disabling them might result in problems.
To disable startup services:
- Press Windows + R, type MSConfig and ok.
- Here system configuration window moves to the services tab.
- Now Checkmark on Hide all Microsoft services.
- Then Disable recently added services.
- Click Apply and ok to make save changes.
- Restart windows And check Windows running smoothly.
Make Sure Windows Have the Latest Drivers Installed
The device Drivers are a key part of the operating system because Windows uses drivers in order to work with your hardware. If a certain driver is outdated, corrupted, or incompatible with Windows OS there might be a memory leak, which results in High CPU & memory usage.
To check if the error is caused by a faulty drive, run an automatic driver update or manually update the drivers to the latest available versions. Install the latest drivers for any newly installed hardware device. If no new hardware has been installed, make sure you have the latest drivers for the below devices.
- Video card
- Network card or router (if present)
- Any removable or external disk drive
To manually check and update the device driver:
- Press Windows + R, type devmgmt.msc, and ok.
- Here on Device manager display all installed driver list.
- Check if any driver is listed with the yellow triangle mark.
- Right-click on it and select update driver.
- Select “Search automatically for updated driver software”
- Follow the on-screen instructions to download and install the latest driver.
Otherwise, visit the device manufacturer’s website, download the latest available driver software and install it on your PC. Restart Windows to take effect the changes, and check there is no more CPU, or memory leak. System running smoothly without any problem.
Check Windows services causing the problem
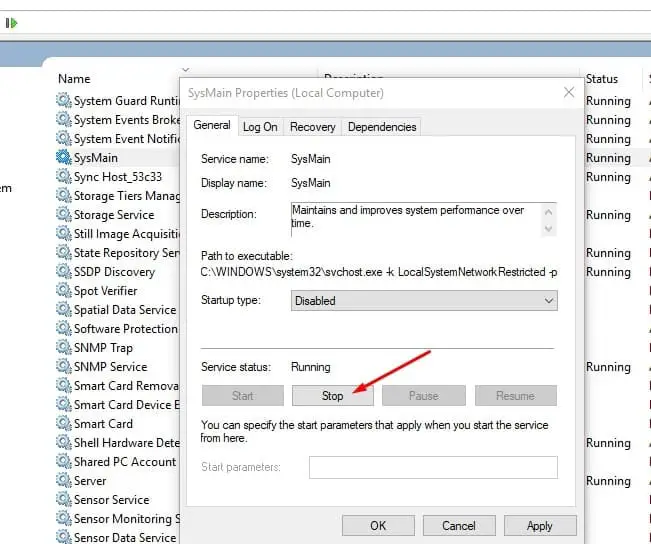
There are a few Windows 10 services that are the main culprit in eating up your CPU resources. Superfetch is a Windows 10 system service, which makes sure that the most accessed data is available right from the RAM. However, if you disable the service, you will notice a huge decrease in CPU usage.
- Press Windows + R, type services.msc, and ok.
- This will open the windows services screen.
- Scroll down, and look for a service named sysmain (Previously known as Superfetch)
- Right-click on the service and select “Properties”
- Change the Startup type to disable, and stop the service.
- Click Apply and ok to make save changes.
Note: Do the same process for Other CPU-intensive services like Background Intelligent Transfer Service, Windows Search, and Windows update service.
Adjust Windows 10 Performance
Undoubtedly, the High CPU caused by System Idle Process can greatly impair the performance of your computer, so you have to adjust it on your own.
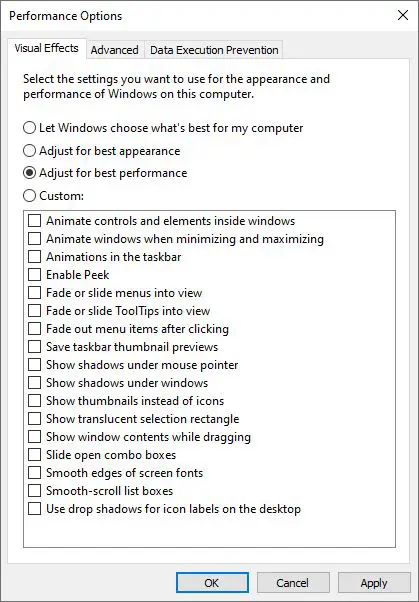
- Open Control Panel.
- On the top of the Control Panel window, search Performance.
- Then choose to Adjust the appearance and performance of Windows from the results.
- In Performance Options, under Virtual Effects, tick the box for Adjust for best performance. Then hit OK.
Disabling Windows 10 Tips
Additionally, it appears that, in some cases, the notification system is at fault for the High CPU usage, and some users recommend disabling the Windows 10 tips from the very beginning to avoid this.
- Press Windows + I to Open Windows Settings
- Click on System then Notifications & Actions
- Here simply Turn off the toggle that says “Show me tips about Windows.”
Check if anti-virus programs may causing the issue
If Are you using a third-party anti-virus program? Often, the anti-virus program, along with protecting our CPU, causes the issue of High CPU usage. This can be due to the unforeseen background scans it runs, thus utilizing the majority of your CPU resources, and causing your system to slow down. You simply need to go to the settings of your anti-virus and choose a time for the scan to run. This can be helpful in determining when your computer shall be affected by the anti-virus scan, thus preventing the issue of High CPU usage while you are working.
Upgrade RAM or Adjust Virtual Memory
This is another option available to users who wish to overcome the issue of High CPU usage. Every system has a maximum capacity for RAM ports. For the ones using 2GB RAM, they can check for another port to install the RAM manually, and so on, as this solves the problem of High CPU usage successfully. or you can Adjust virtual Memory to fix issues like High Memory Usage, low Memory, etc.
Repair Corrupted system files
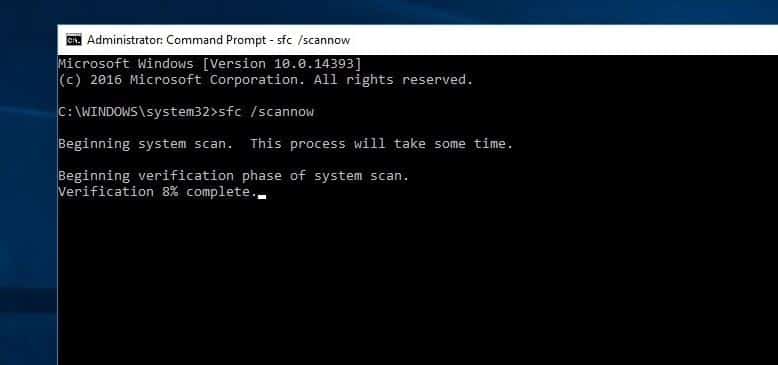
Some Times corrupted system files may Cause CPU, Memory Leak. Windows has an inbuilt System File Checker tool That can use to scan the system for any potentially corrupted files. This tool will detail and potentially fix any unexpected corruption, returning the system to a good working state. To run the system file check tool
- Open the command prompt as administrator,
- Type the command sfc /scannow and press the enter key,
- This will start scanning for corrupted missing system files if found any the SFC utility automatically restores them with the correct ones from the compressed folder located %WinDir%System32dllcache
- Let the scanning process complete 100%, once done restart your PC.
Note: If the SFC utility fails to restore missing files we recommend run DISM restore health command following steps here.
Disable RuntimeBroker using Windows Registry
RuntimeBroker is a Windows process, which is supposed to help you manage the permissions of the Windows Store apps. Ideally, it should not take up a lot of memory or CPU resources but faulty apps result in the process using GBs of memory, thus causing performance issues. Disable RuntimeBroker can help a lot to fix High CPU, Memory, and Hard Disk Usages On windows 10
Here is How To disable RuntimeBroker using Windows Registry
- Press Windows + R, type Regedit and click ok,
- This will open the Windows registry editor,
- Back up the registry database and navigate to the following path.HKEY_LOCAL_MACHINE\SYSTEM\CurrentControlSet\Services\TimeBrokerSvc
- Here double click on “Start” to change its DWORD value from 3 to 4.
Note: The value 2 means automatic startup, 3 means manual, and 4 means are disabled.
Once done, reboot your PC for the changes to take effect.
Did these solutions help fix windows 10 High CPU usage or System Idle Process’s High CPU usage problem? Let us know on the comments below,
Also read:
- Windows 10 Search not working after windows update? Apply these solutions
- How to Fix Printer Problems in Windows 10, 21H2 Update
- Solved: Hmm We can’t reach this page error in Microsoft edge Browser
- Can’t access web pages “Server DNS Address Could Not be Found”? Let’s fix the problem
- Google Chrome not working/responding after windows 10 update


