A stable and reliable internet connection is essential for a wide range of activities including Work and Productivity, Entertainment, Education, Communication, Social Engagement and more. However, at times you may experience Wi-Fi connectivity issues on Windows 10 Lapotp. Users report WiFi disconnect frequently, and No internet access after the Windows 10 update. Few users report, the Internet connection suddenly disconnected with a yellow exclamation mark over the Wi-Fi or Ethernet icon. Wi-Fi connectivity issues on Windows 10 laptops can arise due to a variety of reasons, ranging from hardware and software conflicts to network configuration problems. Here we have a few effective solutions to resolve common Wi-Fi Connectivity Issues on Windows 10 and ensure a seamless internet experience.
WiFi not working windows 10
There are several possible reasons why Wi-Fi might not be working on Windows 10. It could be due to incompatible or outdated Wi-Fi drivers, settings on the network adapter, problems with the router or modem, signal interference, or issues with security software.
- Outdated or incompatible Wi-Fi drivers for Windows 11 can lead to connectivity problems.
- Problems with the network adapter hardware or settings can result in Wi-Fi not working. Again Faulty or misconfigured routers or modems can result in Wi-Fi connectivity problems.
- Incorrect network settings, such as IP address conflicts or DNS issues, can prevent proper communication with the router or modem and result No internet access on Windows 10.
- Third-party applications, especially security or firewall software, may interfere with the operation of the network adapter.
Restart Your Router and Modem
Over time, routers and modems can encounter minor glitches or error that cause Wi-Fi Connectivity Issues or No internet access on Windows 10 Laptop. Restarting the router and modem clears out these temporary issues and re-establishes the network connection. That not only resolves minor connectivity issues but also improves overall network performance.
- Unplug the power cables from both the router and modem.
- Wait for at least 30 seconds.
- Plug in the power cables and power on the devices.
- At the same time restart your Windows 10 Laptop as well
Check WiFi Network settings
Incorrect network settings can hinder connectivity. Ensure your network settings are properly configured.
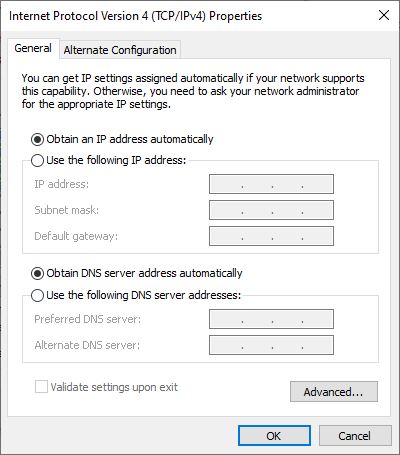
- Press the Windows key + R, type ncpa.cpl and press the enter key
- Right-click on your Wi-Fi network and select “Properties”.
- Ensure settings like IP address and DNS are set to obtain automatically.
Also, open the command prompt as administrator and type netsh wlan show WLAN report press the enter key to Generate a Wireless network report which helps to diagnose the problem or at least provides you with more information.
For a few users, Disable and Re-enable Wi-Fi Adapter help them re-establish the connection and help fix Fix Wi-Fi Connectivity Issues on Windows 10 Laptop.
- Press Win + X and select “Device Manager”.
- Expand the “Network adapters” section.
- Right-click on your Wi-Fi adapter and select “Disable”.
- After a few seconds, right-click again and select “Enable”.
In addition, check WiFi signal on your Laptop, or take the laptop closer to the Wi-Fi router to fix connectivity issues and improve internet speed.
Run Network Adapter troubleshooter
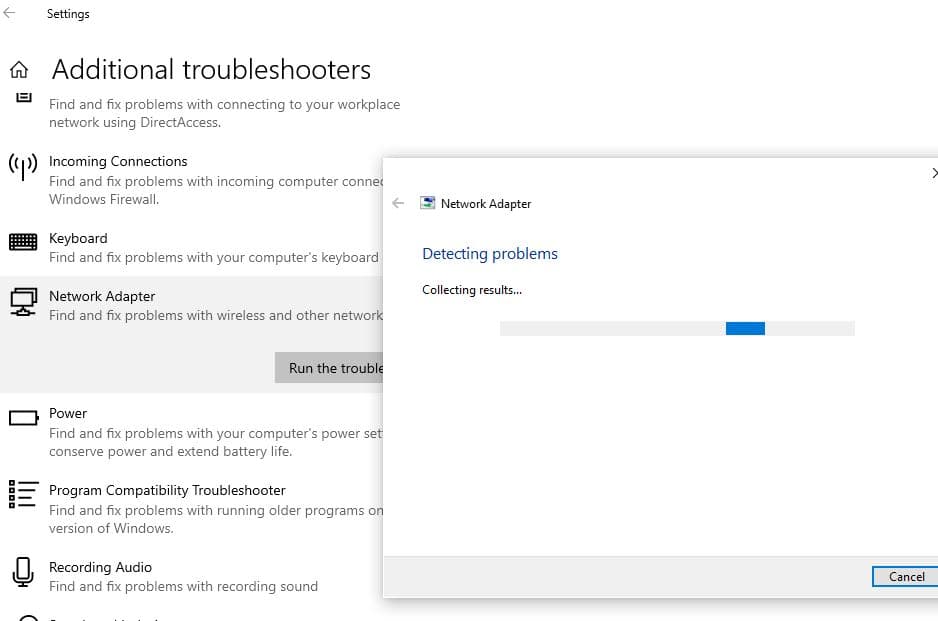
Windows has a built-in network troubleshooter that can automatically detect and fix common connectivity issues. To use the Network Adapter troubleshooter,
- Press the Windows + I keyboard shortcut to Open Settings.
- Click on Update & Security, then Troubleshoot.
- Select Network Adapter, and click Run the troubleshooter.
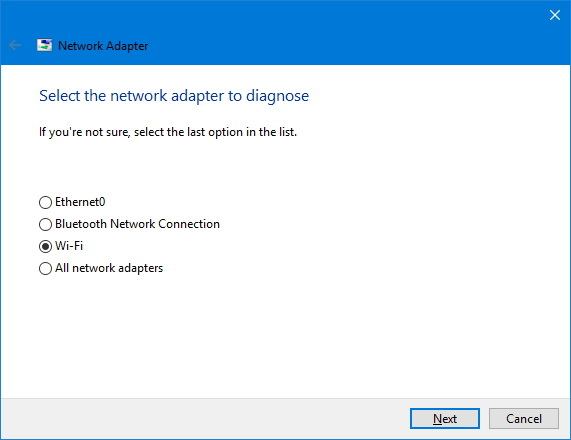
- This will open the Network Adapter troubleshooting popup,
- Select the network adapter you want to fix, in this case, select the radio button Wi-Fi and click next to proceed the troubleshooting.
- The troubleshooter will find and try to fix the Wi-Fi problem on your device.
- Restart windows After the process is complete,
- Now open your web browser and try to connect online.
If everything is working again, you’re all done. If it’s still not working, try the following method.
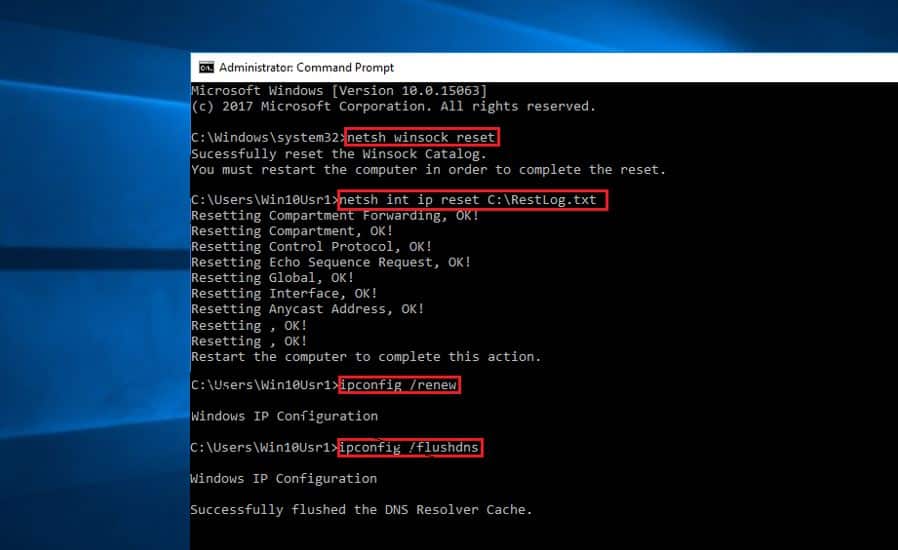
Reset TCP/IP configuration
This is another effective solution that most probably fixes almost every network and internet connectivity problem on Windows 10.
Corrupted TCP/IP settings can disrupt network connectivity. Resetting it can help.
Search for the command prompt, Right-click and select Run as administrator,
Here on the command prompt window type command below one by one and press enter after each.
- netsh winsock reset
- netsh int ip reset
- ipconfig /release
- ipconfig /flushdns
- ipconfig /renew
- ipconfig /registerdns
That’s all close the command prompt and restart windows. Now check if this helps to fix Wi-Fi Connectivity Problems on Windows 10.
Completely reset a Wi-Fi adapter
Yet another effective solution that remove, and reinstall all your network adapters and reset all the networking components to their default settings, which can help to fix slow speeds or Different problems trying to connect online.
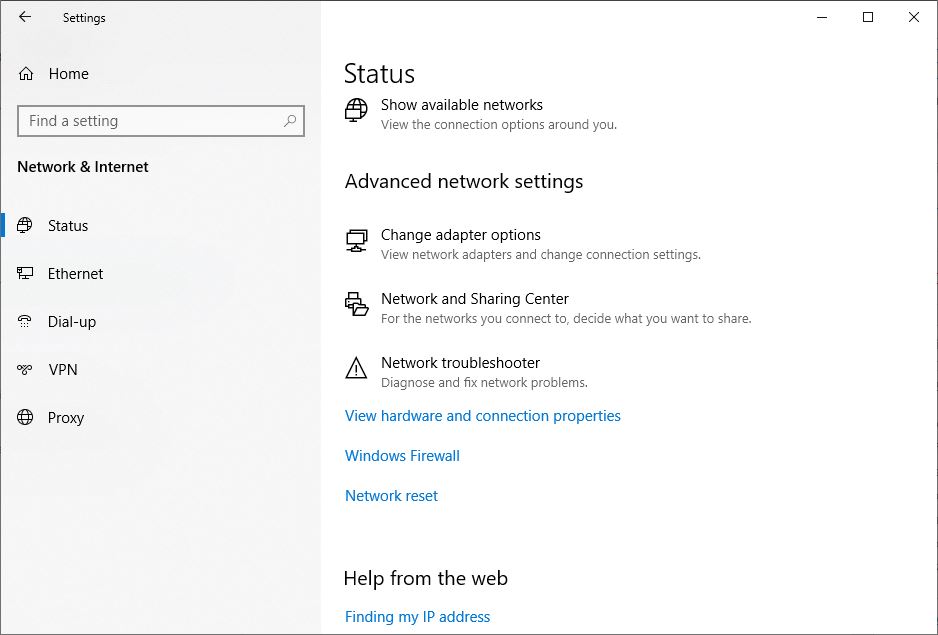
- Open the Settings app using the Windows + I keyboard shortcut,
- Click on Network & Internet then click on Status.
- Here scroll down and look for the Network Reset link As shown below image, click on it.
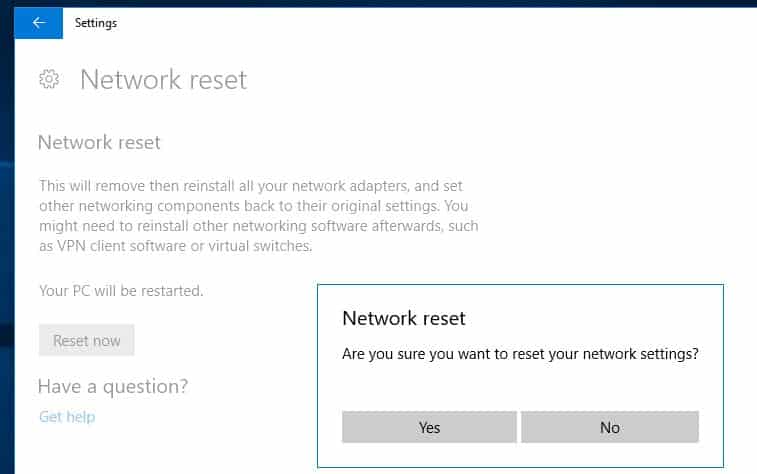
- A New Network reset Windows will open
- Here click on the Reset Now Button As shown below image to completely Reset the Network Adapter settings To the default setting.
- After That Restart Windows To take effect the changes, check Internet or Wi-Fi Connectivity Problem is resolved.
Note: After the Network Reset You’ll need to manually reconnect to any Wi-Fi network, which may require to enter a password.
Update a Wi-Fi adapter driver
Driver files of your WiFi adapters may get corrupted, causing intermittent connections and other issues. Downloading and install the latest driver files should solve the problem.
Outdated or incompatible drivers can lead to connectivity issues. Keeping them up-to-date is crucial.
- Press Windows + X select Device Manager,
- Right-click on your network adapter and choose “Update driver” from the context menu.
- Choose ‘Search automatically for updated driver software and wait for the process to complete.
- If the driver isn’t found, go directly to the official website of your network adapter manufacturer.
- Download the driver for your adapter model and update manually.
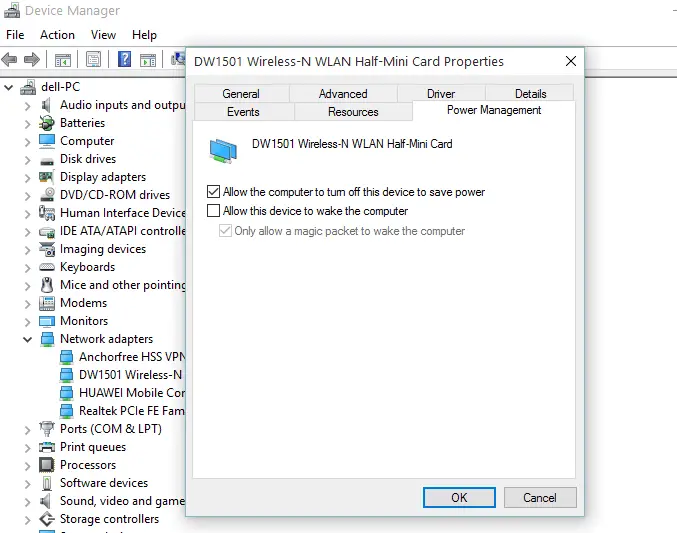
Change Settings in the Power Management Tab
Also, Laptop Users suggested changing the Settings on the power management Tab, help to fix the WiFi Disconnect issue.
- Open Device Manager, and Expand Network Adapter
- Right-click your Wi-Fi Adapter and select properties.
- Here move to the power management Tab and uncheck the option Allow The Computer to turn off this device to save power.
- Click Apply, Ok And Restart Windows to take the changes effectively.
Forget and Reconnect to Wi-Fi Network
Sometimes, reconnecting to the network can resolve authentication issues.
- Go to “Settings” > “Network & Internet” > “Wi-Fi”.
- Click on the network you’re connected to and select “Forget”.
- Reconnect by selecting the network and entering the password.
These are some of the best solutions to fix Wi-Fi Connectivity Problems on Windows 10 laptops. Did you find this helpful? let us know on the comments below, also read:
- Solved: WiFi Keeps Disconnecting After Windows 10 update
- How to Fix The Computer Restarted Unexpectedly Loop in Windows 10
- Fix Windows Cannot Connect to the Printer Error in Windows 10
- How To Fix Video_Dxgkrnl_Fatal_Error In Windows 10
- Fix Ethernet Doesn’t Have A Valid IP Configuration Error In Windows 10
