Microsoft Released Windows 10 which is much more secure and faster than previous versions of Windows. Also with Windows 10, Microsoft added lots of new features like the Start menu, Edge browser, new user interface, action center and much more. But after installing a number of applications windows performance gets down. Mostly after install, recent update users face windows 10 running very slow, the startup takes much more time and winnows not perform well. If you are also suffering from this and looking for a solution, Here we have some tweaks to improve windows 10 performance.
How to improve windows 10 performance
Note Before performing below steps we recommend create a system restore point first. So that if anything goes wrong while performing the bellow tweaks we can revert back to a previous working state by performing System Restore.
Fix Windows 10 slow boot issues
It is known that Windows 10 is still vulnerable to malware infection, especially if you have not run an anti-virus scan or complete system malware scan, following the free upgrade. So, go ahead and run a full system scan with your favorite anti-virus/anti-malware software to remove any possible infections from the PC.
Press and hold Ctrl, Shift and Esc to invoke the Task Manager. Then select the Startup tab and then sort out the items according to their Startup impact rating. Disable all those in the High category, except for the crucial security software installed on the computer. For instance, you can safely disable AMD and Nvidia driver services from the startup without affecting the system graphics performance.
Perform Disk Cleanup
The built-in Disk Cleanup tool in Windows 10 actually does a decent job of removing unnecessary files.
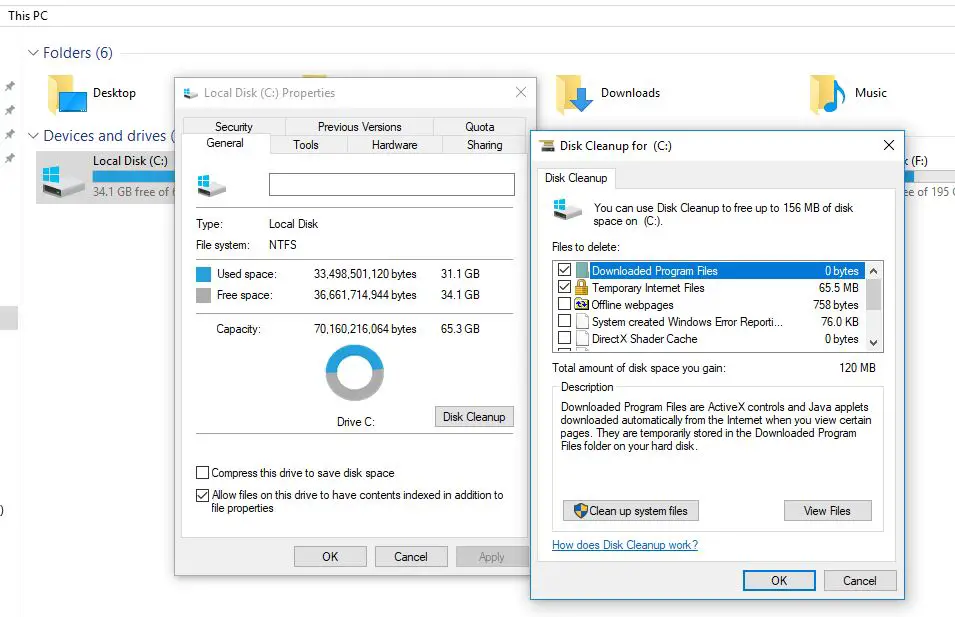
- First, open This PC,
- Here Right-click Local Disk C: and choose Properties.
- Now Under the General tab, click the Disk Cleanup button.
Disk cleanup tool will scan system error memory dump files, temporary internet files etc. when the scanning is complete select all unnecessary files (temporary internet files, etc.),” then click OK
This will clean all junk, system temp files, you can also click on Clean up system files” button for advanced system cleanup this will clean previous windows installation files ( windows.old) old restore points etc.
Defragment Your C: Drive
Defragmenting C: drive is more applicable if you’re still booting off a spinning disk hard drive and not a SSD. SSDs don’t need defragmentation, and unless you’re using a more advanced file system format like EXT4, you’re going to need to do some defragmentation.
1. Click the Start button, then click the File Explorer link
2. Right-click Local Disk C: and choose Properties
3. Click the Tools tab
4. Click “Optimize and Defragment Drive” or on the start menu type defragment
Enable Fast Startup
Windows 10 came with no shortage of performance improvements, but one of the neatest is its fast boot times. If your machine is taking too long to boot up, ensure this setting is enabled to speed things along. The feature in question is called Fast Startup. The way it works is when you shut down your computer, rather than just dumping everything in RAM, Windows will save an image of your loaded kernel and drivers in something called the hiberfile. This way, when the system boots up again, it simply reloads this file, making boot times much faster. To enable this, follow these steps:
First, you need to open the windows power options. from Control panel > From Small Icon View Click on Power Options. or you can simply Type power options on Start menu search and select the same from search results.
This will open the Power options window here From the left column select Choose what the power buttons do.
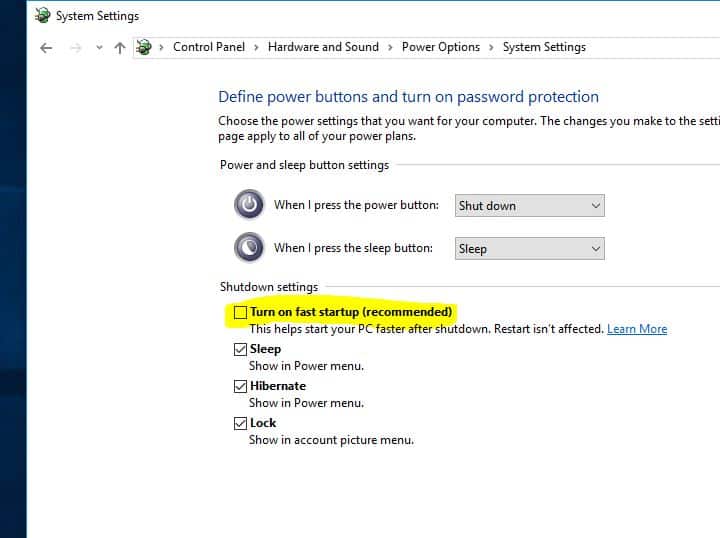
Now on System Settings Window, you will see the options Turn on Fast Startup, Sleep, Hibernate and lock under shutdown settings. If options are grayed out, select Change settings that are currently unavailable.
Now after a click on Change settings that are currently unavailable you will notice the options Turn on Fast Startup, Sleep, Hibernate are visible. Here check the Fast Startup and click save changes. Close opened window.
Now Click On Save changes. That’s all When you next Restart windows you will notice the startup will be much better compared to previous.
Disable Programs at Startup
The startup is a great place to poke around to see what kind of programs have wedged themselves in there, slowing boot-to-desktop times and loading up unnecessary CPU cycles. You’ll often find things you don’t actually want automatically turned on. Programs should launch when we ask them to, not because they think they’re privileged!
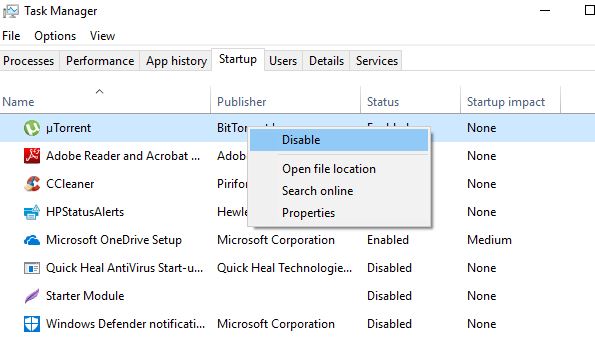
To disable startup programs first Open Task Manager by simultaneously pressing Ctrl, Shift and Esc keys. or, right-click on the empty space of the taskbar and then click Task Manager to open the same.
If the Task Manager is launched with the minimal view, click the More details button to view the actual Task Manager. Now Move to Tab.
Here you will get lost of apps list which are start at windows 10 and 8.1 startup process. You can also check the application Status its or enabled to run at startup or disabled. Right-click on the program entry that you want to stop from loading with Windows 10 and then click Disable option to remove it from the Windows 10 startup folder. Just right-click each program with the High Impact rating and select Disable.
Uninstall Unused Programs
This one is self explanatory! Remove stuff you don’t use!
1. Right-click the Start button Click Programs and Features. Here Select the unwanted software and click “Uninstall/Change”.
Disable Unnecessary Services
Services are very much like programs in Startup, except they can be much more crucial to the overall operation of Windows. There are lots of Microsoft-specific features that are enabled, but there are some that most people don’t need. Have a look through the Services tab and read the description of each one. You can stop service to see if it impacts anything, and re-enable it if necessary. You can also permanently disable a service from starting at all.
Press Windows + R key, Type services.msc on Run and hit enter key. This will open the windows services. Here scroll down and look for the unnecessary services.
Simply Right-click on it select properties. Here change the startup type to disable and click on stop next to service statue.
Note: Disabling the Windows update service, BITs and super fetch works great for me and you can notice After disable these services remarkable speed for windows.
Disable Transparency Effects
Transparency effects can often add unnecessary effects to things just for the sake of special effects. If you want that classic solid look, turn off the transparency effects, and get a decent increase in responsiveness.
- Right-click the desktop and choose Personalize
- Choose Colors
- Turn off “Make Start, taskbar, and action center transparent”
Adjust Windows for Best Performance
- Right-click on the “Computer” icon and select “Properties
- Select “Advanced System settings” to go to the “System properties” windows
- Next Select “Settings”, “Adjust for best performance” and “Apply”. Click “OK”.
- Restart your computer.
Registry Tweak to Speedup Startup apps at Launch
This is a very interesting tweak to optimize the startup apps so that windows can load and start very fast for you. Microsoft engineers implemented a short delay in startup applications at launch in order to make boot times seem faster. For those of us with fast computers, disabling this startup delay may give you faster access to your startup apps. You can do this by performing a registry tweak lets see how to do.
First press win + R, Type regedit and hit the enter key. This will open the windows registry editor. Here on left pane navigate to the following key
HKEY_CURRENT_USER\Software\Microsoft\Windows\CurrentVersion\Explorer\Serialize
Note if serialize key not available then right-click on explorer > new > key and name it to serialize.
Right-click on the “StartupDelayInMSec” key and modify the value to 0.
If Serialize or the StartupDelayInMSec key doesn’t exist, create it by right-clicking in the Explorer and selecting New > Key. Name it Serialize and right-click to create a new DWORD value called “StartupDelayInMSec” (without quotes) and set the value to 0.
Now Simply close the registry windows and Restart the computer.
Tips for keeping optimized windows 10
- Keep your Windows updated
- Install only necessary software programs
- Use a good antivirus and keep it updated
Also read:


