Your PC or Laptop won’t turn on when you press the power button. It can feel like a nightmare, particularly if you rely on it as your primary device and you may concern about the loss of work, and important data like pictures, documents, and more. A few users report the laptop won’t turn on after the Windows 11 update or the laptop won’t turn on but the power light is on. You may experience this problem with all world-famous brands of laptops include Dell, HP, Lenovo and more. There are multiple reasons that may cause the laptop won’t turn on after windows 11 23H2 update, faulty power supply to software or hardware problems or attached accessories are common. In this article, we have a few effective solutions apply to turn on your laptop before heading to a service center.
Laptop Won’t Turn on After Update
One of the most common reasons a laptop won’t turn on after an update is due to a software conflict or corruption that occurred during the update process. Here are some specific factors that could be at play:
- Interruptions during the update process, such as a sudden power loss or manual shutdown, can lead to incomplete installations, causing startup issues.
- Sometimes, an update may introduce a driver that is incompatible with your hardware, preventing the system from booting properly.
- If the update process encountered an error or issue, it might lead to corruption within the operating system files, making it unable to start.
- In rare cases, malicious software can interfere with the update process, causing issues with the system’s ability to start.
- Hardware problems like a faulty power supply, motherboard, or RAM can also prevent a laptop from turning on.
- Changes to the boot configuration during the update process may result in an inability to start the system.
- An update to the graphics driver that doesn’t work well with your hardware could lead to display issues preventing startup.
- If the battery is critically low or the power adapter is faulty, the laptop may not have enough power to turn on.
Again If the update process was interrupted, the system may attempt to go into automatic repair mode, which can sometimes get stuck in a loop.

Check power supply
The first thing you need to check the power supply. Look at the Laptop charging Adapter for lose connection. Connect the charger to the laptop and turn on the power outlet now try to turn on the laptop. If the laptop starts normally there is a problem that might be your laptop battery and you need to replace it.
If your Laptop has an accessible battery, remove it, clean it, and plug it back in.

If you are experiencing similar problem with a desktop computer Unplug the computer from wherever it’s currently plugged in and plug it directly into a wall outlet, also make sure that outlet works by plugging something else into it,
A hard reset clears temporary memory and can resolve minor software glitches.
Power Reset your Laptop
- Disconnect the charging adapter, and Remove the laptop battery,
- Now on your laptop press and hold the power button for 30 sec
- Next, Connect the AC adapter and plug it into an ac jack.
- Try turn on the Laptop check if this helps.
Disconnect External Devices
If you have external devices connected to your Laptop it may the reason why the laptop fails to turn on. Let’s Disconnect External Devices and disks from your PC and check if this helps.
Another reason your laptop isn’t booting is that an external drive or other connected device conflicts with the boot process.
- First, make sure the laptop is turned off and No charging Adapter is connected.
- Now disconnect all external devices such as printers, backup HDD or Bluetooth devices.
- Let’s press the power button again and check if the Laptop turn on.

In addition check and Ensure that the hardware components are functioning properly.
- Check the power adapter for any damage and verify it’s providing power.
- If possible, try a different power outlet.
- Test the laptop with a different battery or without a battery (if applicable).
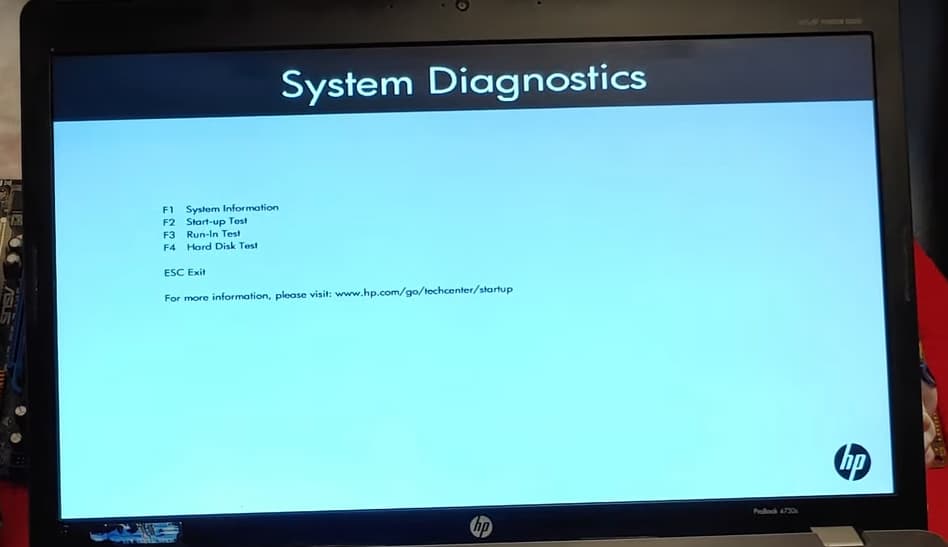
Run The Component Tests
Running component tests can help you identify any faulty components that may be causing your laptop to not turn on.
If you have a Dell computer here is How to Run a Preboot Diagnostic Test on a Dell Computer.
- Press the power button and keep pressing the Esc key until a menu pops up.
- Press F2 to enter the System Diagnostics menu.
- From the menu, select “Component Test.”
- Select the components you want to test from the list provided.
Did you notice Laptop won’t turn on after installing a new RAM or Hard drive if the laptop stopped booting immediately after it might be new hardware is faulty and you need to remove or replace it. If you hear a clicking noise or the drive spinning but then powers down, this is a telltale sign your hard drive has failed.
Again Incorrect BIOS/UEFI settings can prevent the laptop from starting up.
- Access the BIOS/UEFI settings.
- Verify that the boot order is set correctly and the hard drive is recognized.
Boot into Safe Mode
Well if you notice Laptop turn on but No display screen appears, it might be a buggy driver maybe booting at startup and causing the laptop to not turn on. You can check the same by start Windows 11 in safe mode. Safe Mode is a diagnostic mode in Windows that loads a minimal set of drivers. This can help identify and fix software conflicts.
- Restart the laptop and repeatedly press the F8 or Shift + F8 key during startup until the Advanced Boot Options menu appears.
- Select “Safe Mode” and press Enter.

If the laptop starts normally you need to update the Windows or installing up to date drivers from the manufacturer.
Perform a Repair Install or Reset
This option reinstalls Windows while keeping your files intact.
- If you have a Windows installation media, boot from it.
- Select “Install Now” and follow the prompts. Choose “Custom: Install Windows only” to preserve your files.
If you can hear the laptop fan and other noises and the screen still isn’t displaying anything. It is possible that the laptop’s screen is faulty and needs a replacement.
If none above troubleshooting tips helped get your laptop working again, it’s time to send it to the manufacturer for a repair.
To avoid such problems, Make sure to install the latest Windows updates and driver updates on your Laptop or PC. That ensures the best performance for your computer.
Regularly maintain and clean the mechanical parts of your laptop, such as the fans and vents, to ensure that they are working properly.
Also, install antivirus software and time to time perform full system scan to protect your laptop from security threats.
Also read:
- Windows 10 keeps shutting down and restarting automatically.
- How to Fix No boot device found Error on Windows 10, 8.1 and 7
- How to fix the External Hard Drive not showing up / Not Detected issue
- Windows 11 not recognizing iPhone after update (Solved)
- Windows 11 printer sharing not working after update (7 solutions)