Windows updates bring security fixes, bug fixes, and improvements to keep your PC running smoothly. However, sometimes an update can introduce unexpected problems, including audio issues. For example, after installing the Windows 11 KB5124008 update, you may notice your speakers or headphones stop working, the volume icon shows no output device, or you get “No sound” when you play videos or music. This problem can occur for several reasons, including audio driver compatibility issues, incorrect sound output settings, or problems with Windows audio services. If your PC stopped playing sound after a Windows update, try these troubleshooting steps to restore audio on your Windows 11 PC.
Why Is There No Sound After a Windows 11 Update?
Several issues can cause sound to stop working after installing a Windows 11 update. In some cases, a cumulative update may introduce an audio compatibility problem. In others, Windows may switch to a different output device, an audio driver may stop working correctly, or a required audio service may fail to start.
Here are some common reasons why you may experience audio problems after a Windows update:
- Audio driver issues: An update may affect the compatibility of your existing audio driver, causing speakers or headphones to stop working.
- Incorrect sound output device: Windows may select a different output device, such as a monitor, Bluetooth headset, or HDMI audio device.
- Windows audio services not running: If the required audio services stop responding, Windows may be unable to play sound.
- USB audio compatibility problems: Certain USB headsets, speakers, and other audio devices may experience compatibility issues after an update.
- Damaged system files or update-related bugs: Corrupted Windows components or an unresolved update bug may interfere with audio playback.
The following fixes will help you identify the cause and restore sound on your Windows 11 PC.
1. Check the Sound Output Device and Volume
Before changing drivers or uninstalling an update, check whether Windows is sending audio to the correct device. Windows updates, newly connected peripherals, or Bluetooth connections can sometimes change the selected output device.
- Press Windows + A to open Quick Settings.
- Click the arrow next to the volume slider to view available audio output devices.
- Select your speakers or headphones instead of another connected device.
- Increase the volume and make sure the sound is not muted.
- Play a video or audio file to check whether sound has returned.

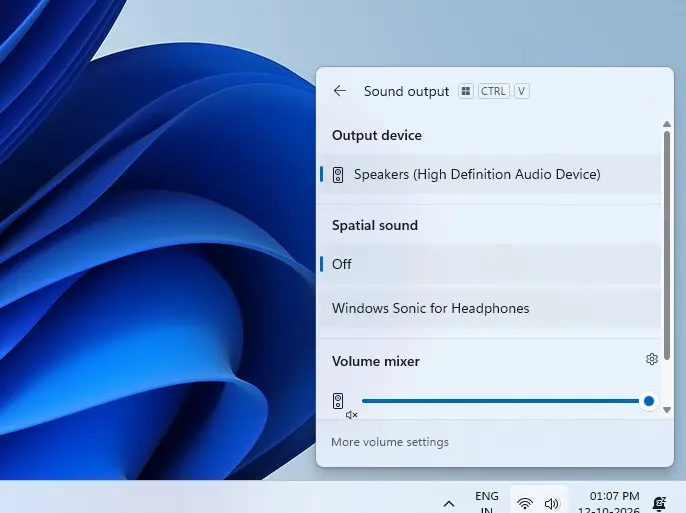
If you use external speakers or wired headphones, make sure the cable is securely connected and the device is powered on. For USB audio devices, try another USB port. If you use Bluetooth headphones, disconnect and reconnect them.
You can also go to Settings > System > Sound, select your output device, and check the volume settings.
2. Run the Audio Troubleshooter
Windows 11 includes an audio troubleshooter that can detect and resolve common sound problems. It can help identify issues with audio settings, connected devices, and related Windows components, making it a useful next step if sound stopped working after an update.
- Press Windows + I to open Settings.
- Select System > Troubleshoot > Other troubleshooters.
- Find Audio or Playing Audio in the list and click Run, if available.
- Follow the on-screen instructions and allow Windows to check for audio problems.
- Apply any recommended fixes and restart your PC if prompted.
- Play an audio file to see whether the problem is resolved.
If Windows directs you to the Get Help app, follow its troubleshooting instructions to check your audio configuration.


If the troubleshooter cannot detect the problem or the sound is still missing, move on to the next fix.
3. Restart Windows Audio Services
Windows relies on background services to manage audio playback. If these services stop responding after an update, you may get no sound, even when your speakers or headphones appear connected correctly.
Restarting the Windows audio services can help restore normal playback without changing your sound settings or reinstalling drivers.
- Press Windows + R to open the Run dialog box.
- Type
services.mscand press Enter. - Find Windows Audio in the list.
- Right-click it and select Restart. If Restart is unavailable, select Start if the service is stopped.
- Find Windows Audio Endpoint Builder and restart it as well, if the option is available.
- Close the Services window and test your audio again.

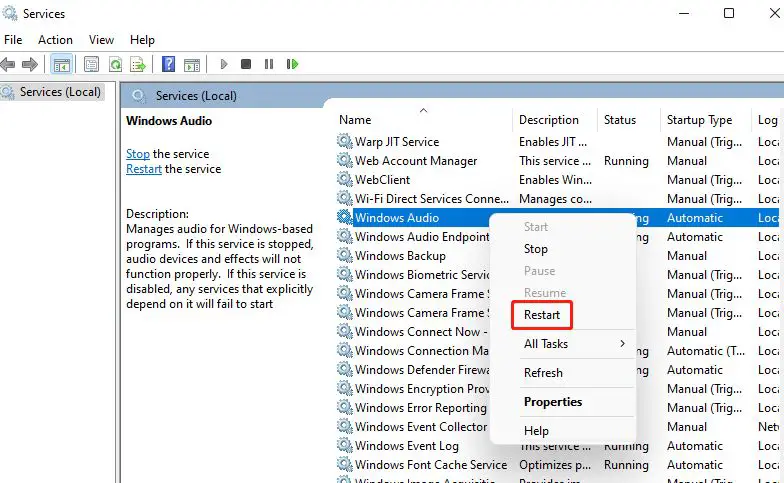
If either service is stopped, open its Properties and check that its Startup type is set to Automatic.
If sound remains unavailable, the problem may involve an incompatible or malfunctioning audio driver.
4. Update the Audio Driver
An outdated or incompatible audio driver can prevent your speakers, headphones, or USB audio devices from working correctly after a Windows 11 update. Updating the driver may restore compatibility and resolve the problem.
Follow these steps to check for an updated audio driver:
- Press Windows + X and select Device Manager.
- Expand Sound, video and game controllers.
- Right-click your audio device, such as Realtek Audio, and select Update driver.
- Select Search automatically for drivers.
- Follow the on-screen instructions if Windows finds an updated driver.
- Restart your PC and check whether sound works again.

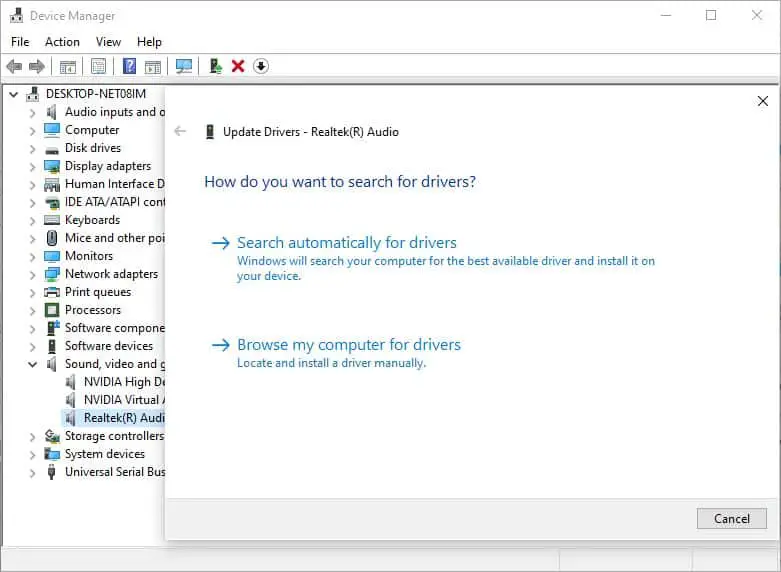
If Windows reports that the best drivers are already installed, check your PC manufacturer’s website for a newer audio driver compatible with your Windows 11 version. For laptops and branded desktops, the manufacturer’s driver is often the best option.
Also, check the Audio inputs and outputs section in Device Manager. If your speakers or headphones appear with a warning icon, their driver or device configuration may need attention.
5. Roll Back or Reinstall the Audio Driver
Sometimes a Windows update exposes a compatibility problem with the existing audio driver. If sound worked correctly before the update, rolling back the driver may restore the previous working version.
To roll back the audio driver:
- Press Windows + X and open Device Manager.
- Expand Sound, video and game controllers.
- Right-click your audio device and select Properties.
- Open the Driver tab.
- If Roll Back Driver is available, click it and follow the instructions.
- Restart your PC and test the sound.


The rollback option may be unavailable if Windows does not have a previous driver version stored.
If rollback is unavailable, reinstall the driver:
- Open Device Manager and expand Sound, video and game controllers.
- Right-click your audio device and select Uninstall device.
- Confirm the removal. Avoid selecting any option to delete the driver package if you do not have another copy available.
- Restart your PC. Windows may automatically reinstall the audio driver.
- If sound still does not work, install the compatible audio driver from your PC manufacturer’s support website.
Important: If you use a USB headset or USB audio adapter and Device Manager shows Code 10, check whether a known Windows update compatibility issue affects your device before repeatedly uninstalling its driver.
6. Disable Audio Enhancements
Windows 11 includes audio enhancements designed to improve sound quality. However, some audio drivers and devices may not work correctly with these enhancements, resulting in distorted sound, crackling, or no audio after a Windows update.
Disabling audio enhancements can help determine whether they are contributing to the problem.
- Press Windows + I to open Settings.
- Go to System > Sound.
- Under Output, select your speakers or headphones.
- Under Advanced settings, look for Audio enhancements.
- Change the setting to Off, if available.
- Play an audio file to check whether sound has returned.


Depending on your audio device and driver, this option may appear under a different name or may not be available.
7. Install the Latest Windows Updates
If the sound problem started after you installed a cumulative update, Microsoft may address it in a later update. Installing the latest Windows updates can also fix system components and improve device compatibility.
- Press Windows + I to open Settings.
- Select Windows Update.
- Click Check for updates.
- Install any available updates and restart your PC if required.
- After restarting, test your speakers or headphones.


You can also check Advanced options > Optional updates for a compatible audio driver, if one is offered. Driver updates listed there are optional, so review the device and driver details before installing them.
What If There Is Still No Sound After the Windows Update?
If none of the above fixes restore audio, the recent Windows update may be causing a compatibility issue with your audio device. As a last resort, you can try uninstalling the problematic update.
- Open Settings > Windows Update > Update history.
- Under Related settings, select Uninstall updates.
- Find the most recent cumulative update (e.g., KB5124008) and select Uninstall if available.
- Restart your PC and test the sound.


Before uninstalling, check Microsoft’s Windows release health information for any known audio issues and available fixes. Removing a security update can expose your PC to vulnerabilities, so avoid this step if a newer update already resolves the problem.
Frequently Asked Questions
Sound may stop working because of an incompatible audio driver, incorrect output device, stopped Windows audio services, or an update-related compatibility issue. Start by checking the output settings and updating or rolling back the audio driver.
First, check the selected output device and volume. Then run the audio troubleshooter, restart Windows audio services, and update the audio driver. If the problem started immediately after an update, check for a newer fix.
Yes. A Windows update can expose compatibility problems with an existing audio driver or change how a device works with Windows. Installing a compatible driver from your PC manufacturer’s website may resolve the issue.
The issue may involve the USB port, device configuration, audio drivers, or Windows compatibility. Try another USB port, check Device Manager for errors, and install any available compatible driver. If Device Manager displays Code 10, check Microsoft’s release health information for a documented issue affecting your device.
Uninstalling an update may help if the problem began immediately after installation and other troubleshooting steps have failed. However, check for a newer update that fixes the issue first, because removing a security update can leave your PC vulnerable.