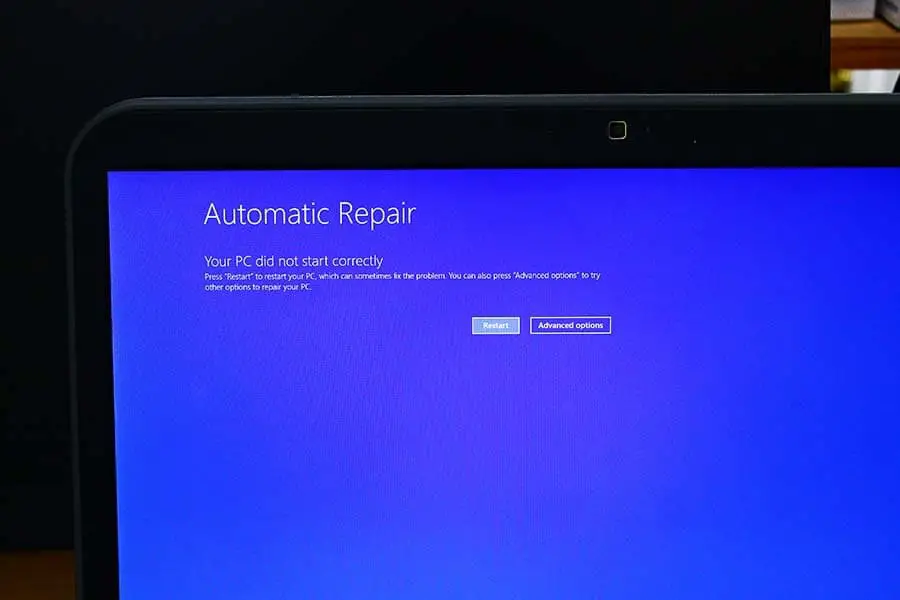
Sometimes you may notice your Windows 11 PC won’t start as it should after booting; it runs Startup Repair and displays “Automatic Repair: Your PC did not start correctly.” A number of users report that when they turn on or restart the PC, Windows 11 Automatic Repair starts and displays ” Your pc did not start correctly. There are multiple reasons for this problem, Broken or corrupt system files to Problematic Windows updates, Incompatible hard drives or bad sectors on hard disks are common. Again, you may experience the Windows 11 PC didn’t start correctly error if the Boot Manager file is corrupted due to a power outage or any other reason. If restarting your computer didn’t help, apply the solutions below to resolve the “PC Did Not Start Correctly” Error on Windows 11.
PC Did Not Start Correctly Windows 11
Multiple reasons can cause Your PC did not start correctly error, a recent hardware upgrade, incompatible device driver, file system corruption and more.
- First, disconnect external devices and additional USB drives attached and reboot your PC to check if the issue is resolved.
- If the Startup Repair tool didn’t fix the problem, you can access Advanced options and then start Windows 11 in Safe Mode.
- Also, you need to repair the Boot Configuration Data and master boot record to fix the problem.
- You can open Command Prompt and then run SFC and DISM commands to check if system file corruption prevents your Windows 11 PC from starting normally.
Let’s first restart your computer, which not only refreshes the operating system but also restarts all processes and clears temporary glitches that might prevent the PC start normally.
Run the Startup repair tool
If you’re still getting “automatic repair your pc did not start correctly,” click the Advanced option.

Now navigate to Troubleshoot > Advanced options > Startup Repair.
Start-up repair this will scan and fix any problems that may have prevented your PC from loading correctly

Log into your user account and let the process complete, this will fix problems with files that are required to boot the operating system and help you recover Windows from a serious error.
Restart and see if you can now boot into Windows. If the answer is yes, open Command Prompt as an administrator and run the System File Checker, CHKDSK, and DISM /RestoreHealth commands to repair Windows 11 files. If Windows still won’t start normally, we need to start Windows 11 in Safe Mode.
Start Windows 11 safe mode
Windows Safe Mode lets you access a modified version of Windows and can fix problems that prevent Windows 11 from starting normally. In safe mode system loads only a minimal set of drivers and services to allow the isolation of problems causing system instability. Here are different ways to boot into Safe Mode in Windows 11.

- When you get your PC did not start correctly error, Click on Advanced options,
- Next, click on Troubleshoot then Advanced options followed by startup settings and click on restart

- Now press F4 to start windows safe mode and F5 to start windows safe mode with networking.

- When your PC starts in Safe Mode, apply the following solutions to correctly fix the “PC did not start” error on Windows 11.
Repair Windows system files
Corrupted or missing system files are a common reason your PC did not start correctly. You can run DISM, and SFC scans to fix any issues with the system files on your PC.
Note – If Windows 11 fails to start in Safe Mode, then access Advanced Options and click on Command Prompt, then perform the following commands.

- If you are in Safe Mode, press the Windows key + S, type cmd, right-click Command Prompt, and select Run as administrator.
- First, run DISM RestoreHealth command DISM /online /cleanup-image /restorehealth
- Next, run the System File Checker command sfc /scannow
- The above command scans your PC for missing or corrupt system files, and add or replaces them with a stable copy.
In addition, run the chkdsk C: /f /r command to scan the disk drive for errors and repair them.
Once the scanning completes 100% reboot your PC and check if windows 11 starts normally.
Repair Boot Configuration Data
The Boot Configuration Data contains files used by Windows to boot your PC, and if, for any reason, Windows fails to access those files while you turn on your PC, it may fail to start Windows normally and display the ‘Your PC did not start correctly’ error.
Similarly, the Master Boot Record (MBR) is an essential part that helps your PC locate the operating system on your hard drive. And the issue with the Master Boot Record (MBR) on your PC may also result in the computer not starting correctly.
Again, open the Command Prompt as administrator and perform the following commands to repair the MBR and Boot Configuration Data on Windows 11.
bootrec /fixmbr
bootrec /fixboot
bootrec /rebuildbcd
Once done reboot your PC and check if this help fixes the problem.
Update Windows 11
Microsoft regularly updates the Windows 11 operating system with the latest security enhancements and bug fixes. Installing the latest Windows updates also replaces system files that may cause problems starting Windows 11.
- Start Windows 11 in Safe Mode with Networking.
- Open the Settings app using the Windows key + I
- Click on Windows Update, then hit the Check for updates button,
- If Windows updates are pending there allow them to download and install on your computer,
- In addition click on Advanced options then optional updates, if any driver updates or optional windows updates are available download and install them as well.
- Now you need to reboot your computer to apply the changes.
Perform system restore
The System Restore feature is very useful for recovering from such startup errors, but it’s only available if you previously enabled system protection. System restore points create a snapshot of the current Windows settings before critical operations take place. So if anything goes wrong with Windows 11, you can perform a system restore to revert back to a working state.
- If your PC starts in Safe Mode, run the command rstrui.exe to open the System Restore wizard. Otherwise, you can perform a system restore from Advanced options as well.

- Next, choose a restore point before the error appeared and click Next.

- Review the restore point one more time and hit Finish to perform a system restore.

In addition, if the problem started after a recent Windows update, we recommend uninstalling the Windows update and checking if this helps.
Start Windows 11 in Safe Mode and uninstall third-party antivirus or recently installed programs, then reboot your PC. This helps if third-party software conflicts or security software prevents Windows from starting normally.
Also read: