Our data stored on our phones is more valuable than our devices. There are many people who can’t afford cloud service subscriptions and keeps their data on their device itself. And you never know when and what may go wrong and result in data loss. If you are iOS user who Accidentally deleted data or lose photos after performing iOS Update you can use the backup stored on your iTunes, or iCloud, to restore deleted photos. But what if you don’t have an old backup?
Luckily, there are numerous recovery apps to help you restore your lost data. Here, we’re going to check out the features and functionality of the iOS data recovery tool PhoneRescue And learn how it could be our life savior. To review this amazing product, we took a backup of our data and deliberately deleted everything from our iPhone device as if we met a system crash while updating iOS. We are hoping to recover Photos, videos regular or high-quality 4K videos.
To get this on your device and recover your lost items from your iPhone, first, you’ll need to download and install the app on your computer. The application is available for both Windows and macOS machines. We can download it on a Windows PC and recover iPhone’s data as well.
PhoneRescue for iOS
The iMobie PhoneRescue app is capable of restoring 31 types of data files including photos, messages, contacts, WhatsApp data, Kik and more. If you have used your iPhone for a long time, you might have a vast amount of important data to recover.
- Save Your Data From Accidental Deletion
- Restore Lost Data from iTunes Backup
- Recover Your Valuable Data From iCloud
- Save iPhone/iPad From System Crash
- Recover Your Favorite App’s Data
How to recover iPhone photos by using PhoneRescue
Here are the steps to use PhoneRescue to recover deleted Photos and Videos from your iPhone.
- Download the PhoneRescue iOS version and install it on Windows/Mac computer.
- Now connect your iPhone via a USB cable.
- Select ‘Recover from iOS Device’ mode on the homepage of the PhoneRescue App,
- Then click on the Right Arrow at the bottom right corner to move further.
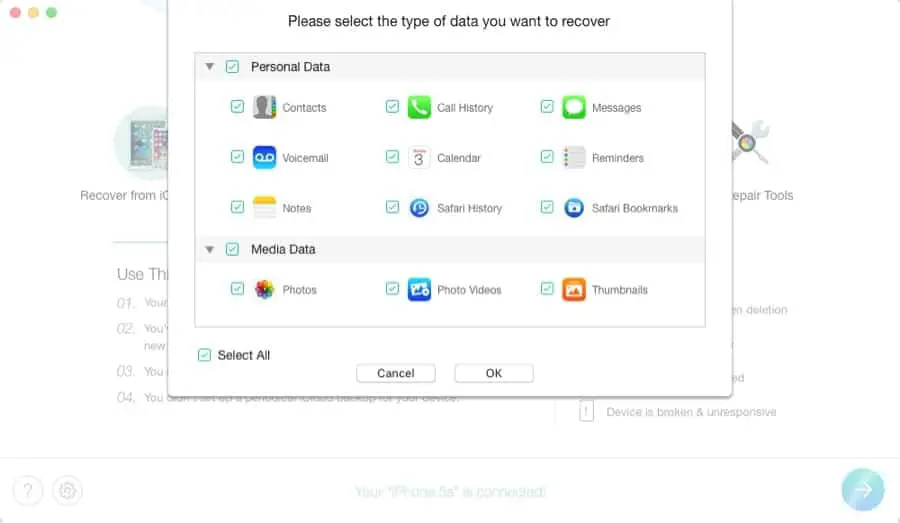
- All data types will be selected by default.
- You can uncheck everything and choose only Photos. Click OK to start scanning.
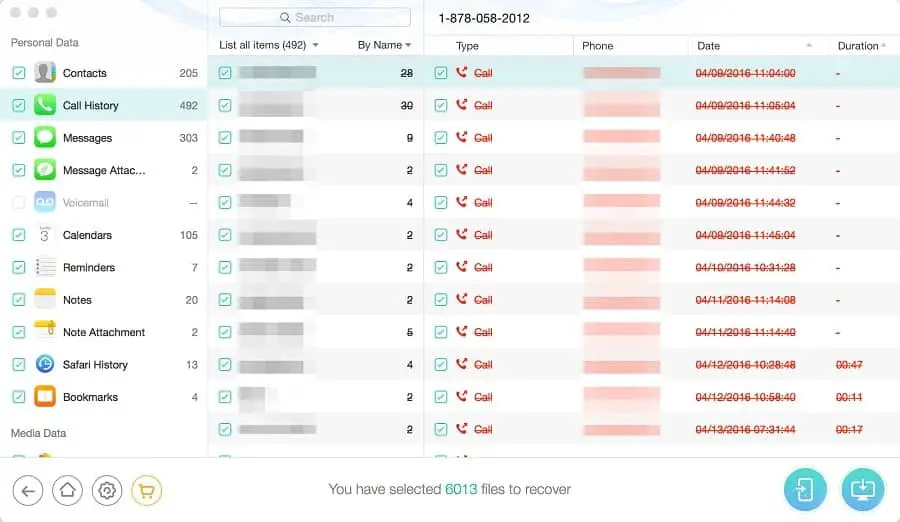
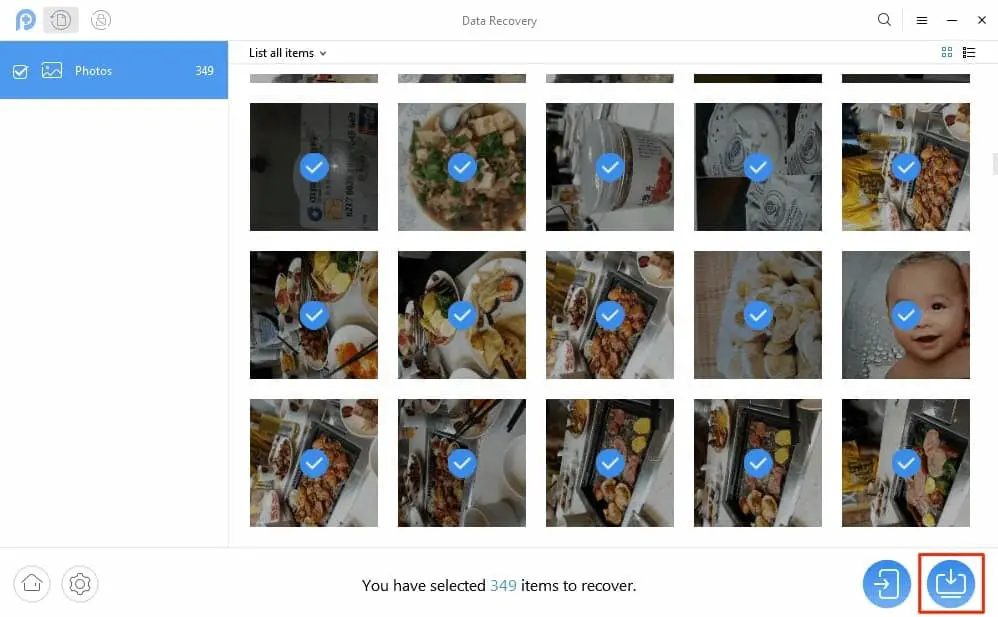
- When the application is done with the scanning, it will show you the recoverable media found on the device.
- Select all or any photos to recover and click ‘To Device/To Computer’ button as per your choice.
Note: Two different options there to save data if your computer option all recovered data save to your Local drive. But for personal data (like contacts, messages, notes, etc..) you need to choose phone icon.
- After the retrieval process is complete, exit out the USB connectivity and check your iPhone for recovered photos.
- You can also check the PhoneRescue Export file folder on your computer desktop to look for recovered Photos.
Other Features of PhoneRescue
PhoneRescue not only recovers lost Photos and Videos but can also recover the below-mentioned data.
- Retrieve Lost Call Logs And History
- Restore Deleted Contacts and Address Book
- Recover Deleted Music from iTunes and Calendar items
- Get Back Messages From The Instant Messaging Apps Like Line and WhatsApp
- Recover Accidentally Deleted Messages And Backups
Also, there is a Recover from iCloud and Recover from iTunes Backup mode option that detects all iCloud and iTunes backups on the computer and helps you retrieve lost data back from iTunes and iCloud backups.
Pros and Cons of PhoneRescue (iOS data recovery)
Pros
- The data scan completes in a few seconds which is the most brilliant feature.
- PhoneRescue has a high recovery rate because of the fact that there are different software for different handsets like iPhone, Samsung, Google, Windows, etc. This is something that is unique in PhoneRescue software if compared to other smartphone data recovery software that we reviewed.
- PhoneRescue is the only iOS/Android data recovery software that is available in multiple languages.
Cons
Although there are not so many cons of PhoneRescue, the only thing which pulls it back is it is not available for all versions of Android smartphones. Though, they are working on the same to get support for Moto and LG models.
As there are equal or higher users of Android devices, here are some steps that will help Android users to recover lost data using PhoneRescue.
PhoneRescue For Android
PhoneRescue has much-advanced features in comparison to iOS to recover lost data. If you have experienced data loss on your Android device for any sort of reason, PhoneRescue is here to rescue your data by recovering it from your Android smartphone. Here we are going to list out a step-by-step process to provide a solution to data loss on Android Devices. We have compiled how to recover deleted photos, videos, messages, contacts, WhatsApp messages and much more on Android devices.
How to recover Android photos by using PhoneRescue
Step 1. Download PhoneRescue on your Windows computer from the Official Website and install the application as you install regular software for smooth restoration.
“Note: You need to ensure that you select the correct handset before downloading and installing the application.” Here we have selected PhoneRescue for Samsung Smartphones.
Step 2. Launch PhoneRescue (by selecting the Samsung option in this case) once the installation is complete.
Step 3. It will ask you to select the language. Here we have selected English and moved ahead.
Step 4. You will reach the welcome screen, where it will show you some tips and tricks to perform the restoration steps and some tips for optimal use of the software. Once you go through them, you need to click on the ‘Getting Started’ button.
Step 5. You will need to connect your Samsung Android device using a USB cable to your PC and allow USB debugging on your Samsung mobile.
“Note: It should give you a popup on your Samsung mobile screen or you may need to get into the setting to do the same. Go to Settings > Developer Options > Toggle USB debugging switch to turn it ON. Put a checkmark on ‘Always Allow’ and tap on ‘OK’ on the next pop-up screen.”
Step 6. PhoneRescue app will be installed on your Android Smartphone to establish a connection between the software and your Smartphone.
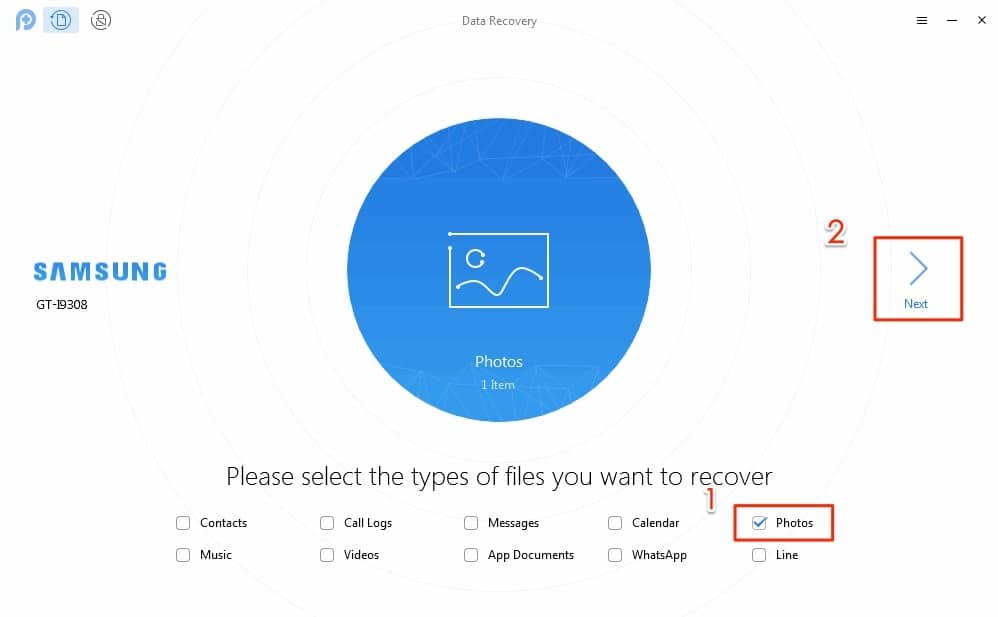
Step 7. Manually select the items you would want to recover. We have selected Photos and Videos and clicked on the ‘Next’ button. If you wish to recover the entire data, by default all the data types are selected for your retrieval and you can click on next to move ahead. Default data types include Contacts, Call Logs, Messages, Calendars, Photos, Music, Videos, App Document, WhatsApp, Line and other applications installed on your phone.
“Note: To enable the software to work on your device, you will need to allow PhoneRescue to access photos, media files and other files on your Android device. Tap on Allow on your Android device to initiate the scan.”
Step 8. On the next screen, it will prompt you for a Quick Scan and a Deep Scan. It is strongly recommended to go for a Quick Scan as it will not require system rooting. If the quick scan doesn’t get you the desired results or show you the deleted items to recover, then you can try the Deep scan option.
“Please Note: Deep Scan option will root your device automatically and this will be an irreversible operation. That is the reason it is recommended to go for a quick scan at the initial stage.”
Step 9. When you click on the Quick Scan option, within a few seconds, it will show you the items which were lost or deleted from the device. To recover detected items, you will need to click on Save to Computer button at the bottom right corner of the screen.
As we say, nothing comes for free. To recover the lost data from your device, you will need to purchase a premium license for the software. You can only preview the lost items with the trial version.
Step 10. Once you proceed with the purchase, all the lost files and media will be recovered and restored on your Samsung device in respective folders and a backup will be saved on your PC as well.
Overall it’s a safe tool that works to recover almost multiply by two average number of deleted and lost files. You can Extract backups even if they are encrypted, isn’t it great? Well, for the sake of data recovery, you just need to provide the backup and the Apple ID Password to access the backup, that’s it. The only major throwback in this method is, it requires a backup which have been synced with your device. If this article helped you, or you know someone who can be benefited from this, please like and share it with your friends.
Also read:
