


Windows updates are important for keep your system secure and up to date with the latest patches and improvements. Microsoft regularly releases Windows updates with the latest security enhancements and bug fixes that need to be installed as soon as possible to secure and optimize Your PC. However, Sometimes, Windows Update may encounter issues that prevent it from downloading or installing updates properly. In such cases, Reset Windows Update components are effective in fixing the problem. Resetting Windows Update components will clear the cache, stop/start the related services, and re-register the DLL files. This will allow Windows Update to start fresh and download the updates again.
Reset Windows Update Components
If you consistently encounter errors while trying to install Windows updates, resetting the update components can help resolve the underlying issues. Again Sometimes, updates may get stuck in the installation process. This could be due to corrupted files or misconfigurations in the Windows Update components that need to be cleared.
If update downloads are slow or repeatedly fail, resetting the update components might resolve the connectivity or download-related issues. If the Windows Update service is not working correctly or fails to start, resetting the components can often restore its functionality.
Run Windows Update Troubleshooter
Whenever you experience a problem installing Windows updates, the first step is to run the built-in troubleshooter. The troubleshooter reset some of the components that are involved in the update process, such as the Background Intelligent Transfer Service (BITS), the Windows Update database, and the Windows Update service.
- Press the Windows key + I to open Settings.
- Go to “Update & Security” and then “Troubleshoot.”
- Click on the Additional troubleshooters link, to display all troubleshooters list
- Run the “Windows Update Troubleshooter.”


The troubleshooter will attempt to identify and automatically fix issues related to Windows Update. If the troubleshooter doesn’t resolve the issue manually reset the Windows update following the next steps.
Manually reset windows update
If the built-in update troubleshooter fails to fix the problem, here is how to reset Windows Update components to defaults in Windows 11/10.
Note: Before proceeding, it’s advisable to create a system restore point or back up your important data.
Step 1: Stop Windows Update and related Services
Press Windows key + S, Search for Command Prompt and select the Run as administrator option. Run the following commands to stop the Background Intelligent Transfer Service (BITS), Windows Update service, and Cryptographic service.
net stop bits
net stop wuauserv
net stop appidsvc
net stop cryptsvc


Step 2: Delete qmgr.dat Files:
Next, you need to run the following command to delete all the qmgr*.dat files created by BITS from your PC
Del “%ALLUSERSPROFILE%\Application Data\Microsoft\Network\Downloader\*.*”
Type Y and press enter key to confirm the deletion.
Step 3: Flush SoftwareDistribution and catroot2 Folders:
Clear existing Windows Update cache and force Windows 10/11 to redownload updates instead of utilizing potentially damaged files already present on the system.
This process ensures a fresh and reliable source for updating the operating system.
Run following commands to rename the softwaredistribution and catroot2 folder where windows update stored before install on your devcie.
- Ren %systemroot%\SoftwareDistribution SoftwareDistribution.bak
- Ren %systemroot%\system32\catroot2 catroot2.bak
Next time when you check for updates, it will create new softwaredistribution and catroot2 folder and download fresh update files.
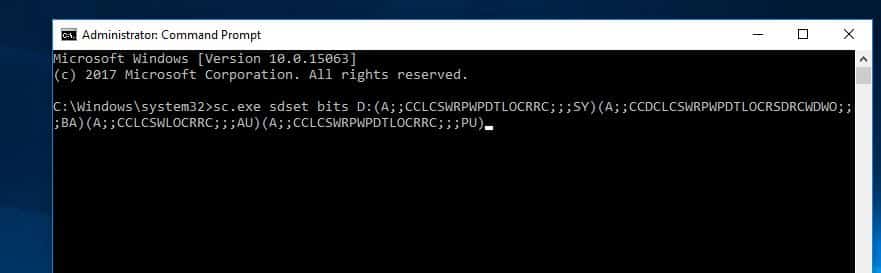
Step 4: Reset BITS and Windows Update Services Security Descriptor
Run the following commands to reset the BITS and Windows Update services to their default security descriptor,
sc.exe sdset bits D:(A;;CCLCSWRPWPDTLOCRRC;;;SY)(A;;CCDCLCSWRPWPDTLOCRSDRCWDWO;;;BA)(A;;CCLCSWLOCRRC;;;AU)(A;;CCLCSWRPWPDTLOCRRC;;;PU)

sc.exe sdset wuauserv D:(A;;CCLCSWRPWPDTLOCRRC;;;SY)(A;;CCDCLCSWRPWPDTLOCRSDRCWDWO;;;BA)(A;;CCLCSWLOCRRC;;;AU)(A;;CCLCSWRPWPDTLOCRRC;;;PU)
Step 5: Re-register BITS and Windows Update DLL Files:
Run command cd /d %windir%\system32 to move to the System32 folder. And perfom following commands to register all the corresponding BITS and Windows Update DLL files on the Registry.


regsvr32.exe atl.dll
regsvr32.exe urlmon.dll
regsvr32.exe mshtml.dll
regsvr32.exe shdocvw.dll
regsvr32.exe browseui.dll
regsvr32.exe jscript.dll
regsvr32.exe vbscript.dll
regsvr32.exe scrrun.dll
regsvr32.exe msxml.dll
regsvr32.exe msxml3.dll
regsvr32.exe msxml6.dll
regsvr32.exe actxprxy.dll
regsvr32.exe softpub.dll
regsvr32.exe wintrust.dll
regsvr32.exe dssenh.dll
regsvr32.exe rsaenh.dll
regsvr32.exe gpkcsp.dll
regsvr32.exe sccbase.dll
regsvr32.exe slbcsp.dll
regsvr32.exe cryptdlg.dll
regsvr32.exe oleaut32.dll
regsvr32.exe ole32.dll
regsvr32.exe shell32.dll
regsvr32.exe initpki.dll
regsvr32.exe wuapi.dll
regsvr32.exe wuaueng.dll
regsvr32.exe wuaueng1.dll
regsvr32.exe wucltui.dll
regsvr32.exe wups.dll
regsvr32.exe wups2.dll
regsvr32.exe wuweb.dll
regsvr32.exe qmgr.dll
regsvr32.exe qmgrprxy.dll
regsvr32.exe wucltux.dll
regsvr32.exe muweb.dll
regsvr32.exe wuwebv.dll
regsvr32.exe wudriver.dll
Step 6 : Delete Incorrect Registry Values
Open Registry Editor by pressing Win + R, typing regedit, and pressing Enter.
Navigate to HKEY_LOCAL_MACHINE\SOFTWARE\Microsoft\Windows\CurrentVersion\WindowsUpdate and delete any values named SusClientId or SusClientIdValidation.
Step 7: Reset Winsock
Winsock defines how Windows network software should access network services, especially TCP/IP. Windows OS comes with a Dynamic Link Library (DLL) file called winsock.dll which implements the API and coordinates Windows programs and TCP/IP connections. If Due to some reason, Winsock gets corrupted. you may experience difficulty in establishing a connection to the Internet. Therefore resetting Winsock is a Good solution.
Open command prompt as administrator and run following two commands:
netsh winsock reset
netsh winsock reset proxy


Step 8: Restart Windows Update and related Services
You can restart your PC or run following commands to restart the BITS, Windows Update, and Cryptographic services.
net start bits
net start wuauserv
net start appidsvc
net start cryptsvc
After completing these steps, check if your Windows Update issues have been resolved. Restart your computer if necessary.
Run SFC and DISM command
In some cases, you may also need to run the System File Checker (SFC) and Deployment Image Servicing and Management (DISM) commands to repair any corrupted system files that may affect Windows Update. These commands scan your system for any integrity violations and attempt to fix them automatically.
- Press windows key + S, type cmd and Open command prompt window as administrator.
- First run the system file checker command sfc /scannow and press Enter. This will start the SFC scan, which may take some time to complete.
- If the SFC scan finds and fixes any issues, restart your computer and check if Windows Update works.
- If the SFC scan does not fix the issue or reports that it could not repair some files, type DISM /Online /Cleanup-Image /RestoreHealth and press Enter.
- This will start the DISM scan, which may also take some time to complete.
- If the DISM scan finds and fixes any issues, restart your computer and run the SFC scan again to verify that all issues are resolved.
- Check if Windows Update works.
Install windows updates manually
If none of these steps work for you, you may want to try manually installing the latest Windows update from Microsoft’s website. This can sometimes fix issues that prevent Windows Update from working properly.
To manually install a Windows update:
- Go to the official Microsoft Update Catalog.
- Enter the KB number of the update you want to install.
- Download the appropriate update for your system architecture (32-bit or 64-bit).


- Once you’ve identified and selected the update, click the “Download” button. Save the update file to a location on your computer.
- Double-click the downloaded update file (usually a .msu or .exe file), Follow the on-screen instructions provided by the update installer.
If prompted, restart your computer to complete the installation. After the restart, go to “Settings” > “Update & Security” > “Windows Update.” Check for additional updates to make sure your system is up to date.
Also Read:
- How To Fix Disk Errors with Check Disk Utility (CHKDSK)
- Fix wuauserv (Windows update) High CPU usage in Windows 10
- 3 Ways to Reset Windows 10 Password with/without software
- Solved: “Windows Update Components Must Be Repaired” In Windows 10
- How to fix windows update when it gets stuck at 0 percent or 100


