
Computer freezes, not responding for a long time after Windows 10 21H2 update? A number of users report System and Compressed memory frequently runs at 100% CPU usage for 2 to 3 minutes at a time, effectively preventing any other computer operation from occurring – so the machine just hangs until the CPU becomes available again. Some other System and compressed memory background high CPU usage after resuming from Hibernation. Windows 10 high CPU usage occurs for various reasons, for example, virus/malware infections, out-of-date drivers, anti-virus programs or other third-party programs, etc. Whatever the reason, here we have effective solutions to fix the system and compressed memory high CPU usage, 100 Disk usage on Windows 10.
What is the system and compressed memory?
System and compressed memory is a windows service, designed to handle the compression and extraction of your less used and old drivers and files. And make it easier to store and faster to use when you need them. Usually, System and compressed memory processes take a small amount of CPU or disk but Sometimes due to some third-party applications installed in Windows or even because of the incompatibility of the machine with Windows 10, This process starts using 100% Disk or CPU.
Disable system and compressed memory
First of all, suggest you install all the pending updates and check if the issue persists.
- Press Windows + X select settings,
- Update & Security, then windows update,
- Click the Check for updates button,
- Let windows download and install updates (if available)
- Restart windows and check the problem is fixed.
Scan your system scan for virus malware infection, with a good antivirus with the latest updates installed
Put the computer into a clean boot state and check if it helps.
A clean boot is performed to start Windows by using a minimal set of drivers and startup programs. This helps eliminate software conflicts that occur when you install a program or an update or when you run a program in Windows. You may also troubleshoot or determine what conflict is causing the problem by performing a clean boot.
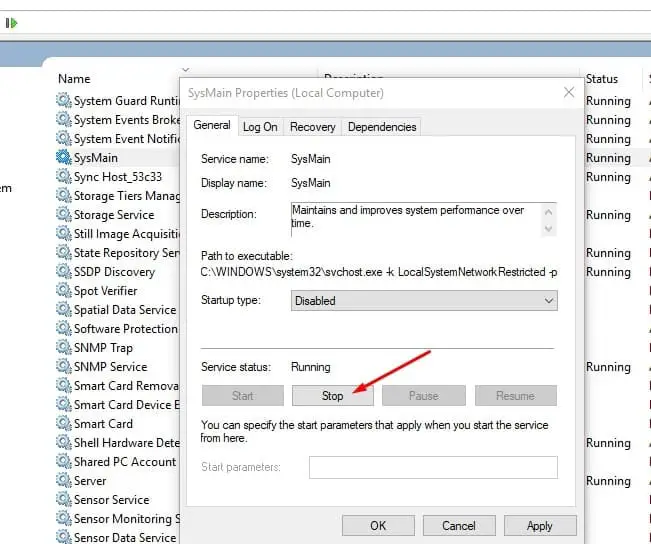
Disable sysmain Service
- Press Windows + R, type services.msc and ok,
- Look for a service named sysmain
- Right-click and select properties,
- Choose to stop the service,
- In the “Startup type” drop-down list, select “Disabled“,
- Click apply and ok t make save changes.
Set The pagefile.sys File Size Back to Automatic
This is the Second Best Solution to Fix System And Compressed Memory High CPU Usage. By default, Windows will set the pagefile.sys file size and manage it automatically. If you recently changed the “pagefile.sys” file size, restoring it back to the default setting will help you solve this problem. To do so, follow the instructions below:
- Press Windows + X and select settings
- In the Settings window, search for “Performance” and then choose “Adjust the appearance and performance of Windows“.
- Go to the Advanced tab and click the “Change…” button, in the Virtual Memory section.
- In the Virtual Memory window, check the “Automatically manage paging file size for all drives” box.
- Click the OK button twice and then restart your computer.

Disable Fast Startup and check if it works for you.
Fast startup is a new feature in Windows to help your PC start up faster after shutting down. When turned on, Windows does this by using a hybrid shutdown (a partial hibernate) method that saves only the kernel session and device drivers (system information) to hibernate (hiberfil.sys) file on disk instead of closing it when you shut down your PC.
Disable fast startup following the steps below and check if this helps:
- Open the Control panel,
- Search for and select Power options.
- Click on “Choose what the power buttons do”.
- Click on “Change settings that are currently unavailable”. If it prompts click on yes.
- Uncheck “Turn on fast startup (Recommended)” under shutdown settings.
- Click Save changes to configure the settings.

Optimize Windows Visual Effects for Best Performance
According to some answers from the Microsoft forum, many users have resolved the System and Compressed Memory high CPU usage problem by optimizing Windows’ visual effects for best performance. This solution is mostly applicable to fix the 100% memory usage problem because all virtual effects consume more memory.
- Right-click on “This PC” and choose “Properties“.
- Select “Advanced system settings” from the left panel.
- Click on the “Settings…” button in the Performance section.
- Select the “Adjust for best performance” option, and click on “Apply” and then “OK” button.
- Restart your computer and check there is no more high CPU usage.

Repair Corrupted system files
- From the start menu search for command prompt,
- Right-click and select Run as administrator,
- First, run DISM restore health command : Dism /Online /Cleanup-Image /RestoreHealth
- After 100% complete the scanning process, run sfc /scannow.
- This will scan and restore missing corrupted system files from %WinDir%\System32\dllcache
- Restart Windows after 100% complete the scanning process and check there is no more 100% CPU or Disk usage.

Apply if chrome or skype causes High CPU
- Open Google Chrome,
- Navigate Settings > Show Advanced Settings > Privacy > Use a prediction service to load pages more quickly.
- Disable the toggle next to “Use a prediction service to load pages.”
For Skype
- Completely close skype, or end task from Task Manager for Skype.
- Navigate C:\Program Files (x86)\Skype\Phone\
- Right-click on Skype.exe and select Properties.
- Switch to the Security tab and click Edit.
- Select ALL APPLICATION PACKAGES under Group or user names then checkmark Write under Allow.
- Click Apply followed by OK and see there is no more high CPU usage.
Did these solutions help to fix the system and compressed memory high CPU usage, 100% disk usage problem on windows 10? Let us know in the comments below, also read: