Getting Error We couldn’t install Windows 10 update Error 0x8007002C-0x400D While upgrading To Windows 10 Update? You are not alone one, A Number of users Report While Install Windows 10 or upgrading To recent Windows 10, installation Stop With An error We couldn’t install Windows 10 (0x8007002C – 0x400D). The installation failed in the Safe-Os phase with an error during the Migrate-Data operation” error.
Sometimes The Error code Will Be different Like :
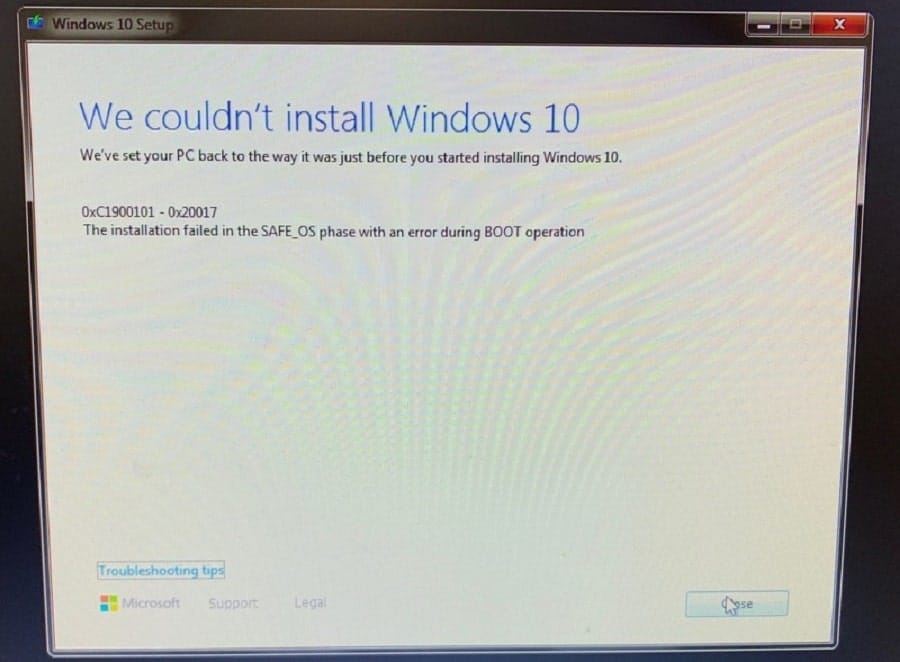
We couldn’t install Windows 10
We’ve set your PC back to the way it was right before you started installing Windows 10.
0xC1900101 – 0x20017
The installation failed in the SAFE_OS phase with an error during BOOT operation
—you may also receive this error code—
0xC1900101 – 0x30018
The installation failed in the FIRST_BOOT phase with an error during SYSPREP operation
We couldn’t install windows 10 0x8007002C-0x400D
If you are also suffering from this Error 0x8007002C-0x400D We couldn’t install windows 10 While install or upgrade. Here we have some working solutions to get rid of this. This Error mostly Occur due to Third-party Application Conflict, Security Software, Disk Drive Errors, not enough storage space, incompatible driver, system file corruption, and more.
Basic Troubleshooting
Uninstall Custom Theme and Theme Patches: Personally, we have notice While upgrade my laptop windows version to Windows 10 November 2021 Update gets this Error. After check and perform Different solutions last we found After uninstall the Custom Theme or Theme patches Windows allow me to upgrade without any error.
If you also have installed any custom theme you should probably uninstall that custom theme and theme patchers. Those will cause issues 100% Theme files need to be updated for every version, so they won’t work unless they get updated. The same goes for theme patches.
Disable Third-party Application
Try temporarily disabling or uninstalling your antivirus software and turning off any 3rd party firewall software you have running and see if the upgrade will succeed. Especially if you are using the Folder Locker application Then Uninstall the same and try To upgrade to Windows 10.
Make sure you have enough Disk Space
The error “The installation failed in the Safe_OS phase with an error during Migrate-Data operation” indicates that the upgrade failed while migrating the data and could be because of the low disk space on your system drive. An upgrade requires at least 16GB of free space to install the 32-bit version of Windows 10 or 20GB for a 64-bit version. So make sure you have enough Disk Space to install / Upgrade Windows 10.
Disconnect External Devices
Sometimes installation problems can be caused by a peripheral that isn’t compatible with a new version of Windows 10. You can quickly avoid any issues disconnecting all unnecessary peripherals, like printers, webcams, especially storage media (e.g., USB flash drive and external hard drive) connected to your computer
Also If you are using a Wi-Fi connection, try switching to a wired connection using a network cable, and disable or uninstall your wireless network card.
Update/Uninstall Outdated Drivers
- Open Device Manager by press Win + R, type devmgmt.msc and hit the enter key.
- This will display all installed driver lists, Look For any Device driver with a yellow exclamation mark, Right Click on it and uninstall.
- Now visit the device manufacturer website download the latest available driver and install it.
Also if you didn’t find any yellow exclamation mark, Then especially Update the Display driver, Network Adapter driver and Audio Driver by right click on it and select update driver.
Reset The Windows Update components
If you are getting this Error 0x8007002C-0x400D We couldn’t install windows 10 While Upgrade to the recent windows version, Then there must be something wrong with the windows update Storage folder (software Distribution folder). Windows have inbuilt Update troubleshooting tool Which helps to find and fix this type of problem itself for you. We recommend first run the windows update troubleshooting tool and let windows to fix the problem for you. If this didn’t help then manually reset the Windows update components.
Run Windows Update troubleshooting Tool
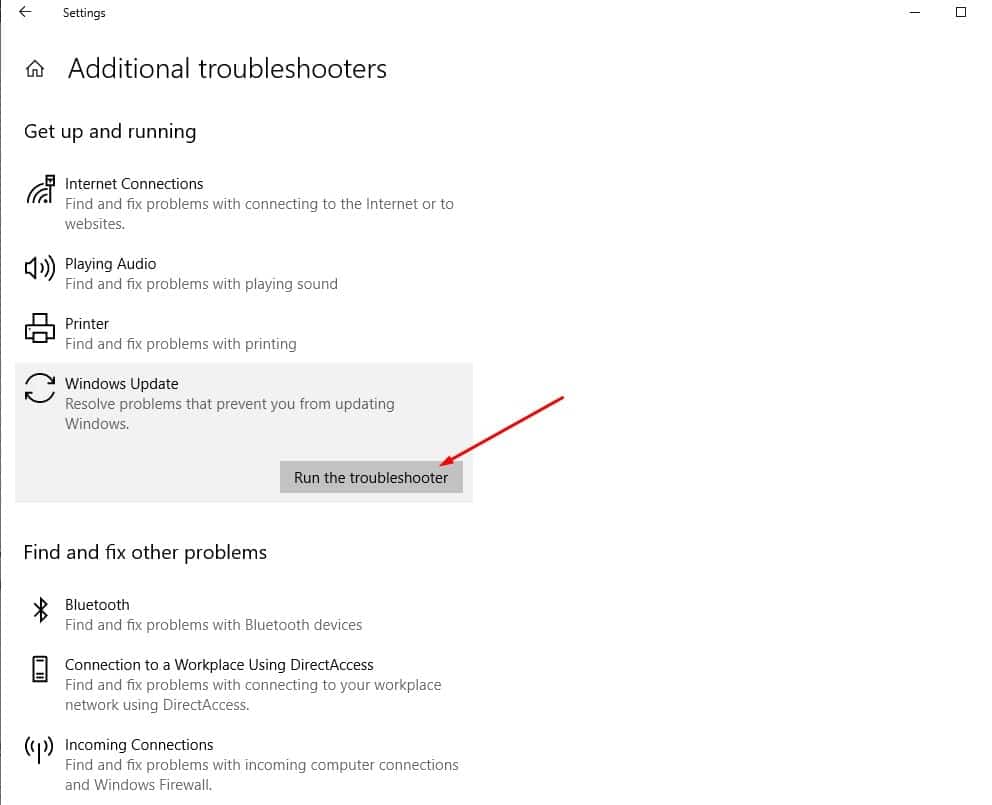
You Can Run windows update Troubleshooter From Windows Settings -> Go to Update & Security > Troubleshoot. Then select windows update and Run The Troubleshooter As shown Bellow image, and follow on-screen instructions.
The troubleshooter will run and attempt to identify if any problems exist which prevent your computer from downloading and installing Windows Updates. After complete, the process Restart windows and again try to upgrade to windows 10 21H2 update.
Reset Software Distribution and catroot2 Folder
Software Distribution folder and catroot2 contain many important Update related files, So if these files get corrupted users may face different Errors while upgrade or install updates. we are going to rename Software Distribution and Catroor2 folder so that windows create New folders and install the fresh files automatically. For this first, we need to stop some windows update related services.
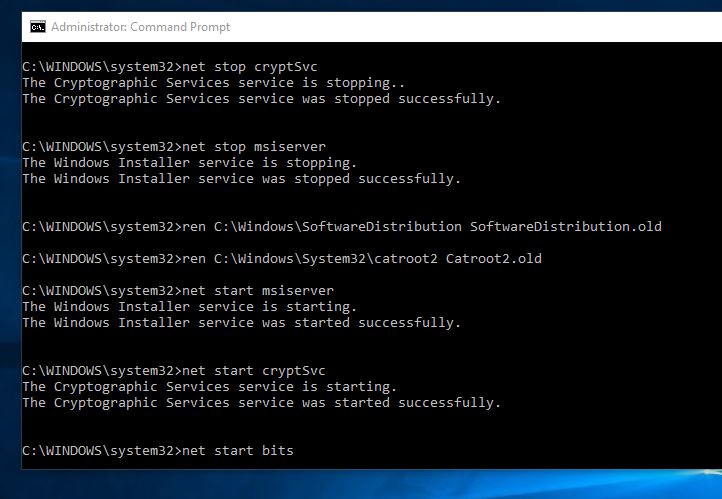
Open Command prompt as administrator, Type and hit the enter key to execute the command net stop wuauserv To disable Windows Update Service. Next type net stop bits To stop Background Intelligent Transfer (BITS ) Service, Again type net stop cryptSvc to stop Cryptographic service and type net stop msiserver To stop MSI Installer service.
Now Type command ren C:\Windows\SoftwareDistribution SoftwareDistribution.old hit enter to rename SoftwareDistribution folder to SoftwareDistribution.old
Again type ren C:\Windows\System32\catroot2 Catroot2.old command to rename Catroot2 Folder to Catroot2.old.
Now Restart the windows update related Services BITS, Cryptographic, MSI Installer, and the Windows Update Service. using following commands in the Command Prompt and hit Enter after each of them: net stop wuauserv, net stop bits, net stop cryptSvc and net stop msiserver.
That’s All Now Restart windows, check for Windows updates from Settings -> Update & Security -> windows update -> Check for updates. After installing Recent updates now try to upgrade the recent windows 10 version. This is the most applicable solution to fix We couldn’t install windows 10 error 0x8007002C-0x400D While upgrade to the recent windows version, I hope this solution fix the error for you.
Repair Corrupted System Files
Most of the time Corrupted system files cause Different errors while run applications, installing updates or upgrade to the recent Windows version. If after applying the above solutions still getting We couldn’t install Windows 10 error 0x8007002C-0x400D while upgrade to Windows 10. We recommend check and fix missing, Corrupted system files with the help of DISM and SFC utility.
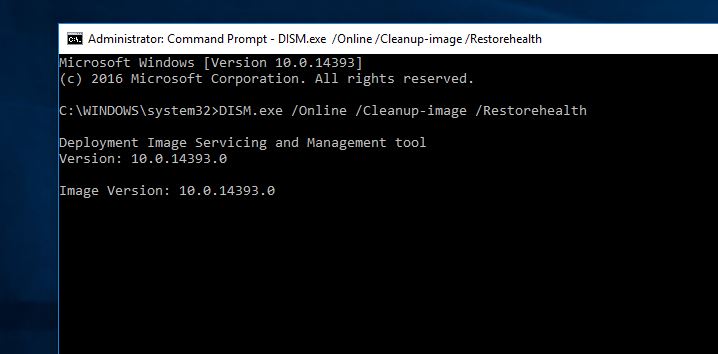
First run the DISM (Deployment Image Servicing and Management) tool, a command-line tool that can be used to service a Windows image or to prepare a Windows Preinstallation Environment. Open the command prompt as administrator, type the command below and hit the enter key to execute the command.
dism.exe /Online /Cleanup-image /Restorehealth
Wait until 100% complete the scanning process, after that run SFC utility To scan and restore missing, Corrupted system files. To run the System file checker utility on the same command prompt type sfc /scannow and hit enter key to execute the command.
Sfc Utility will start scanning for missing, damaged system files, If found any this will restore them from a special folder located on %WinDir%\System32\dllcache. You only have to wait for 100% to complete the scanning process then after restarting windows and again try to upgrade Windows 10, Hope this time complete successfully.
Check disk drive errors
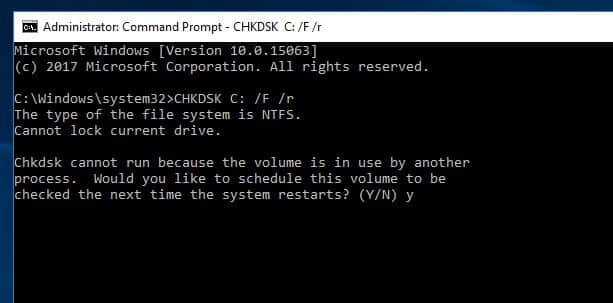
Also If the disk drive has any error or Bad Sectors then This Can cause We couldn’t install Windows 10 Error. If all the above methods fail we recommend check the disk drive for errors using CHKDSK command.
open the command Prompt As administrator Then Type Bellow command And hit the Enter key to execute the command and check disk Drive for the scan repair process.
chkdsk C: /f /r
Command Explained: The Command chkdsk is for Check Hard disk for Errors. /F Fixes errors on the disk and /R Locates bad sectors and recovers readable information.
Chkdsk cannot run when the volume is in use, if this is the case you’ll to type Y and press Enter to schedule a check in the next reboot. On the next restart, the tool will scan and repair the drive automatically. After complete 100% scanning process, this will reboot Windows, Now Start Windows normally and try to upgrade.
Clean disk using diskpart
If you are getting this error 0x8007002C-0x400D We couldn’t install Windows 10 while performing a clean installation, then the clean disk command is very helpful to fix this type of error. Simply boot from the Installation media. ( If you don’t have the create a Windows installation media using media creation Tool )
Insert the Bootable USB / DVD reboot windows, While boot screen press F12 and select Boot from USB / DVD. Now Windows Restart and Ask for Press any key to boot from CD/DVD press any key. Now skip the first screen, On the next screen Press [shift] + [F10] to open the command prompt.
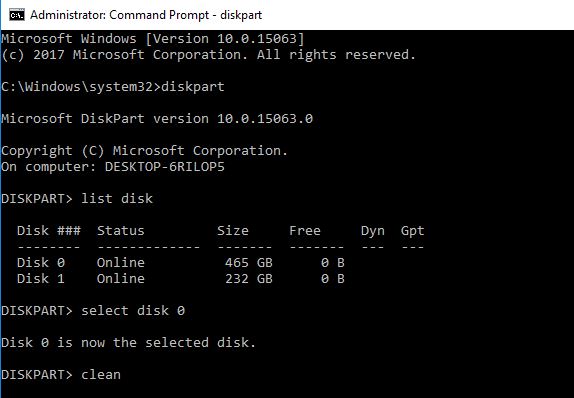
Here type the command disk part hit the enter key. Next type list disk and hit enter to execute the command. Here select The disk by using the command Select Disk 0 And hit the enter key.
Then Type the command clean to clean the drive. (note this will erase all data on the disk) If you look for clean a specific drive then use the command Diskpart -> then list volume -> select Volume 0 ( volume 0 is the Windows installation drive ) then type command clean.
After cleaning the Volume / Drive close the command prompt, Restart windows and again try to perform a clean installation.
Windows Media Creation Tool
If After applying all the above solutions still experience Error 0x8007002C-0x400D We couldn’t install Windows 10. Then you can complete the upgrade process using the official Windows media creation tool. Or create a Windows installation media / Bootable USB device and perform Windows 10 clean installation.
These are the probable best working solutions to fix Error 0x8007002C-0x400D We couldn’t install Windows 10 while upgrade, Or perform Windows 10 Clean installation. I hope after applying These solutions We couldn’t install Windows 10. Still, have any Query, or suggestions about this Error 0x8007002C-0x400D We couldn’t install Windows 10 Feel free to discuss on the comments below.
Also, Read
- Fix pfn list corrupt Windows 10 Blue Screen Error Permanently
- Solved: Windows 10 Critical Structure Corruption BSOD Error (5 Working solutions)
- How to enable or disable the Hibernate Option in Windows 10
- Solved: This app is preventing the shutdown of Windows 10
- How to install Kali Linux on Windows 10 subsystem (Step by step guide)
