
Sometimes you might experience, No internet access or the wifi or Internet connection disconnected after windows update. And you see the frustrating yellow exclamation mark over your network connection icon in Windows. Well the OS offers build in troubleshooter, you can right-click on the network icon on the system tray and select Troubleshoot problems to automatically fix the issue. But few users report, the troubleshooter results, “windows could not automatically detect this network’s proxy settings”.
Internet connection Get disconnected And running My network troubleshooter keeps giving me this message:“Windows could not automatically detect this network’s proxy settings”. I have already tried updating network adapters, set LAN settings to automatically detect settings and reset my TCP/IP but the problem is still not fixed. Please help me : Users reported on microsoft forum
What’s a Proxy Server?
proxy server acts as a middleman between your computer and the internet. With a proxy server enabled when you visit any website The proxy server connects to it, gets the data from it, then relays the data back to you.
Also read: What Is The Difference Between A VPN And A Proxy and how they work?
Windows 10 could not detect network proxy settings
The error can be caused by a change in proxy settings on your system it may be due to an infection or change in system files and network settings or file corruptions that will lead to change in network settings. Again virus malware infection also causes Windows 10 can’t detect proxy settings errors. No matter what causes the error ‘Windows could not automatically detect the network’s proxy settings, Apply the solutions listed below to fix the problem.
- Before starting make sure you don’t have a firewall, VPN, or security suite interfering with your network connection.
- Perform a full system scan with the latest updated antivirus software to detect and remove viruses or malware infections that might be causing or changing proxy settings.
- Check your system date and time and make sure they’re correctly set.
Reboot Your Computer and Router
This error is usually related to misconfigured settings on one computer. Most of the time restarting your computer and router fixes the problem.
- Let’s power off your router/Network switch and shut down the computer.
- Wait at least 30 sec and power on both the router and computer.
- Let’s open the web browser and check if the problem is resolved.
If you reboot your computer and router and the problem hasn’t fixed itself, apply the next solutions.
Check your proxy server settings
Most of the time, Windows could not automatically proxy settings error occurs because users changed the proxy server settings for some reason.
- Press Windows key + R, type inetcpl.cpl and ok to open internet properties,
- Go to the Connection tab and click the Lan Settings button.
- If you do not use a proxy server to connect to the Internet, then the following two checkboxes must be unchecked.
- Use automatic configuration script;
- Use a proxy server for your LAN.

- Uncheck them all except Automatically detect settings options. Save the changes.
- If this did not help, then try also to check off the Automatic parameter definition too.
In Windows 10, the proxy server settings can also be set in Settings -> Network & Internet -> Proxy. Check that everything is disabled there, except Automatically detect settings. As in the screenshot below:

Set to Obtain DNS server address automatically
It’s not just proxy server settings, misconfigured IP address or DNS settings can cause this error too. several users mention, change and set Obtain IP Address And DNS server address automatically to help them to restore the internet connection.
- Press the Windows key + R, type ncpa.cpl and hit the Enter button.
- The network connections window opens, locate and right-click on the active network adapter then select properties,
- Locate and select Internet Protocol Version 4 (TCP/IPv4) and click on Properties.
- In the next window, Make sure you have both Obtain an IP address automatically and Obtain DNS server address automatically selected.

Flush DNS and Reset TCP/IP configuration
This is another effective solution to fix this issue if the problem is occurring due to corruption. Simply open the command prompt as administrator and perform the command below.
- netsh winsock reset
- netsh int ip reset
- ipconfig /release
- ipconfig /renew
- ipconfig /flushdns
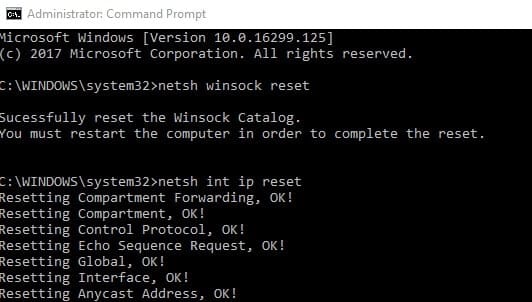
After that Restart the computer to complete this action. Now on the next login check windows restored the network and Internet connection.
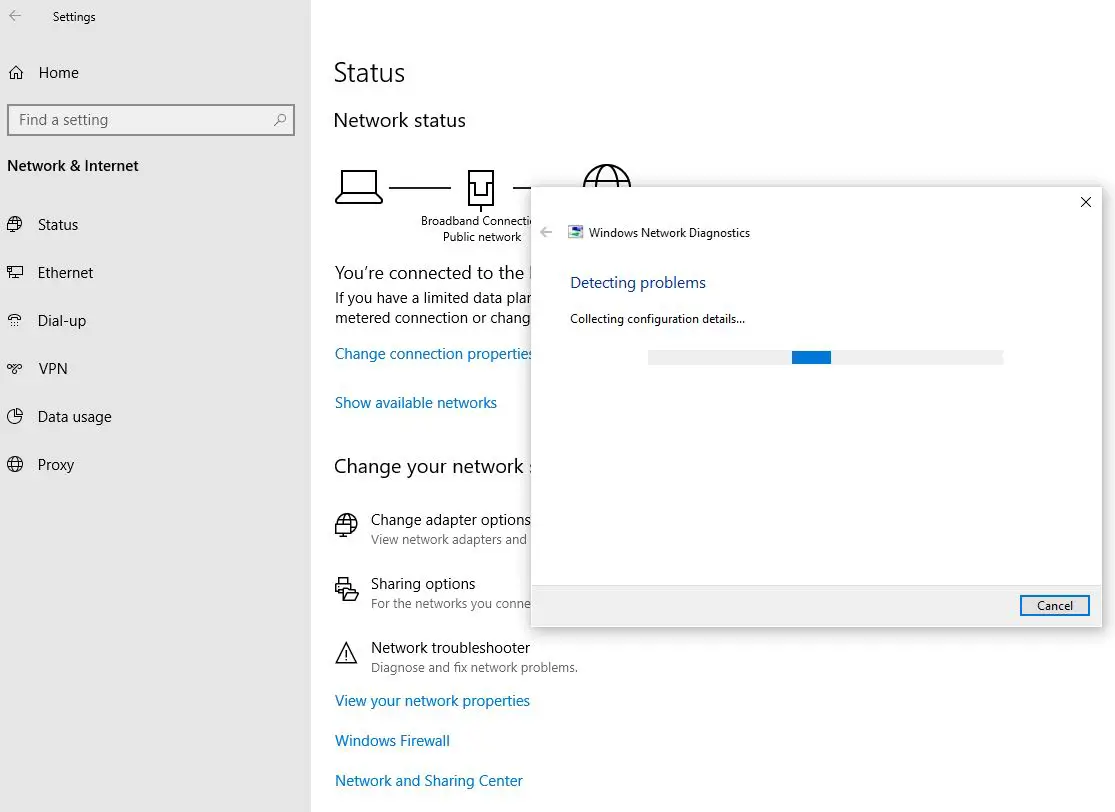
Run windows network troubleshooter
Run the built-in network troubleshooter that automatically detect and fix problems causing the error.
- Press Windows key + I to open settings,
- Go to Network & Internet then click on Network troubleshooter,
- This will start to detect and fix problems that might causing Network and internet problems on your computer.
Network Reset (Windows 10 users only)
If nothing else has worked, then a Network Reset would probably help. This is the most probable solution which reinstalls Network adapters & set networking components to default settings and fixes most of network and internet connectivity problems.
We recommend create a system restore point before performing a network reset.
- Press Windows + I to settings, and Click on Network & Internet.
- Then scroll to the option for Network Reset.
- Click on it and initiate the reset, and wait for the task to complete,
- After which your Windows 10 computer will be restarted. Check on the next login internet connection is restored.

In addition Update your network drivers, and replace the faulty network card, if it exists. And run Run system file checker utility to check and make sure corrupted system files not causing the issue
Did these solutions help to fix “Windows could not automatically detect this network’s proxy settings” on windows 10, 8.1, 7? let us know which option worked for you.
Also, Read