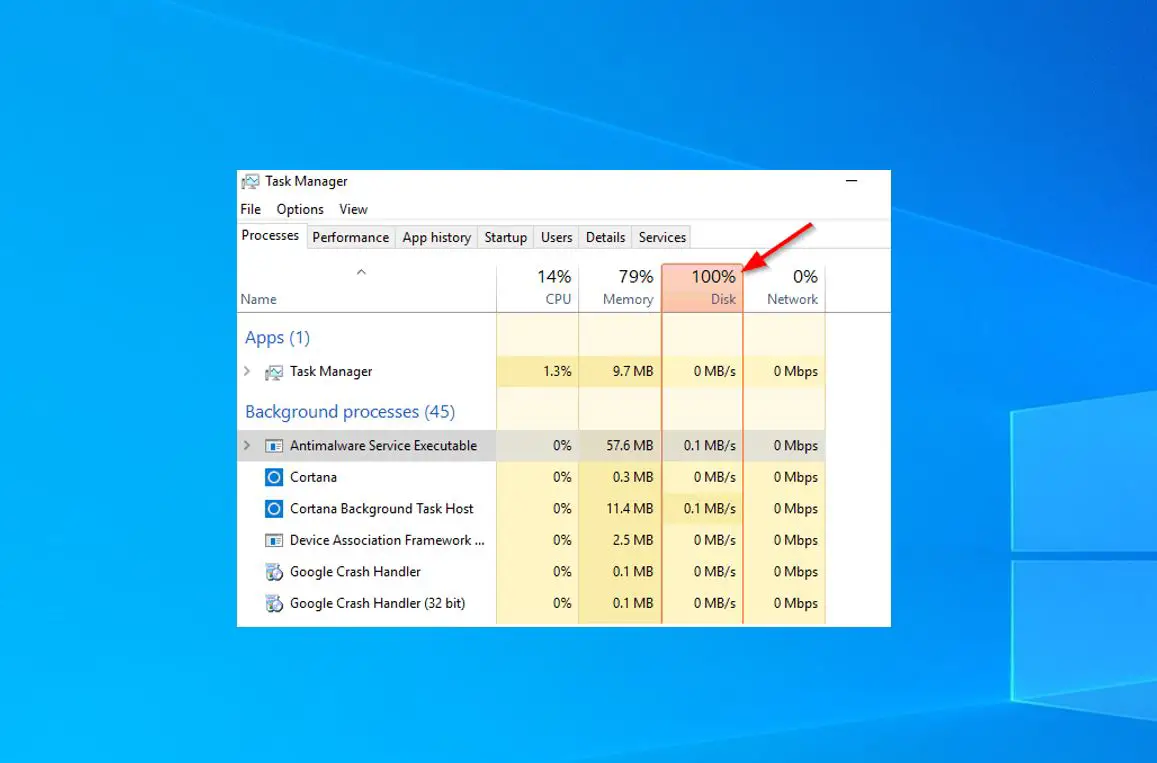
Have you noticed the system gets slow, and freezes after a Windows 10 update? CPU shows extremely high usage (99% or 100%) even if nothing is running in the background. This issue can affect both desktop and laptop users as few others also report Windows 10 freezes, Became Unresponsive, and files, folders or apps won’t open at startup. The reasons may various causing Windows 10 High CPU usage, from a buggy Windows update, System file corruption, incompatible drivers, corrupted registry entry, Virus malware infection and more.
Windows 10 100 CPU usage is really annoying, especially if you don’t actually do anything. Here in this post, we have listed some simple tips that help fix High CPU usage and 100% disk usage on Windows 10.
Windows 10 High CPU Usage
- First of all, restart your PC that helps if any program or service is stuck running and eating up system resources, and that also fix if any temporary glitch causing 100 CPU usage as well.
- Disconnect all external devices such as a printer, scanner, audio jack and check if CPU usage comes to normal.
- It might also be some malicious processes that are running in the background and making Windows think that it’s necessary to utilize CPU a lot. A quick virus check with either defender or Malwarebytes might be helpful.
- Open task manager using the keyboard shortcut, ctrl + shift + Esc, Right-click programs that are taking high memory and CPU usage then Click “End Task” to close selected programs or apps.
Pro Tip: If due to this problem system freezes continuously, didn’t allow to perform any solution that causes start Windows safe mode and apply the solutions below.
If you notice Google Chrome causing High CPU usage then apply the solutions listed here.
Disable Unnecessary Startup Programs
Whenever you start your Windows PC some of the programs automatically get started by themselves without your knowledge. For example, antivirus, Java updater, downloaders, etc. Again Too many startup applications can undoubtedly lead to Unnecessary system resource usage and sluggish PC performance. And disabling these unnecessary programs at the startup will definitely help you to save a lot of RAM / Disk and CPU usage.
To Disable Startup programs
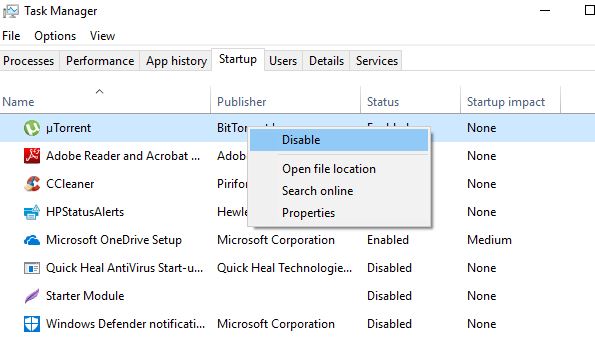
- Open Taskmanager by pressing Ctrl + Alt+ Del key on the keyboard.
- Then Move To the Start tab this will display the list of all programs that automatically run with the PC startup.
- Right-click on the applications that needn’t be run at startup and select “Disable”.
Uninstall unwanted programs
Uninstall as many unwanted preinstalled applications as many you can. Doesn’t matter whether you work on some software or not. But if it is installed on your PC then, it will surely use up space, and consume system resources.
To uninstall unwanted programs on Windows 10
- Press the Windows + R key Then Type appwiz.cpl and hit the Enter key.
- This will open the Programs and Features window.
- Here you see all the programs installed on your system
- Right-click on the program that you want to remove then click uninstall.
Disable Background Apps
- Open the Settings app then click on Privacy,
- Scroll down to choose Background apps
- Here Disable all Background apps.
Also turn off Get tips, tricks, and suggestions from settings -> system -> on the left pane tap on Notifications & actions, then scroll down to toggle OFF “Get tips, tricks, and suggestions as you use Windows”.
Run System file checker
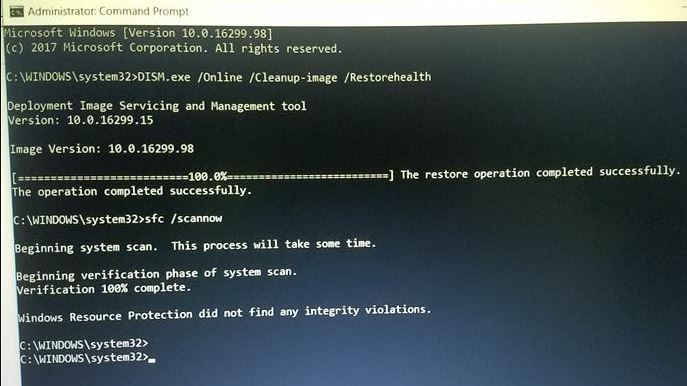
As discussed before corrupted, and missing system files also slow down the system performance. Run build-in DISM and system file checker utility that helps with restore missing system files with the correct one.
- Open the command prompt as administrator,
- First, run DISM restore health command: DISM /Online /Cleanup-Image /CheckHealth
- Wait for 100% complete the scanning process
- Once done run sfc /scannow command that scans the system for missing corrupted system files. If found any the sfc utility automatically restores them with the correct one from a compressed folder located on %WinDir%\System32\dllcache.
Once the scanning process 100% complete restart your PC and check if the CPU usage comes to normal.
Disable SysMain and BITs service
Check if any Windows services causing the high CPU usage.
- Press Windows + R, type services.msc and click ok,
- Scroll down and locate the service named, Background Intelligent Transfer Service
- Right-click on BITs service and select properties,
- Here change the startup type disable Stop the service if it’s running.
- Click apply and ok to make save changes.
Do the Same Steps With Other Services like Search index and Windows updates. And check if the CPU usage dropped.
Adjust Windows 10 for best performance
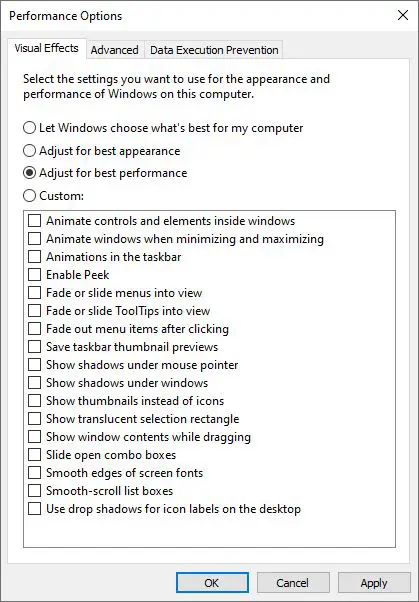
- Search for performance and select Adjust the appearance and performance of Windows.
- Here Under the Visual Effects tab Select the radio button Adjust for Best Performance.
- Click Apply and ok to close and take effect the changes.
Disable Updates From More Than One Place
- Click on the Windows 10 Start button and then click on the Settings icon.
- Click on Update & Security, then click on Advanced Options.
- Choose how updates are delivered link.
- On the next screen, disable or Turn OFF the option to receive updates from more than one place.
Make sure Installed Drivers Are updated
As we already discussed incompatible drivers can result in a memory leak and different system problems, Make the system slower. So it’s important to check and install the latest updated Device drivers on your system to fix all the driver issues
To check and update Drivers’ open Device manager by right-clicking on the Windows Start menu and select Device Manager. Here you can update all the drivers, but the most important drivers which need to be updated are
- Graphics Card driver
- Chipset driver
- Networking/LAN drivers
- USB drivers
- audio drivers
Now expand and right-click on the Driver which you want to update (Ex graphic driver) and select update driver. Or you can visit the device manufacturer’s website and get the up-to-date drivers from there. Check how to update/reinstall the device driver on windows 10.
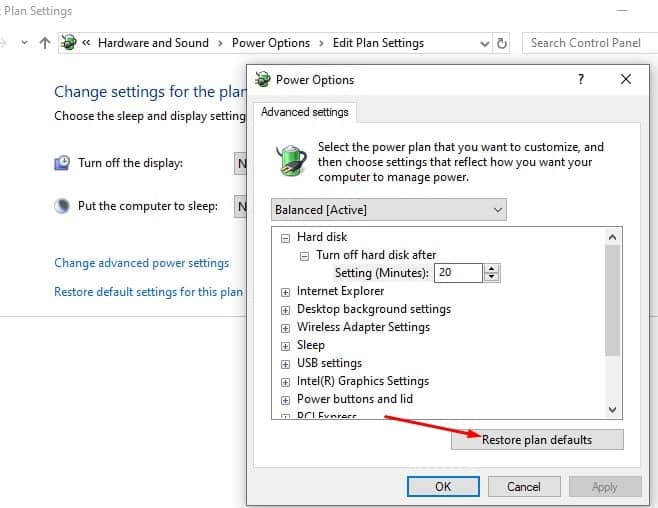
Reset Your Power Plan
Power Options have a significant impact on your PC’s performance. If your computer is on a Power saver, especially if you have changed its’ plan settings, it will cause your CPU to become higher.
- Open control panel,
- Search for and select power options,
- If you’re on “High performance” or “Power Saver,” then switch to “Balanced.”
- Then click Change plan settings which is next to the Balanced.
- Now, you just need to click Restore default settings for this plan and click OK to make the changes.
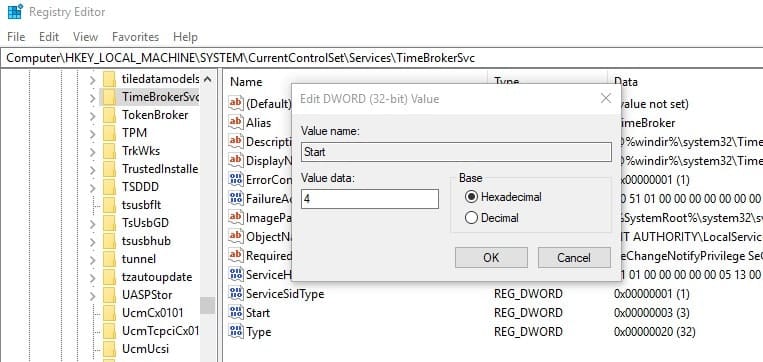
Disable runtime broker
Note: Disabling the Runtimeborker didn’t affect your Windows 10 computer. The Runtime Broker isn’t a necessary process.
- Press the Windows key + R, type regedit and click ok to open the Windows registry editor.
- Now first backup registry database then navigate to the following path:
- HKEY_LOCAL_MACHINE\SYSTEM\CurrentControlSet\Services\TimeBroker
- Here On the right side of the pane, double-click on Start and change the Value data from 3 to 4.
Note: 4 is Disabled, 3 is Manual and 2 is Automatic startup.
Disable System and compressed memory
- On the start, menu search type Task Scheduler and press enter key.
- Now double-click on Task Scheduler Library in the left pane to expand its contents.
- Again expand windows and Click on MemoryDiagnostic in the left pane to have its contents displayed in the right pane.
- In the right pane, locate and right-click on a task named RunFullMemoryDiagnosticEntry.
- Click on Disable in the contextual menu, And close the Task Scheduler.
That’s all now restart Windows and check if there is no more high Disk usage or 100% CPU usage problem with Windows 10.
Also, Read
- How to remove activate Windows 10 watermark permanently
- Fix Windows Cannot Connect to the Printer Error in Windows 10
- Solved: Windows 10 brightness not working (can’t adjust screen brightness)
- Microsoft Windows search indexer high CPU usage Windows 10 !!!
- 9 Ways to Fix 100% Disk Usage Problem in Windows 11
- 8 Ways to fix Windows Explorer High CPU Usage on windows 11
