
After upgrade to Windows 10, you may face at startup windows 10 keeps crashing and freezes continuously. Your Windows PC may have automatically rebooted itself and shown a BSOD screen with some error code. The issues mostly encountered by the users were the incompatibility of hardware and drivers. Because initially they were designed to run on your original Windows before upgrading, and after the upgrade, they transited permanently into the latest Windows 10. This is by far the most common cause of Windows 10 keeps crashing random hangs & freezes problems. On Windows 10 computers when the system becomes unresponsive. (The user cannot do anything on the computer) The only method to get Windows 10 back and work is to continuously press the Power button to completely shut down the system.
Some possible causes behind System crash freezes
There is a various reasons that can cause the issue such as an incompatible outdated device driver, (especially the Display driver ) corrupted system files, HDD error, Third-party application, virus malware infection, Computer or processor is overheating or any external device causing fatal error etc.
Fix Windows 10 keeps crashing problem
If Due to This Problem you are unable to boot windows normally. Unable to perform any Troubleshooting Steps to fix this problem. Then Access Windows Advanced startup options Where you get a number of Troubleshooting Tools like. Advanced System Restore, System Image Recover, Command prompt, safe mode boot Startup repair etc. This Tools will very helpful to fix problems as these windows restart frequently, BSOD error etc.
First Access Windows Advanced Startup Options. Then perform Startup Repair this will fix if any windows startup application causing the problem. You can also refer to the video to perform Startup repair on Advanced startup options.
Boot Windows 10 Into Safe Mode
If Due To This Problem you are unable to boot into windows then use Advanced Startup option to boot Windows 10 into safe mode. Otherwise, if you are able to login to windows follow the below steps to Boot Windows into safe mode. Where you can perform Troubleshooting Steps without any problems.
Press Windows + R, type msconfig and click ok to open the system configuration window. Here select the “Boot” tab and check the box that says “Safe boot.
 Select the radio button that says “network” now click apply and click OK. Reboot your system this will start your system with minimal driver loading. Now In Safe Mode, you can Perform bellow Troubleshooting steps to fix Computer crashes, freezes continuously and Auto Restart with BSOD after upgrading to Windows 10 Problem.
Delete Temp Files
First Delete your computer Temp files to do this press win key + R, type %temp% and click on ok. This will open your local drive Temp file folder. Now use Keyboard Shortcut Ctrl+ A to select all file folders and delete them permanently with Shift + Del.
Perform Drive Disk Cleanup
The built-in Disk Cleanup tool in Windows 10 actually does a decent job of removing unnecessary files on your system. Double-click to This PC on Desktop, right-click on C drive and select properties. On local disk C properties, you will see an option Disk Cleanup, click on it. This will open Disk Cleanup windows with showing calculating/scanning Temporary files, system error dump files etc.
Use the advanced system cleanup to clean up system files. This will again scan the system for temp files, error files and present the same window.

Now on files select all files and click on ok this will prompt Are you sure you want to permanently delete these files? Click on Delete Files.
Perform System File Check ( sfc /scannow)
System File Checker or SFC is a utility in Windows systems that allows users to scan for and restore corruption in Windows system files. Type cmd on the start menu search, right click on the command prompt and select run as administrator. now type sfc /scannow and hit Enter. Wait until 100% complete the verification. After completing Restart the windows. And Check the problem Get Solved if not fallow the next step.

Update Installed Device Drivers
Drivers are essential components of your Windows system. They facilitate communication between the system and all installed programs and applications. They need to be installed and must be up-to-date for smooth computer operations. And sometimes after upgrade, this driver may get compatibility issues with new installed windows. and windows start problem like system crashes, freezes with BSOD error etc. And make sure you have the latest drivers for the below devices.
- Video card
- Network card or router (if present)
- Any removable or external disk drive
Update Graphics/Video Drivers
Graphic Video Driver is an important part of installed drivers. If this driver gets corrupted windows to start BSOD error, Auto restart problem. So make sure you Video Driver is updated
To do this On Desktop Right-click on This PC and select Manage. Now on the computer management window click on devices. this will list all hardware installed on your system. Next, expand Display Adapters it will show the installed graphics driver on your system. Right-click on it this will show options update driver software click on it. Windows will find the best driver for this and install it.

If the problem persists, uninstall the currently installed display drivers download and install the latest driver Download manually from the manufactures website. You need to visit your motherboard/graphics card manufacturer’s website and download the latest chipset drivers for your motherboard.
Update network drivers
Issues with the random freeze on Windows 10 can be caused by your network drivers, especially if they are out of date. If that’s the case, you might want to visit your network adapter manufacturer’s website and download the latest drivers.
You can manually update the driver click on the start menu and type Device Manager. On-device manager window expands Network Adapters select the installed network driver right click on it and select Update Driver software. Select Search Automatically for updated driver software. This will find the latest driver for your system and install it. After installing Restart the windows.
Increase the virtual memory (Paging file)
In Windows Explorer, right-click on the Computer icon (This PC) and select Properties. Now select the Advanced system setting left side on the system properties window. This will open the system properties window. Here select Advanced Tab then click on settings below to performance: visual effects processor scheduling, memory user and Virtual memory. Again on performance properties click Advanced Tab and select Change at the Virtual memory section.
Now Uncheck the “Automatically manage paging file size for all drives” checkbox. Check the “Custom size” radio button. Set the Initial size and Maximum size values to twice of your RAM size in MB* and then press the Set button.
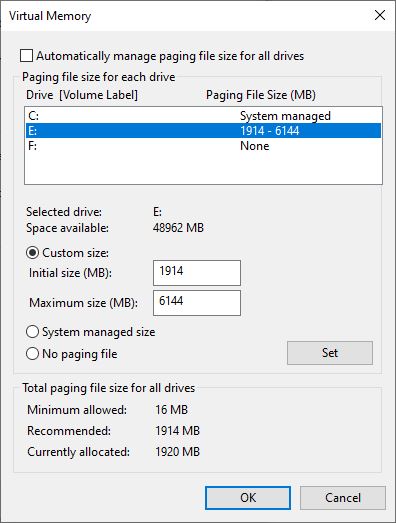
For example: If your RAM’s size is 4GB (4096MB), then type the value 10240 (4096MB x 2 = 8192MB) in the Initial & Maximum size 4096MB x 4 = 16384 (MB) fields. Click ok 3 times to make save changes this will prompt to restart. Restart the windows.
Run the System Maintenance task
you can also run the System Maintenance troubleshooter to automatically fix the system’s problems.
On start type troubleshooting and click on it. This will open Troubleshooting windows As shown below image. You can access the same through Control Panel -> All Control Panel Items ->Troubleshooting. Now click on view all on the left side to control panel home. Look for the tool named System maintenance and click on it. Press Next and then follow the on-screen prompts to run the System Maintenance troubleshooter. Windows will automatically detect issues and try the best solution for the same.
Defragment your system Drive
Defragmenting C: drive is more applicable if you’re still booting off a spinning disk hard drive and not an SSD. SSDs don’t need defragmentation. And unless you’re using a more advanced file system format like EXT4, you’re going to need to do some defragmentation.
1. Click the Start button, then click the File Explorer link
2. Right-click Local Disk C: and choose Properties
3. Click the Tools tab
4. Click “Optimize and Defragment Drive” or on the start menu type defragment
Turn Off Link State Power Management
Link State Power Management is a power-saving mechanism. It has two options, the first one is Moderate Power Savings. Which saves less power but recovers quickly from the sleep state. The second one is Maximum Power Savings. That saves more power and the time to recover from a sleep state is increased.
Turning off this feature will help with blank screens and freezing issues. Especially where NVIDIA/AMD Graphic Cards were being used.
On start menu type powercfg.cpl and click on powercfg.cpl control panel item.
Click Change Plan Settings for your Active Plan.
Then choose Change Advanced Power Settings, scroll down until you see PCI Express. Next click on Link State Power Management and Click “whatever” the option is next to Settings, and set it to Off. Restart windows. This will help to fix this problem.
Enable Fast Startup
Windows 10 came with no shortage of performance improvements. But one of the neatest is its fast boot times. If your machine is taking too long to boot up, ensure this setting is enabled to speed things along.
The feature in question is called Fast Startup. The way it works is when you shut down your computer, rather than just dumping everything in RAM, Windows will save an image of your loaded kernel and drivers in something called the hiberfile. This way, when the system boots up again, it simply reloads this file, making boot times much faster. To enable this, follow these steps:
Search for and open “Power options” in the Start Menu. Click “Choose what the power buttons do” on the left side of the window.
Click “Change settings that are currently unavailable.” Under “Shutdown settings” make sure “Turn on fast startup” is enabled.
Disable Unnecessary Services
Services are very much like programs in Startup, except they can be much more crucial to the overall operation of Windows. There are lots of Microsoft-specific features that are enabled, but there are some that most people don’t need. Have a look through the Services tab and read the description of each one. You can stop service to see if it impacts anything, and re-enable it if necessary. You can also permanently disable a service from starting at all.
1. Right-click the Start button
2. Click Task Manager
3. Click Services
4. Right-click a specific service and choose “Stop”
Especially stopping the windows updates service will very helpful for me.
Remove Virus Or Trojan
A virus or Trojan can cause serious harm to a PC. It might corrupt or remove drivers, delete important system files or change administrative settings. All of these can cause unexpected crashes, freezes or leave you locked out of programs
Download and install the latest updated Antivirus for your system and perform a full system scan.
And use Third-party software like Ccleaner, to optimize system performance. Repair corrupted Registry Entries.
These are some most working solutions to fix Windows 10 keeps crashing at startup, freezes continuously and auto restart with BSOD error. Hope the above steps help to will fix your problem permanently. Have any queries, suggestion feel free to comment below. Also, Read