
Today internet Privacy is something very important for everyone, and some people are very serious about it. If you are using Windows 11 you may aware that, Microsoft regularly tracks your activity by adding unnecessary background services, running active telemetry, needless bloatware to the system. If you are one of those people who worried about your privacy on windows 11, follow this guide and change these 10 settings to protect your privacy on windows 11.
Why does Microsoft collect the user data on Windows 11?
In Microsoft’s Privacy Statement, the company says that some of the data is collected through “your interactions, use, and experiences with our products,” but they also “obtain data about you from third parties.” they use personal data to provide users with “rich, interactive experiences.” This includes using data to personalize products and send targeted advertising to customers.
Which Windows 11 Privacy Settings Should You Disable?
General privacy settings
Let’s start with windows privacy and security settings, that prevent Microsoft from tracking your app launches, learning about your interests, and showing personalized ads.
- Open settings using the Windows key + I
- Go to “Privacy & Security” from the left sidebar and then click on General under “Windows permissions” in the right pane.
- Here disable all the options, which include let apps show me personalized ads using advertising ID, let websites show me locally relevant content by accessing my language list, let windows improve start and search results by tracking app launches and show me suggested content in the settings app.

Turn off Speech recognition
Next disable the Online voice Recognition, to ensure that nothing is heard if we have a microphone. This will prevent Microsoft from sending your voice data to the cloud, thus, preserving your privacy.
- Again Press the Windows key + I to open the Settings app,
- Go to Privacy and security then click on “Speech” (Its under windows permissions)

- And disable the Online Speech Recognition option

Disable Activity History
Previously 2018 with windows 10 Microsoft introduced the Timeline feature to keep track all your activity on your PC, And later it was renamed Activity History. Well in windows 11 it does not show the timeline of your tasks and activities but still Microsoft stores all your activities which is pretty surprising. Well, we can disable this feature to stop Microsoft from keeping track of all your activities.
- Open settings and go to Privacy & security,
- Click on “Activity history” in the right pane.
- Now uncheck the box “Store my activity history on this device”
- After that, click on “Clear” to delete all your activity history sent to the cloud.

Disable location permission
Your location helps apps and websites to deliver you more relevant services. And you need to turn off access to your location on Windows 11. And you can block windows 11 location access with a single click.
This will cause, you should know, that the location system of the device is deactivated, if it is done completely. It is advisable to select the applications that really need it.
- In the Settings menu, click on Privacy & security.
- Under App permissions, click on Location.
- On the following screen, next to Location services click the toggle icon to Off.
Note: If you want to use the location feature on some apps and not others, then keep location services turned on. And then disable location tracking for individual apps under Choose apps that can use your precise location.

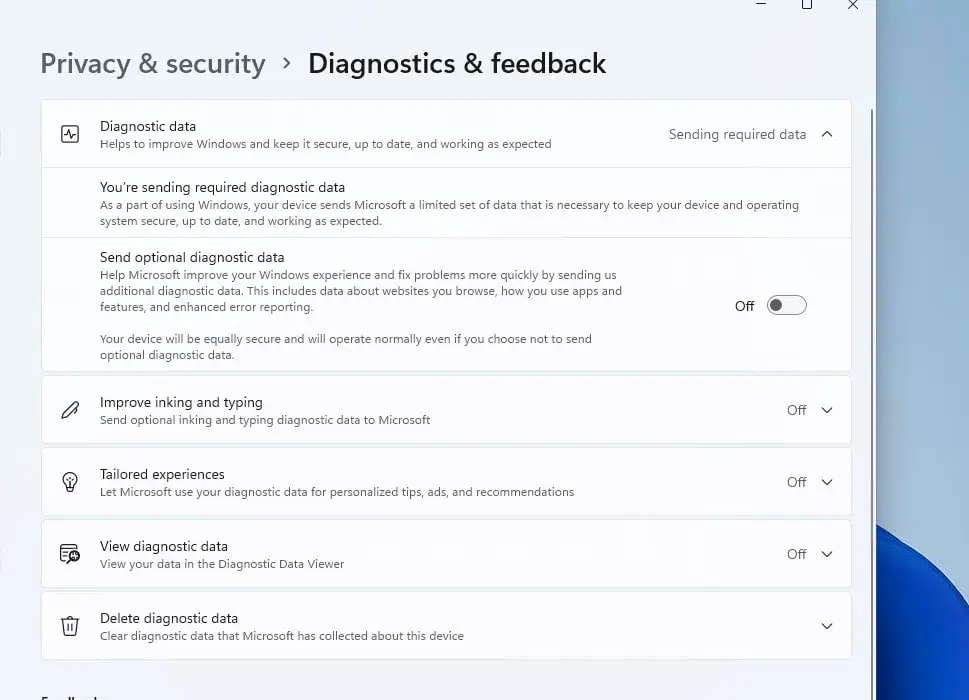
Disable Sending of Diagnostic Data
To improve and secure windows 11 the company sends the limited amount of diagnostic data by default its required. But there is another set of optional diagnostic data which let access your browsing history, how you use an app or feature and more. And you can stop sending these optional diagnostic data to Redmond giant following the steps below.
- Open settings then Privacy & security” and move to the “Diagnostics & feedback” section
- And toggle off the Send optional diagnostic data option.
- In addition also suggest to disabling all three toggles right below, its improve inking and typing, tailored experiences and view diagnostic data.
Change Camera and Mic Permissions
The camera and mic are the most sensitive ones on your device, and you must change and prevent apps from accessing your camera and microphone in the background. Here’s how you can find and change the App permissions:
- Open the settings app and go to Privacy & security option,
- Scroll down and expand the camera option under permission settings, and turn off the “Camera access” toggle.
In case we want to grant permission to the camera for certain applications, we must go one by one choosing the ones we want and the ones we don’t.
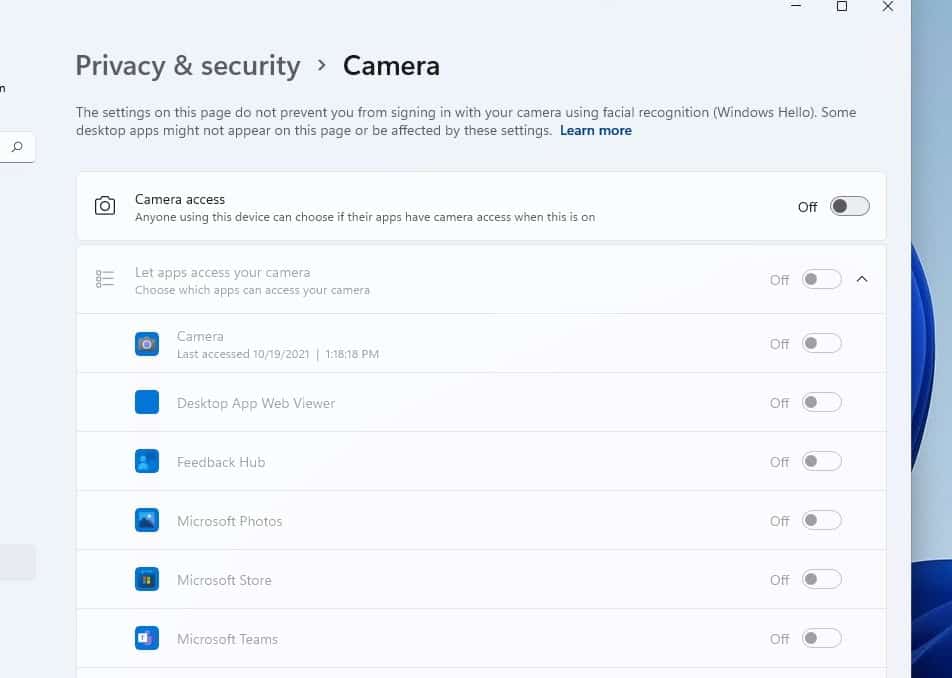
Similarly, open the Microphone permission settings and review, the entire list or disable the Microphone Access option directly.
Switch to Local Account
With the latest operating system, Microsoft pushes users to opt for an online Microsoft account instead of a local account on windows 11. This helps collect more user data and build a monetizable profile of users and target customers with personalized ads. And to preserve your privacy on Windows 11 is to switch to a local account. which will cause Microsoft to not be able to collect information through your activity with that account.
Here is how to switch from a Microsoft account to a local account on Windows 11.
- Press Windows key + X and select settings,
- Go to Accounts then expand the Your info section on the right
- Next click on the link that says Sign in with a local account instead.
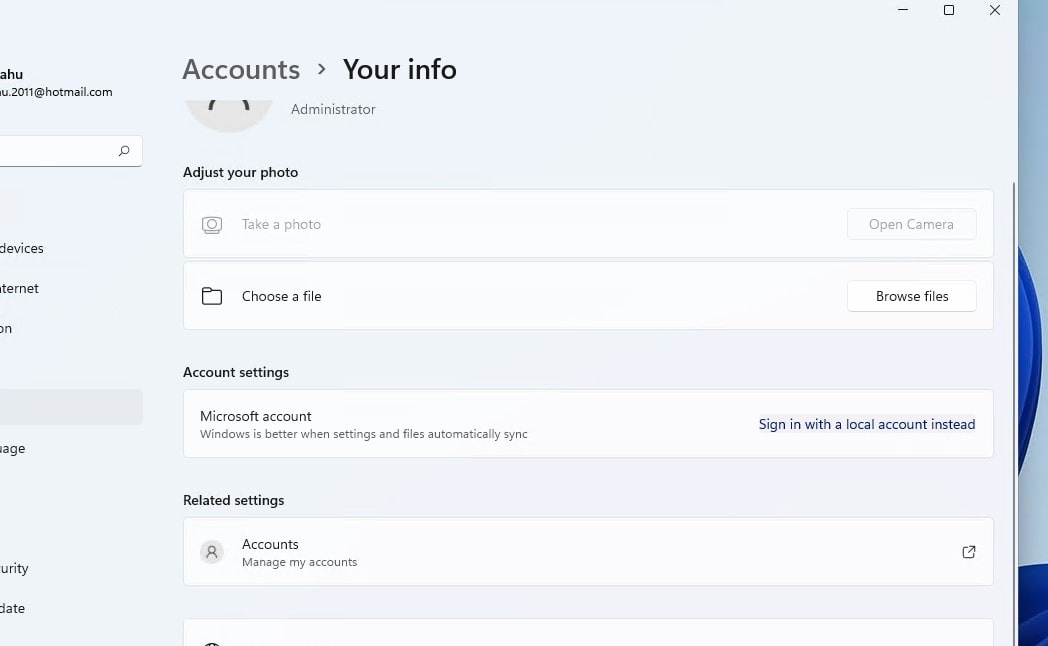
- This will open up a Windows 8-esque pop-up where you have to enter a New user name and credentials for your local account.
- Click next then, click Sign out and finish. And login with the local user account.
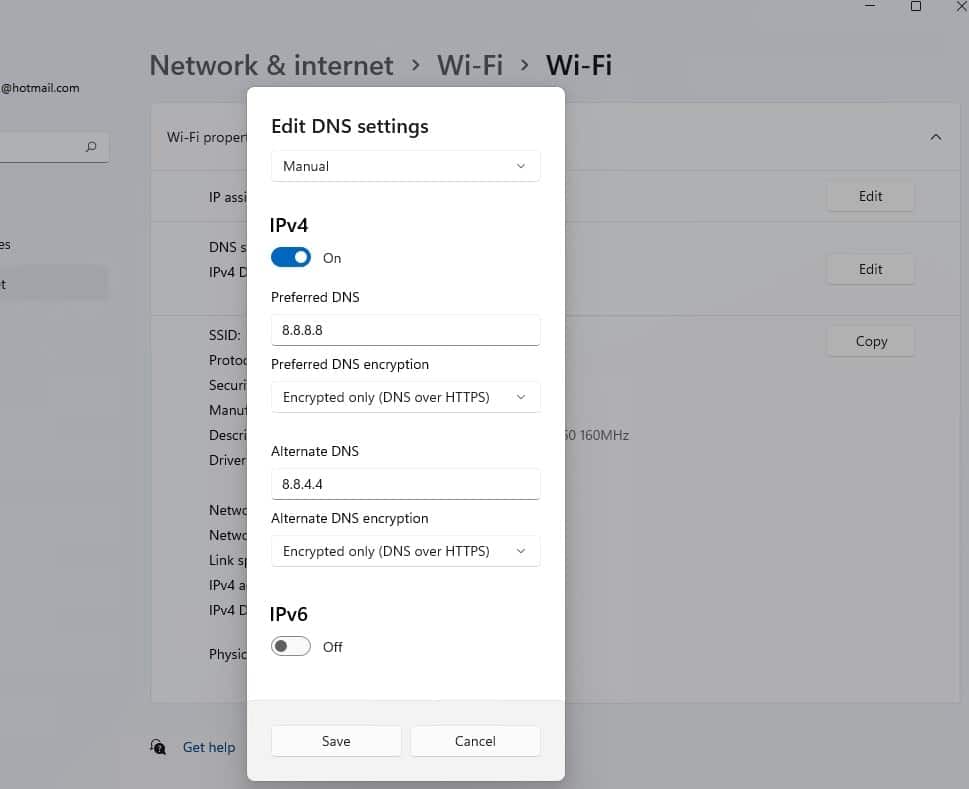
Enable encrypted DNS
This is something interesting you can do to encrypt the web traffic on your computer.
- Open settings then navigate to Network & Internet and select WiFi or Ethernet depending on our connection.
- Go to Hardware Properties, then click Edit next to DNS Server address,
- Here set the preferred and alternative DNS, we recommend use Google DNS which is 8.8.8.8 and 8.8.4.4,
- Now click the drop-down menu under Preferred DNS Encryption and choose the Encryption only (DNS over HTTPS) option.
- We do the same for Alternate DNS Encryption,
- Keep IPv6 turn off, click Save and restart the computer.
Turn On Tracking Prevention on edge
Microsoft Edge is the default browser on Windows 11, it’s one of the latest private browsers available even if you switch your default browser to one that’s more privacy-focused like brave edge will still be used when click on links in windows apps and links in the widgets panel. Enabling tracking prevention will minimize the data collected on you
- Open edge browser, and click on the three-dot menu icon and select settings,
- In the left pane click on privacy search and services
- Here at the very top, if it’s not enabled, toggle on the tracking prevention option,
- Microsoft recommends setting the tracking prevention level to balanced, and the highest privacy level is strict.
![]()
Also, Microsoft Edge collects and stores your information is through Saved data. Avoid letting Edge store your saved data following the steps below.
- Open edge settings then click on Profiles.
- Here expand Payment info and turn off Save and fill payment info
- Personal info, make sure Save and fill basic info is turned off.
- Under Passwords, make sure Offer to save passwords is turned off.
Disable clipboard sync
In additon turn off the clipboard syncing option under settings -> system -> clipboard -> sync across your device.
Another option that we can consider is to install the ShutUp10++ program, which will allow us to disable all types of telemetry, background application access, data collection or suggestions, in a very simple way.
Also read: