Have you noticed laptop won’t shut down or sleep after a recent Windows 10 update? A number of users report clicking on the shutdown button It stuck for hours at shutdown windows with a spinning circle, for a few others the screen and everything goes black, but the computer itself is still on and running and the only way left to shutdown windows forcefully holding down the power button.
Although the possible causes of this problem could be many, the primary reason for the incomplete Windows 10 shutdown is the Hybrid Shutdown feature (also known as Fast Startup). Again incorrect power configuration or any application running background may prevent Windows 10 from shutdown properly. Whatever the reason here are some solutions you may apply to resolve startup and Shut Down related problems including Windows 10 Won’t Shut Down or sleep.
Windows 10 Won’t Shut Down
First of all, be patient and wait a few more minutes, Check windows shut down properly. But if you didn’t see any improvement, the windows is still stuck shut down or black screen which causes try force shutdown windows by pressing and holding the power button for 5-10 seconds till the power goes down completely.
Power reset your laptop computer
- If you are a laptop user then completely shutdown
- Now unplug the power adapter, and remove the battery,
- If you are a desktop user, make sure the computer is power off then disconnect all devices include the power cable, VGA cable.
- Now press and hold the power button for 5 to 10 sec (applicable for both laptop and desktop)
- That all connect everything as previously, add the battery to the laptop and start Windows check if this helps.
Run Power Troubleshooter
Run the built-in Power Troubleshooting tool that detects and fixes problems with computer power settings to conserve power.
- Press the keyboard shortcut Windows + X and select Settings
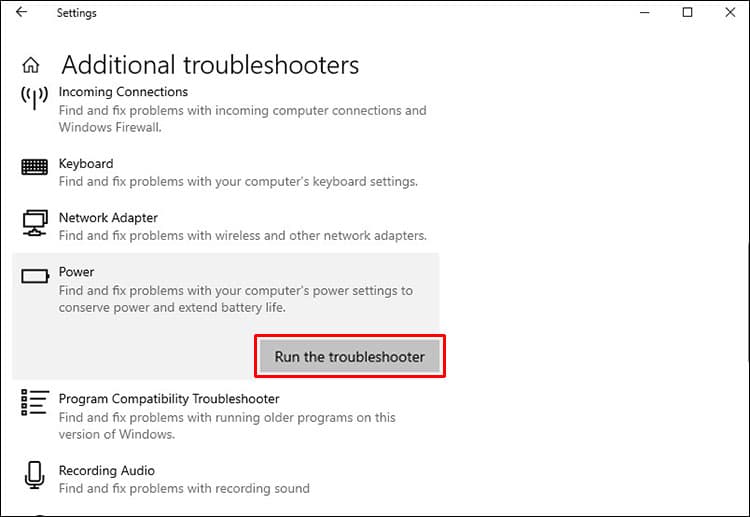
- Click Update & Security then select Troubleshoot and click on Additional troubleshooters
- Here on the middle pane click on Power and run the troubleshooter as shown image below.
- This will check and fix if any incorrect power configuration causing/preventing Windows 10 shutdown properly.
Also from there run the Windows update troubleshooter that detects and fixes if any pending update bug prevents windows from shutdown properly. Once done restart your PC to take effect the changes and check if the problem is fixed.
Disable Fast Startup
The fast startup was first introduced in Windows 8. Now, This is one of the core features of Microsoft Windows which is helpful to boot even faster. But, This cool feature can be a reason for shutdown problems for some older PC or laptops. So, When you face any shutdown issue in Windows 10 or 8.1, It’s recommended to turn off the fast startup feature temporarily.
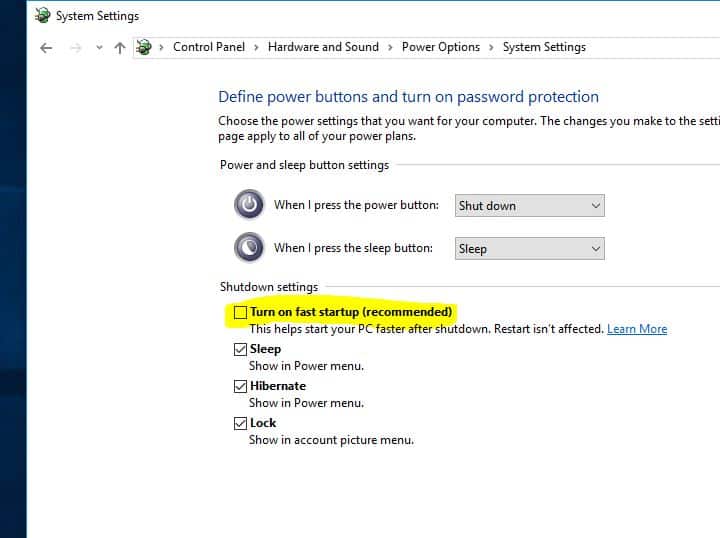
- First of all, Press Windows + X on the keyboard, choose Power Options and click Additional power settings. But, If you don’t see such option there, You can navigate to Control Panel\System and Security\Power Options.
- Now, Click on Choose what power buttons do.
- Then, Click on Change settings that are currently unavailable.
- Now, Uncheck Turn on fast startup (Recommended).
- Save the settings and restart your computer.
- Check, If it fixes the windows won’t shut down properly problem.
Configure on Intel Management Engine Interface
- Use Windows shortcut keys Win + X to launch the Jump List and Select Device Manager.
- Here Expand the System devices entry then Navigate and double-click the Intel Management Engine Interface.
- Choose the Power Management tab (if there is such a tab).
- Uncheck the Allow the computer to turn off this device to save power.
Note: If you are using a desktop computer and may you don’t have the Power Management tab, skip this step and follow the next solution “Update IMEI driver”
Update IMEI Driver
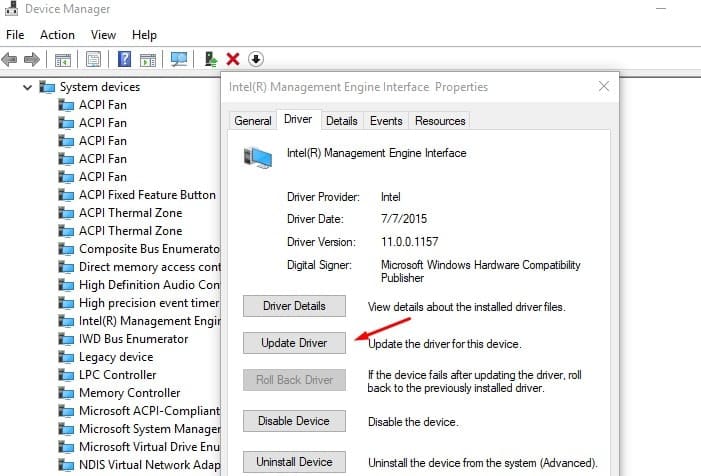
- Again open Device Manager Expand System Devices entry.
- Navigate and double-click the Intel Management Engine Interface.
- Go to the Driver tab of the Intel Management Engine Interface.
- Click the Update Driver button.
In case you have downloaded the driver file from the official website then you can choose the browse my computer for driver software option.
Follow the instructions that display on the screen and update the IMEI driver to the latest version, compatible with Windows 10.
Reset your power plan to default
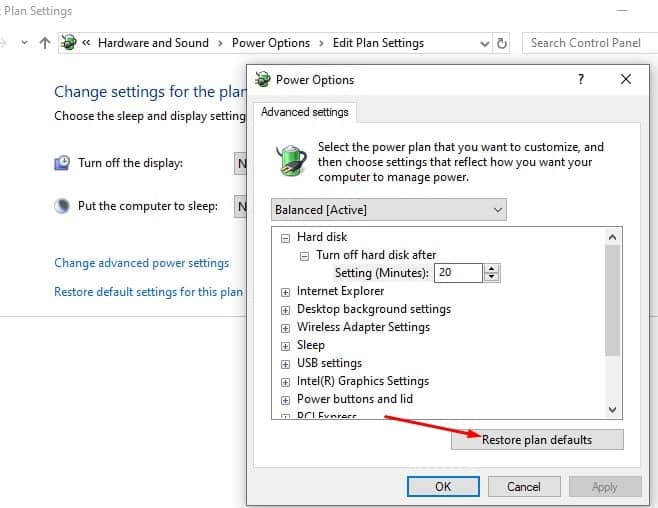
Sometimes the cause of this problem might be your power plan settings, let’s reset power plan settings to default by doing the following which probably helps fix the problem.
- Open Control Panel and go to Power Options
- Locate your current power plan and click Change plan settings next to it
- Next Click on Change advanced power settings.
- A new window opens with the option to Restore plan defaults button click it.
- Now Click Apply and OK to save changes
Uninstall / Install Battery Driver (Only for laptops)
If you are facing this problem on Windows 10 laptop then uninstall and reinstall the battery drive probably helps fix the issue.
- First, completely Shut down your laptop and Detach the power chord
- Now remove the battery (if fixed no need to remove it)
- Attach the power chord and Reboot your computer
- Press Windows Key + X keyboard shortcut and select Device Manager
- Here Expand Batteries > Right-click Microsoft ACPI-Compliant System then click Uninstall
- Now Shutdown the computer and Remove the power chord
- Attach your battery then Attach your power chord and Reboot the computer to automatically install the driver
Fix Corrupted System Files
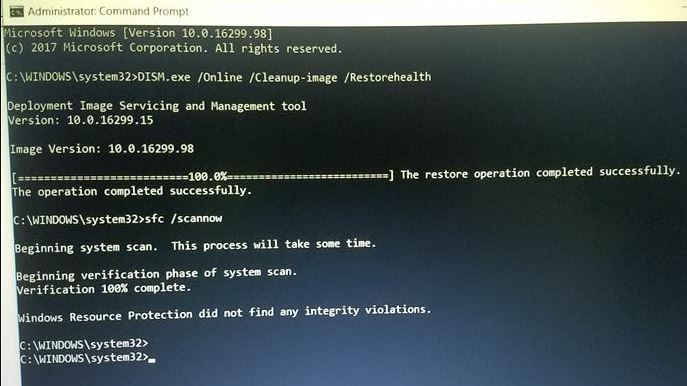
Windows shutdown problems also can be a result of corrupted or missing system files. Running SFC utility and DISM commands can repair these system file issues. This is another working way to fix the Windows 10 won’t shut down properly issue.
Install the latest Windows updates
Also, ensure that your PC is up to date with Windows Updates and there are no pending updates that may prevent Windows from shutting down. You can check and install pending Windows updates by following the steps below.
- Open the Settings app using the keyboard shortcut Windows + I,
- Click Update & Security then Windows Update to allow download and install Windows updates if available.
- Once done you need to restart your PC to apply them
Also, Start windows to clean boot state (where Windows start with basic Windows services and startup programs) To check and make sure any third-party app not preventing Windows 10 shutdown.
If all these solutions failed to fix the issue and still “Windows 10 Won’t Shut Down or Sleep” Then it’s time to use the system restore feature, which reverts Windows to the previous working state where Windows perform smoothly. And as most of the user report performing system restore helps them to resolve Windows 10 Startup And Shutdown problems. check How To perform a system restore on Windows 10.
Did these solutions help to fix Windows 10 Startup and Shutdown problems such As “Windows 10 won’t shut down or sleep“? Which solution worked for you Or any other solution that fixed your problem let us know in the comments below.
Also Read:
- 5 Tweaks to fix Windows 10 slow boot or startup problem
- Solved: “No Internet, secured” Wi-Fi Problem in Windows 10
- Solved: Service Host Local System High CPU Usage In Windows 10
- Solved: Headphones not recognized (Not working) on Windows 10
- Difference Between Recovery Drive and System Image in Windows 10
