


Are you planning to upgrade your Windows 10 PC to Windows 11? Do you want to move your files and data from your old PC to your new one? If so, you might be wondering how to do it without losing any of your important information. You can Move your files to a new Windows PC using an external storage device, cloud storage services, or using Network sharing option. In this article, we will show you some of the effective ways to transfer files and data from one PC to another Windows 11, depending on your needs and preferences.
Windows 11 Transfer Files to New Computer
You can Transfer Files and Data from One PC to Another Windows 11 using:
- Built-in File Transfer tools like nearby sharing or OneDrive Sync.
- Using cloud services, such as OneDrive, Dropbox, Google Drive, or iCloud
- Use an external storage device, such as a USB flash drive, an external hard drive, or a memory card
- Also, you can use a network connection, such as a LAN cable, a Wi-Fi network, or a Bluetooth connection to transfer files and data between computers.
Whether you’re upgrading to a new computer, sharing documents with a colleague, or simply organizing your data, Here is how to Transfer Files Between Windows 11 PCs.
Using an External Storage Device
One of the easiest and most straightforward ways to transfer files and data from one PC to another Windows 11 is to use an external storage device, such as a USB flash drive, an external hard drive, or a memory card. This method involves copying the files and data you want to transfer from the source PC to the external storage device, then plugging it into the destination PC and copying them to the desired location. This method is suitable for small to medium amounts of data, but it can be time-consuming and inconvenient for large amounts of data or frequent transfers.


However, one advantage of this method is you can keep this data as backup in case you are the victim of a problem leading to data loss on your new PC.
- First Connect the external storage device to the source PC.
- Open File Explorer and navigate to the files and data you want to transfer.
- Select the files and data and right-click on them, select the Show More option. Choose “Send to” and then select the external storage device.
- Wait for the copying process to finish and then eject the external storage device safely.
Or you can simply copy the files and folders and then paste on an external device.


- Now Connect the external storage device to the destination PC.
- Press Windows key + E to Open File Explorer and navigate to the location where you want to store the files and data.
- Select the external storage device and right-click on it. Choose “Copy” or “Cut”.
- Right-click on the destination location and choose “Paste”.
- Wait for the copying or moving process to finish and then eject the external storage device safely.
Using a Cloud Service
Another convenient and secure way to transfer files and data from one PC to another Windows 11 is to use a cloud service, such as OneDrive, Dropbox, Google Drive, or iCloud. This method is convenient and secure: you just need to upload the files and data you want to transfer from the source PC to the cloud service, then download them to the destination PC or access them online. This method is suitable for large amounts of data or frequent transfers, but it requires a reliable internet connection and enough storage space on the cloud service.
Using Gdrive:
Sign up for a cloud service of your choice or use an existing account. (For example, Google Drive offers 15 GB of cloud storage for free)


- Install the cloud service app on both PCs or use a web browser to access it.
- On the source PC, open the cloud service app or website and sign in with your account.
- Select the files and data you want to transfer and upload them to the cloud service.


- Wait for the uploading process to finish and then sign out of your account.
- On the destination PC, open the cloud service app or website and sign in with your account.
- Select the files and data you want to transfer and download them to your PC or access them online.
- Wait for the downloading process to finish and then sign out of your account.
Use OneDrive:
Also, you can use OneDrive (A free subscription offers 5GB cloud storage) if you have a Microsoft 365 subscription that includes enough cloud storage. It’s also an ideal solution for users who want their files to be accessible across multiple devices without manual transfers.
- Download and install the OneDrive application on both the source and destination PCs. Sign in using your Microsoft account credentials.
- Drag and drop files into the OneDrive folder, and Files will automatically sync between devices
Using a Network Connection
This is another fast and easy way to transfer files and data from one PC to another Windows 11 is to use a network connection, such as a LAN cable, a Wi-Fi network, or a Bluetooth connection. This method involves connecting both PCs to the same network or pairing them via Bluetooth, then sharing the files and data you want to transfer from the source PC and accessing them from the destination PC. This method is suitable for any amount of data or frequency of transfers, but it requires both PCs to be nearby and compatible with each other.
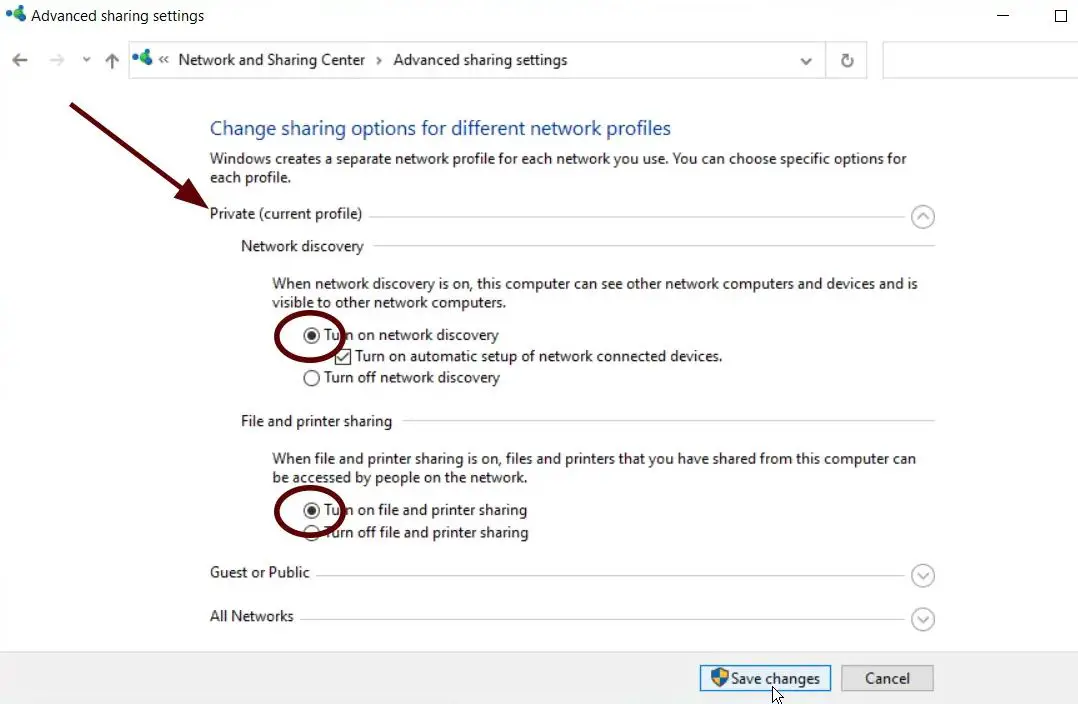
Ensure both device are discovered on the Network:
Before you can share anything on your network, you need to make sure on each of your two PCs that they can be discovered on the network by other machines.
- Press the Windows key + X and select settings, Go to Network & internet then Advanced Network Settings.
- Select, Advanced Sharing Settings, Make sure you are in the Private Networks section, then enable the Network Discovery and File and Printer Sharing options.

Now to share a file or folder on Windows 11/10
- Connect both PCs to the same network using a LAN cable or a Wi-Fi router, or pair them via Bluetooth.
- On the source PC, open File Explorer and navigate to the files and data you want to transfer.
- Select the files and data and right-click on them. Choose “Give access” and then select “Specific people”.


- Choose “Everyone” or select specific users who can access your files and data. Click “Share”.


- On the destination PC, open File Explorer and click on “Network” or “Bluetooth devices”.
- Find the source PC’s name and double-click on it. Enter a password if required.
- Find the shared files and data and copy them to your PC or access them directly.


Using the built-in Nearby Sharing feature
Nearby Sharing, is a built-in feature that allows you to share files and data with nearby devices using Bluetooth or Wi-Fi. This method is convenient and quick: you just need to enable Nearby Sharing on both PCs and then send or receive the files and data you want to transfer. This method is suitable for small to medium amounts of data, but it requires both PCs to have Bluetooth or Wi-Fi enabled and be within range of each other.
- On both PCs, go to Settings > System > Shared experiences and turn on Nearby Sharing.
- On the source PC, open File Explorer and navigate to the files and data you want to transfer.
- Select the files and data and right-click on them. Choose “Share”.
- A list of nearby devices will appear. Choose the destination PC from the list.
On the destination PC, a notification will pop up asking you to accept or decline the transfer. Choose “Accept”. Wait for the transfer process to finish and then open the files and data from the location you specified.
Using a Third-Party Data Transfer App
Also, you can use a Third-Party Data Transfer App such as EaseUS Todo PC Trans, Laplink PCmover, or Zinstall WinWin to transfer files and data from one PC to another Windows 11 quickly. These apps are designed to help you migrate your files and data, as well as your settings, applications, and user profiles, from one PC to another. This method is comprehensive and reliable: you just need to install the app on both PCs and then follow the instructions to transfer everything you want. This method is suitable for any amount of data or complexity of transfers, but it requires you to purchase the app and have enough disk space on both PCs.
Conclusion:
Depending on your situation and preferences, you can choose the one that suits you best. However, before you transfer any files and data, make sure you back them up in case something goes wrong during the process. Also, make sure you scan them for viruses or malware before opening them on the destination PC.
Also read:
- The File Is Too Large for the Destination File System (Solved)
- 3 Tweaks to Increase USB Data Transfer Speed 2024
- Windows 10 “Shared Experience” Nearby share will support Android and iOS platforms
- Windows 11 Laptop Wi-Fi connection issue after update (solved)
- 8 Windows 10 Privacy Settings Change for Maximum Protection
- What Causes ‘Critical_Process_Died’ Error in Windows 11? (Solved)


