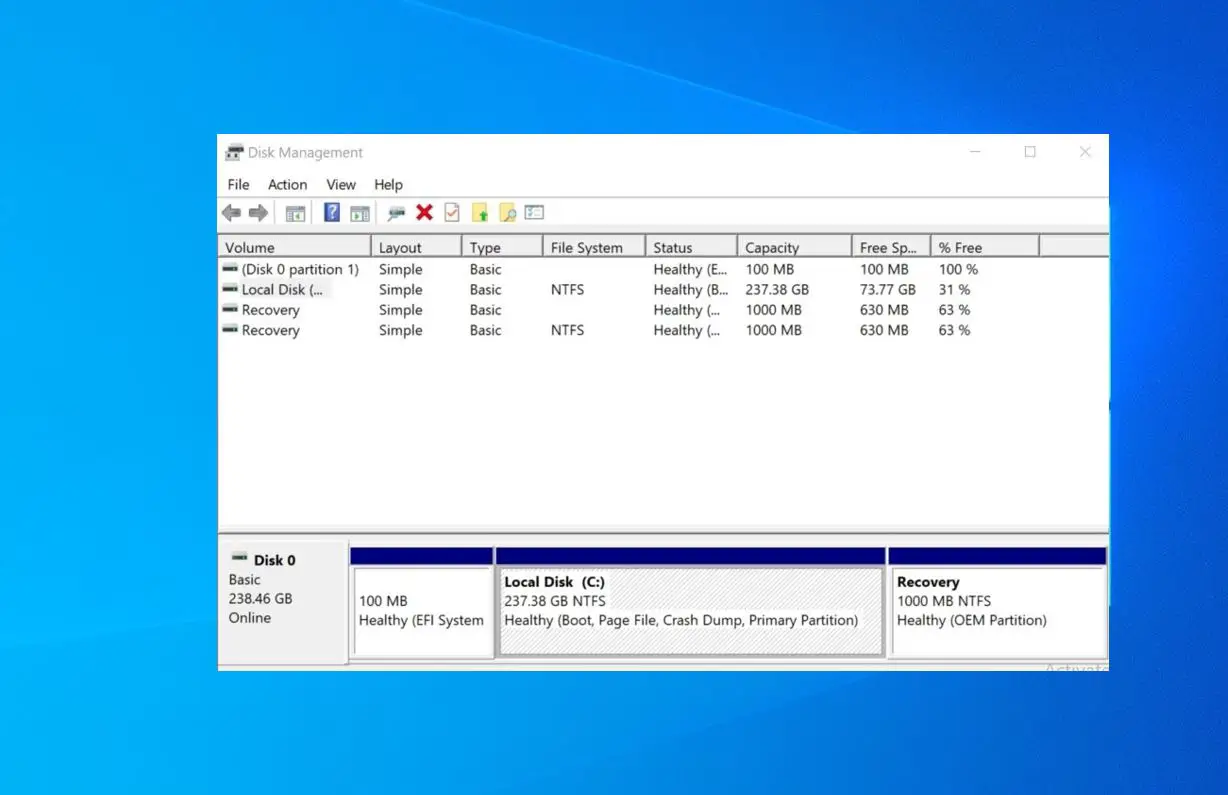
Did you are looking for ways to make partition C drive in windows 10 without formatting the complete disk Drive? Here the complete information How to partition c drive in windows 10 without formatting or without any data loss.
Disk partition or partition is a section of the hard drive that is separated from other segments. Partitions help enable users to divide a computer hard drive into different drives or different portions for a number of reasons. Means by partitioning the hard drive in your Windows 10 laptop or desktop computer, you will be able to create two or more partitions to separate your personal files such as music, photos, videos, movies, documents, etc. from the operating system and program files.
Why do we need to partition our drives?
Generally, Windows 10 operating system and program files are located in the C: drive, and if you have only one partition, for example, C: drive, on your computer with sufficient free space, then you should create hard disk partitions on your Windows 10 computer to make it clutter-free and organized for better management of your files and data.
Normally in 2 causes, we need to make partition the Hard drive. First when you bought a hard drive and want to load an operating system(Windows, Linux, etc) on it and partition the hard drive. (OR) You already have a computer system with OS and want to partition the hard drive using the OS. For example, you purchased a new laptop with preinstalled Windows 10, which contains only one drive C.
If you are planning to install windows OS, then when you are installing windows (formatting your system), a dialog box will appear which will have options containing disk partition tools. So There you can easily make partitions.
But come to the cause 2 When you got a new laptop with preinstalled windows 10 and there is one drive C. So Here the solution how to partition c drive in windows 10 without formatting or data loss.
Note: below steps Also applicable to partition C drive in windows 10, 8.1 and 7 PC.
How to partition your PC’s hard drive
The best way to create partitions in Windows 10 is using the operating system’s built-in ‘Disk Management’ snap-in or with the help of the ‘DISKPART’ command-line tool. First Lets see how to partition c drive using built-in ‘Disk Management’ snap-in.
First, make sure you have enough space on the drive that wants to partition, it’s pretty simple to check that.
- Press Windows + R, type compmgmt.msc and ok to open Computer Management console.
- Then on the left-hand side under “Storage” we want to select “disk management”
- It will take a couple of seconds to get the information it needs from your drives.
- At the top, you will see drives connected to the PC, including any USB flash drives and hard drives you have connected.
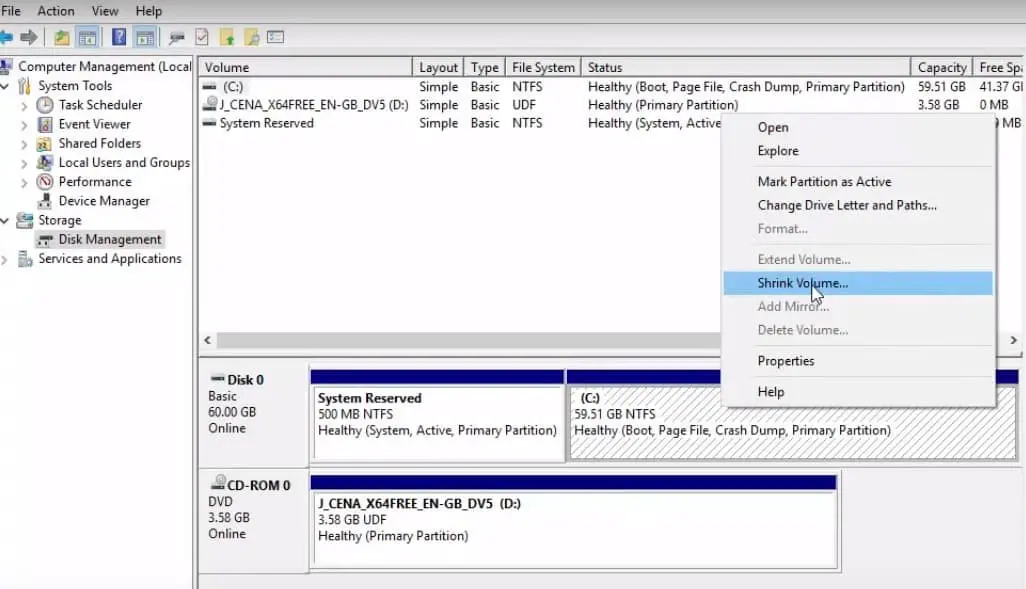
- Select the drive you want to make partition in my case it’s the “C” drive.
- Right click on the drive and select “Shrink Volume.”
- It will take a few minutes to figure out how much you’re able to shrink.
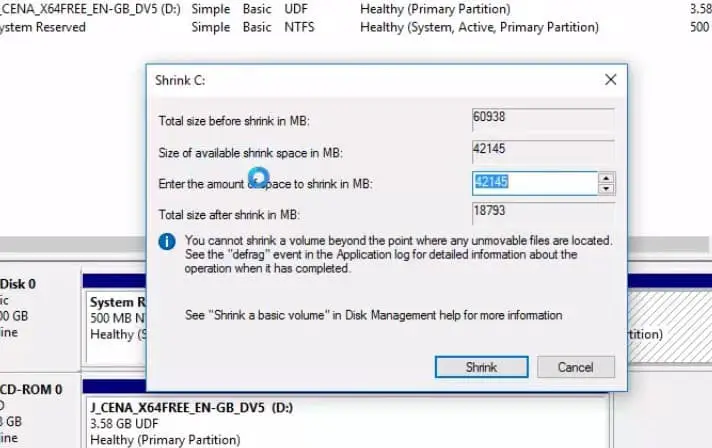
- You’ll be prompted to enter how much space you want the volume shrunk by in megabytes.
- You naturally can’t enter more space than you have free, and you’ll need to have a think about how you’re going to be managing your space between partitions.
- “Enter the amount of space to shrink in MB” this is how big the new partition will be, it’s done in MBs so, if you want a 2GB partition, you would type in 2048 – simple.
Once we have entered a decent size for the new partition, hit “Shrink” it may seem like the computer has frozen, don’t worry it hasn’t – try to reframe from using the computer at this point as it’s working on your hard drive, And don’t worry about Data loss, Partition loss etc it doesn’t happen.
Create New Volume
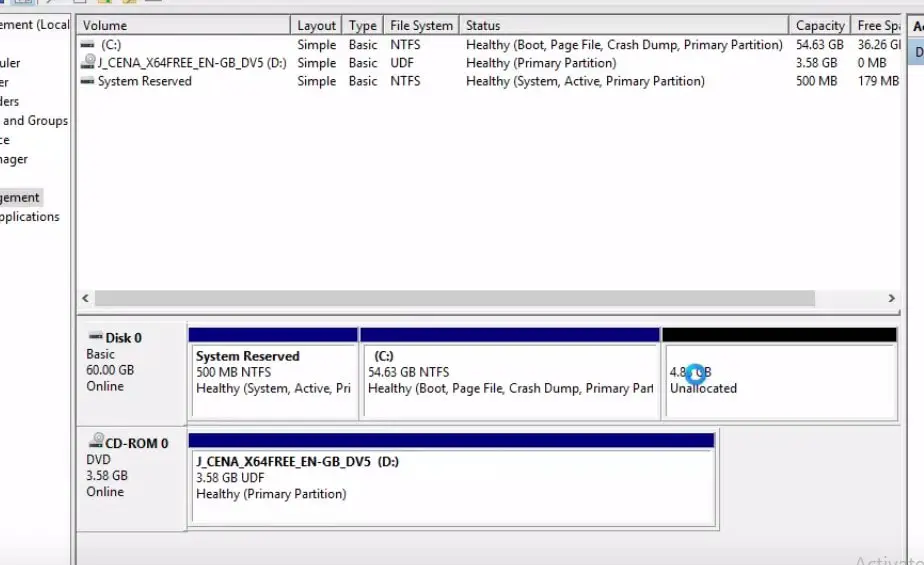
- Now you see a blank box that’s marked “Unallocated” this is our fresh new partition waiting for us to format it.
- Right click the BLANK UNALLOCATED space box and click “New simple volume”
- now we have the wizard to name and format our new partition.
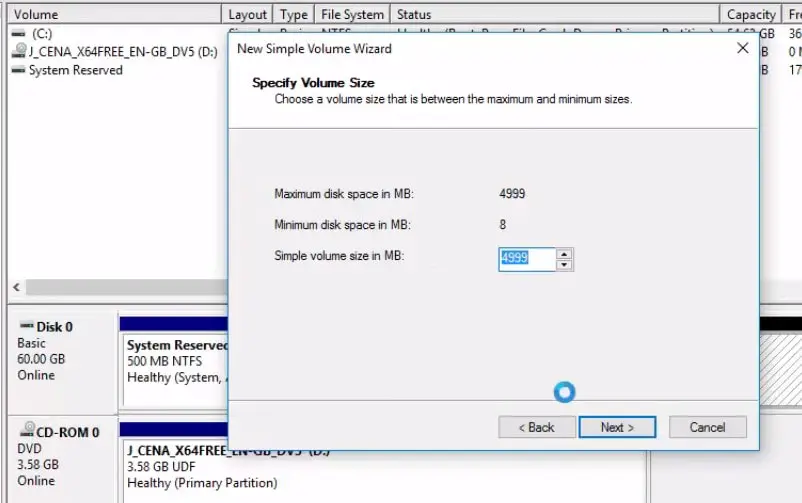
- On the next screen, we then get to specify the volume size.
- It should be the size we shrunk from the first partition earlier, if that’s all good, hit next again.
- You can now choose a drive letter, this doesn’t matter too much.
- Be creative here if you want, in my case I’ll be boring and leave it at “E” and click next.
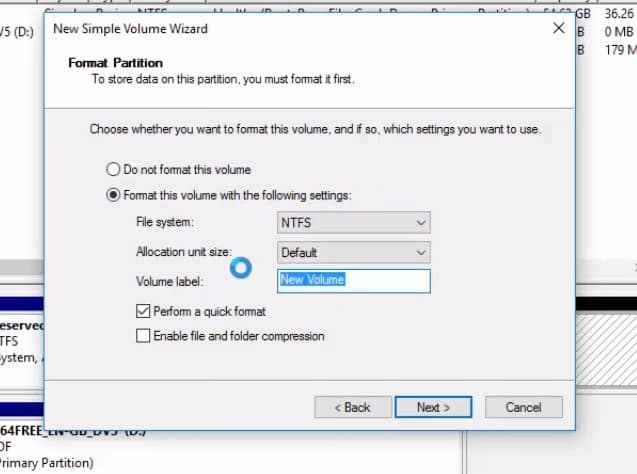
- Now we have 3 options to play with here, File System, Allocation unit size, and Volume label,
- Depending on what you want to use the drive for, you can change the file system, leave the allocation unit size as Default and you can call it whatever you so desire.
- And below the Volume label box you should have a checkbox with “Perform a quick format” make sure this option is selected.
- Which performs a quick format, as it’s a fresh partition, a normal format wouldn’t really do much here, so we can leave that ticked, press next, check everything is in order in the text box and hit finish.
- The PC will now spend a few seconds getting your new partition ready.
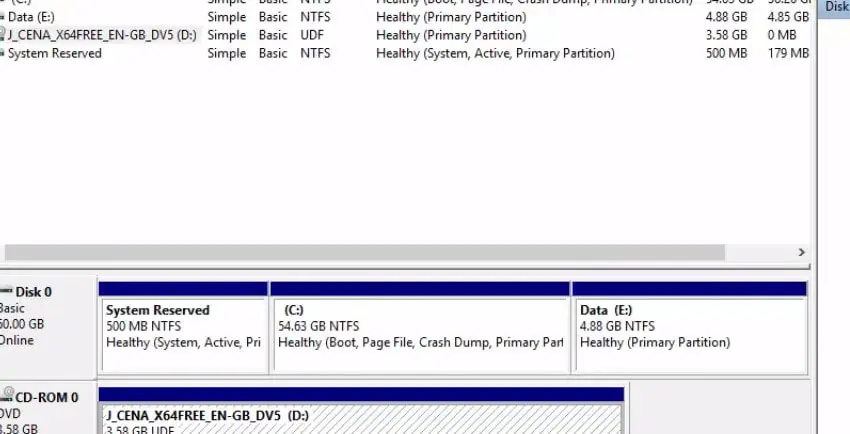
- Once it’s all done, you will find that the blank box has disappeared and now has your volume name, drive letter and size.
- We’re done in this screen now, let’s head into “Explorer” and see if our new partition is showing up, if all is well, we should now have our new partition, easy as that.
That’s all you have successfully partition c drive in windows 10 without formatting or any data loss. Now If you want to try a new operating system without overwriting your main Windows drive, you can do this partitioning the hard drive. If you find any difficulty while performing these steps feel free to discuss on comments below.
Also, Read
- 5 Tweaks to fix windows 10 slow boot or startup problem
- BitLocker | BitLocker To Go drive encryption Feature on windows 10
- Complete Laptop Buying Guide 2019 – Specifications of a Good Laptop
- Difference Between Recovery Drive and System Image in Windows 10
- Google Chrome Slow, Not perform well on Windows 10? Try these solutions
- Fix the disk structure is corrupted and unreadable windows 10
