Most of the users notice Running low on disk space problems After upgrade to Windows 10 From Windows 8.1 or Windows 7. Or Even the same problem after upgrade to Windows 10 21H2 update. That’s because Windows installs a completely new version and keeps the old one around named windows.old folder. This copy is a safeguard mechanism in case something goes wrong during the installation process. Or just in case you want to go back (downgrade) to the previous version. If everything is working as expected after upgrading to Windows 10 version 21H2, you probably don’t need these files, And you can Delete windows.old folder as they will just be wasting precious hard drive space.
Contents
What Is the Windows.old Folder?
When you upgrade from the old Windows version to Windows 10 22H2 update, the software retains a copy of your old operating system just in case you want to revert. It can be used to restore your system to the old version of Windows if you don’t like the new version. You’re left with at least 15GB of wasted space on your hard drive, all of it stored in a folder called Windows.old. It contains files from your previous installation of Windows, which were either not required or can’t be used with the new version.
Delete Windows.old Folder
If you decide that you’re happy running Windows 10 current version 21H2 and don’t want to roll back. Then you can simply delete the windows. old folder to the same hard disk space. But If you simply try to delete the Windows.old directory in File Explorer, the system won’t let you remove most of the files because it considers system files. File Explorer will result in a lot of permission denied errors. Because this is a special folder that can only be deleted from the disk cleanup application.
This Windows.old folder contains the following folders from your old Windows installation:
• Windows
• Documents and Settings
• Program Files
Using the Disk Cleanup tool
- Click on the Start Button and type in Disk Cleanup and Click OK.
- Change the drive if your Windows disk is not already selected.
- Or you can open This PC Right click on Windows installed drive ( mostly its C drive ) and click on properties.
- Here click on Disk Cleanup.
- This will scan system error memory dump files, Memory dump files wait flew moment.
- When the Disk Cleanup utility has loaded, click on the Cleanup system files button under the Description section.
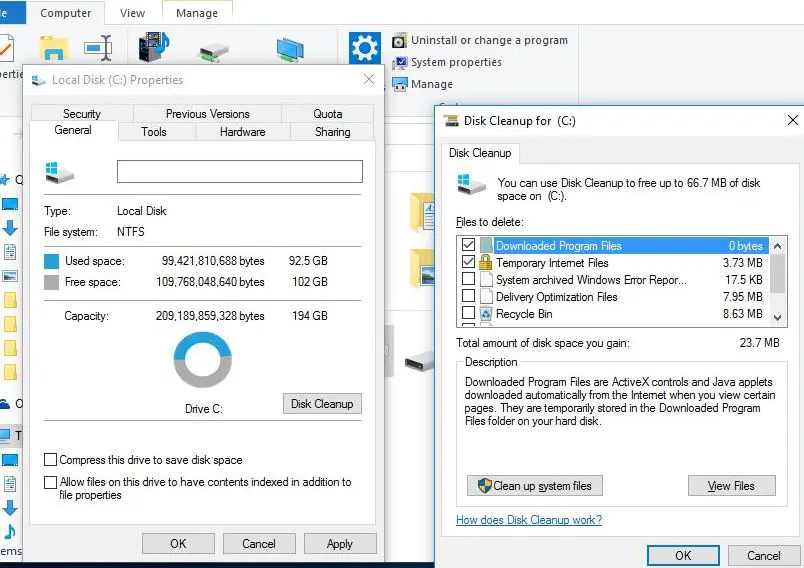
- Click OK again when the drive letter is displayed.
- The Disk Cleanup window will appear again.
- After the utility scans your computer, scroll through the list and check the box next to Previous Windows installation(s).
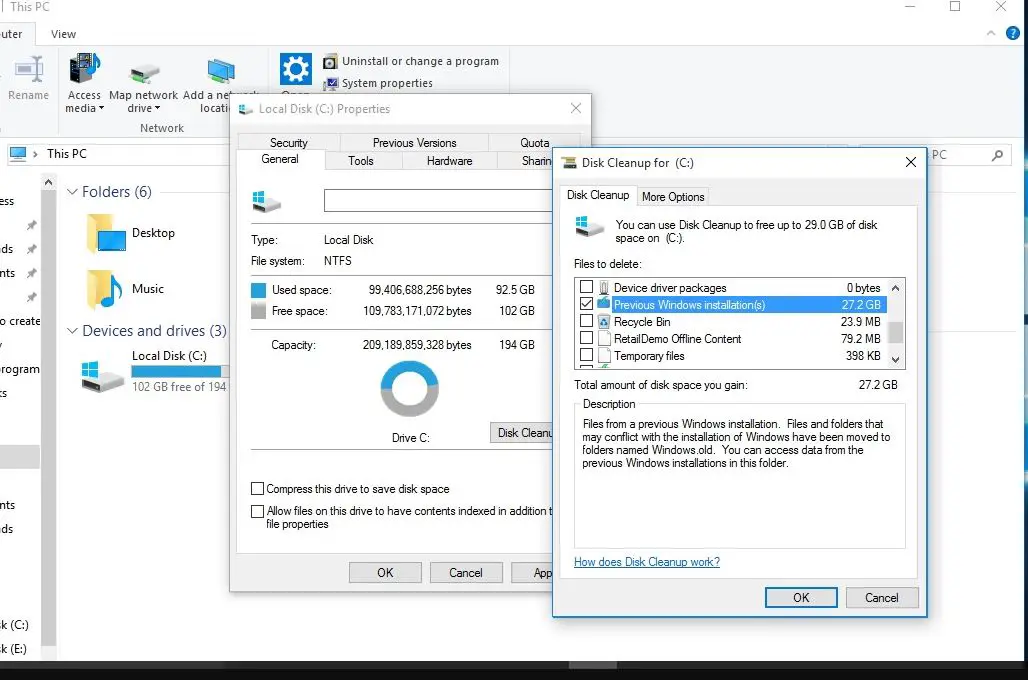
- Click OK, and then click Delete Files on the confirmation screen to proceed.
- As the Disk Cleanup utility begins processing, you will be prompted once again before the old Windows installation files are deleted.
- Click yes when prompted.
- The delete process will take some time after it is completed, the Disk Cleanup utility will close and files in the Windows.old folder will be removed freeing up a significant amount of disk space.
Using Command Prompt
You can also use a command prompt to delete files and folders from an earlier installation of Windows. To do this, Run ‘Command Prompt as administrator.
First, you will need to take ownership of this folder, so at the command prompt, type the below commands one after one and hit the enter key to execute the command.
takeown /F C:Windows.old* /R /A
cacls C:Windows.old*.* /T /grant administrators:F
After running this command, administrators are granted full rights to all files and to all folders.
Now Type below Command and hit enter key to Delete The Windows.old folder
rmdir /S /Q C:Windows.old
This will delete the windows.old folder.
We suggest leaving Windows.old folder where it is until you’ve made sure you’re happy with your upgrade, and all your files and settings are in place.
Also read:

