Windows 10 includes a number of improved features including updates to Hyper-V virtualization. Virtualization is the creation of a virtual (rather than physical) version of an IT environment, including an operating system (OS), a storage device, etc. Virtualization takes place on the same hardware platform after installing specific software known as a hypervisor. The hypervisor is an additional layer between physical and virtual spheres. It manages the system’s hardware resources so they are distributed efficiently among virtual machines Installing an OS on a VM. If you are looking for virtual machine on your computer Here follow this post to enable hyper v windows 10.
Using Windows 10’s built-in Hyper-V is easy as doing it in other VM programs like VirtualBox or VMware. The beautiful thing about this is, you don’t need to install third-party software first. Let’s See How to it works.
Enable hyper v in windows 10
Before Enable or configure Hyper-V feature on your Windows 10 computer first Check The Minimum System Requirement for Hyper-V.
First, ensure that you have one of the operating system editions that support Hyper-V
- 64-bit Operating System
- Windows 10 Pro or Windows 10 Enterprise
- 64-bit processor, CPU needs to support Second Level Address Translation (SLAT)
- Minimum 4GB system RAM
- BIOS-level Hardware Virtualization support
Note: Hyper-V isn’t available in Windows 10 Home edition.
Verifying Hardware Compatibility for Hyper-V on Windows 10
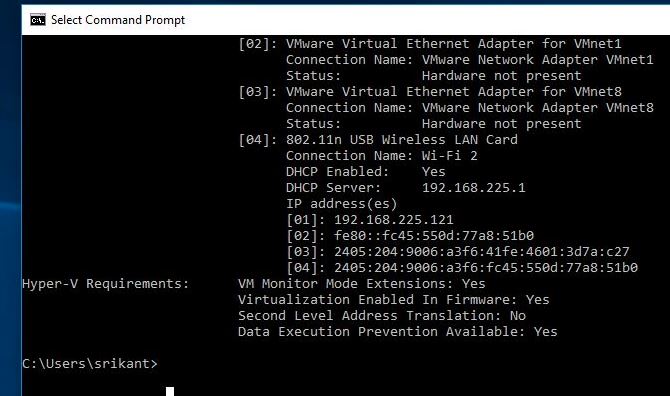
To Verify your installed Hardware Devices are compatible with the Hyper V Feature First right click on windows 10 start menu and select command prompt (Admin). Now When the command prompt opens type systeminfo.exe and hit the enter key to execute the command. If your system is hardware compatible, you will see the Hyper-V related entries.
After performing the command check all of these requirements have a value of Yes, then your system is ready for Hyper-V installation. If some of these values have a value of No, such as Virtualization Enabled in Firmware and Data Execution Prevention Available. Then you may have to enable them in your system BIOS.
Enable Hyper V in Windows 10 BIOS
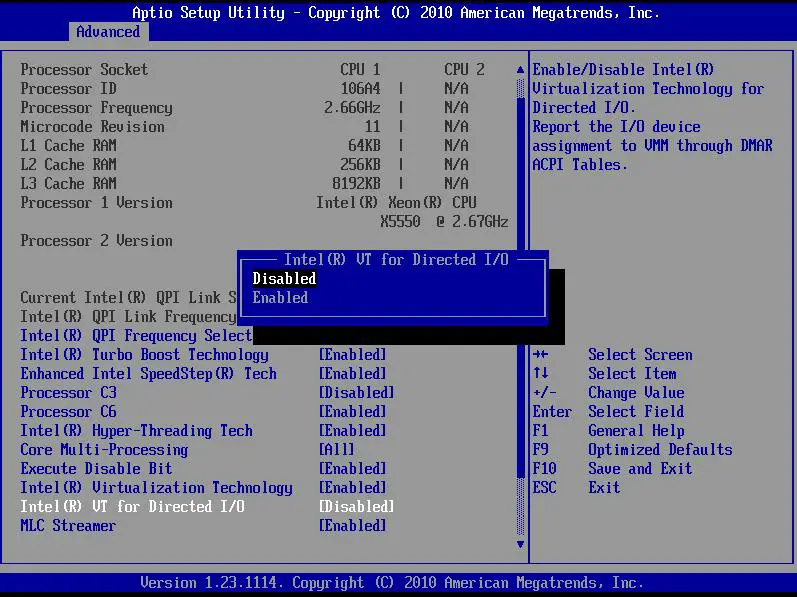
To Enable The Virtualization on BIOS first Restart the computer and enter BIOS setup (usually by pressing Del, F2, F10 or F12 key) on your keyboard before the computer loads the Windows operating system. Select my language Then select Security > System Configuration and Make sure the following are enable otherwise Enable it.
Save BIOS settings (press F10 key). Restart the computer, wait for a few seconds and start the computer.
Enable Hyper-V from Windows Features
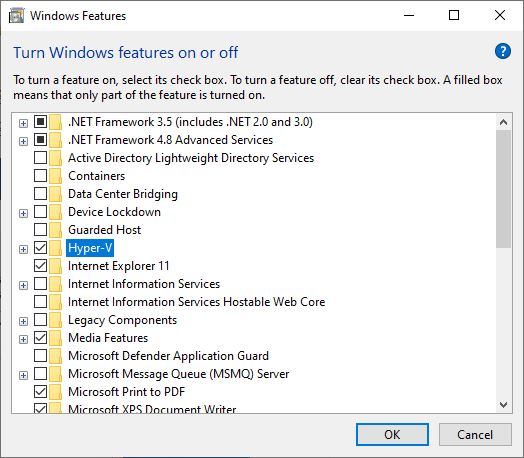
Now After Enable the Hyper V on BIOS setup this for Hardware virtualization, we need to Enable the same for windows Os. To Enable the Hyper V on Windows 10 Access the Windows Features.
- Go to the Cortana search box and search for Turn Windows features on or off.
- select Turn Windows Features on or off the control panel.
- This Will Open windows Features Window.
- Now Scroll Down And look for Hyper-v.
- Select the top-level Hyper-V check box and ensure that all the sub-features are selected.
- Click OK, Wait while Windows installs and configures Hyper-V.
- You will be prompted to restart to confirm changes click Restart now.
Launch Hyper-V Manager
To run Hyper-V Manager click on the Windows button select Search, and then enter Hyper-V Manager. Now Click on Hyper V Manager to run the application.
Configure networking for the Hyper-V environment
Now Configure networking for the Hyper-V environment to support external network connections. Such as your pc to virtual machine computer, or any other network connected pc. To Do this Select Virtual Switch Manager in the Actions pane.
- Select New virtual network switch, then in the Actions pane, select External.
- Now click Create Virtual Switch, In the Virtual Switch Properties pane.
- Here name the virtual switch Public
- And allow the management operating system to share the network adapter bound to the virtual switch click Apply.
- you will see a warning message indicating a potential loss of network connectivity while Hyper-V creates the new virtual switch.
- Click Yes to proceed with the virtual switch creation. Click OK to close the Virtual Switch Manager.
Create New Virtual Machine On Hyper V
- Now on Hyper-V Manager move to Actions pane, click New, and then click Virtual Machine.
- In the New Virtual Machine Wizard, click Next to skip the Before You Begin page.
- On the Specify Name and Location page, enter a name for the new virtual machine, and then click Next to continue.
- Now on the Specify Generation page, select the Generation option that supports the guest operating system you will install in the virtual machine.
- Generation 1 supports most 32-bit guest operating systems,
- while Generation 2 supports most 64-bit versions of Windows and newer Linux and FreeBSD operating systems.
- Select generation 2 and Click on Next.
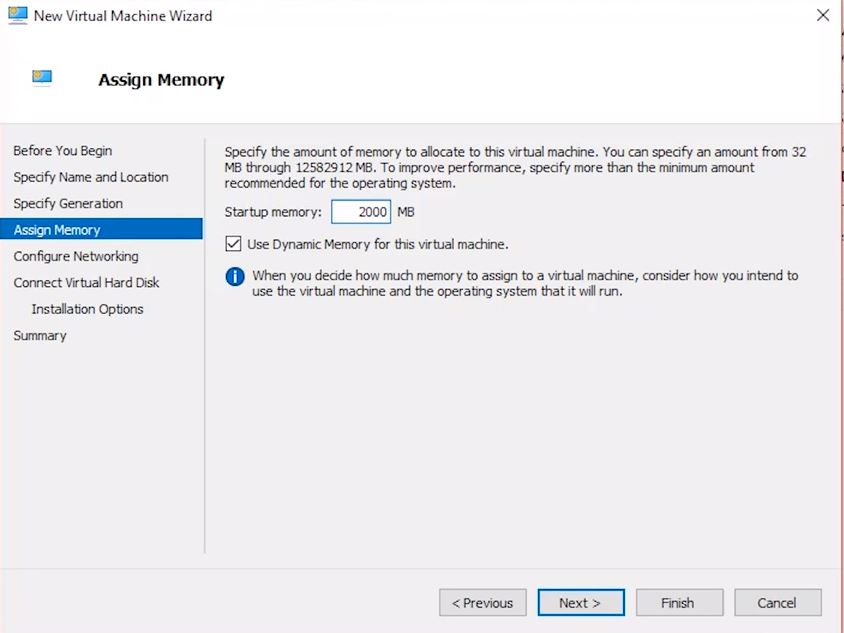
- Here choose how much memory you would like to give the virtual machine. This will be dependent on how much memory you have available.
- If you have limited physical RAM installed, 2 GB or less, uncheck Use Dynamic Memory for this virtual machine.
- On the Configure Network page, select the virtual switch that you just created.
- Configure your Virtual Hard disk where you will install the operating system.
- You can also choose an existing Virtual hard disk if you already have one.
- I have given the virtual machine 30 GBs of disk space.
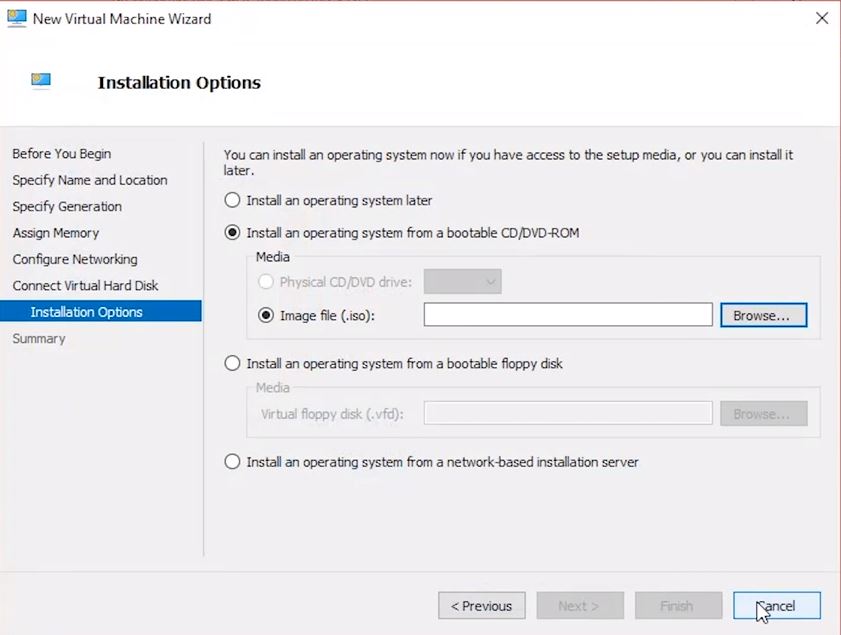
- On the Installation Options page, select the option to Install an operating system from a bootable image file.
- Click Browse to navigate and select the ISO image, and then click Next On the Completing the New Virtual Machine Wizard page.
- Review the settings, and then click Finish to create the virtual machine and close the wizard
- After Hyper-V creates the new virtual machine, you can view it in Hyper-V Manager.
Install Windows on Hyper V Virtual Machine
In Hyper-V Manager, double-click on the new virtual machine to launch the VMConnect tool. In VMConnect, click on the green Start button, and follow the instructions on the screen to boot the virtual machine. This is the first time we use the machine and there is no Operating System installed to Boot. So Here press any key to boot from CD or DVD.
Next install Windows As you normally install on normal machine step by Step.
Enable hyper v windows 10 Using PowerShell
If you prefer to use the command line to install Hyper-V on your system, you can use PowerShell instead of going through the graphical user interface (GUI).
- To install Hyper-V in Windows 10 with PowerShell,
- run the following command with Admin rights:
- Enable-WindowsOptionalFeature -Online -FeatureName Microsoft-Hyper-V -All
- Hyper-V will be installed when you reboot.
- Then follow the above steps to install and configure the Virtual machine.
Hope After reading This post you will well aware about the Windows 10 Hyper V feature. How to enable hyper v windows 10 and Create a Virtual machine on Windows 10 Using The hyper V Feature. Also, Read
