By default, the WiFi option display next to the notification area of the Windows 11 taskbar, or you can enable disable wifi option from the network and internet settings. But sometimes you may notice Wi-Fi option not showing or missing after Windows 11 update. This can be a frustrating experience as you are unable to connect or Access the Internet on your Laptop. A number of users report Windows 11 laptop unable to detect any wireless networks in range or Wi-Fi missing in network and internet settings. This issue can be caused by several reasons, both related to the hardware and software. This article explores the reason why Wi-Fi option is not showing and how to restore wifi option on Windows 11.
Why Wi-Fi option is not showing in Windows 11?
There are several common reasons why Windows 11 PC fails to display the Wi-Fi option. Issues with the Wi-Fi adapter or its driver or Misconfigured settings are common. Again it may be one or more required services are not running, glitches in the user profile, outdated Windows OS, or TCP/IP conflicts in your computer also cause such problems on your Laptop.
Sometimes it might be a temporary glitch and can be resolved quickly after a system restart. Again Restarting your router or WiFi modem fixes the issue.
Wi-Fi option not available on Windows 11
This issue is most likely caused due to missing or corrupt drivers and update the WiFi driver with the latest version help restore the missing Wi-Fi icon on Windows 11. Again Checking the related services and wireless adapter components can help you with this problem.
If Wireless Network Not Showing Up on your Laptop, ensure your device is within the range of the router. Or take your Device closer to the Wireless router.
In addition, try restarting your wireless router by unplugging it from the power source. Restart Windows 11 Laptop as well, this will help resolve temporary glitches and restore the missing Wi-Fi option.
Power cycling the router and modem can fix internet connectivity issues and resolve problems with wireless connections.
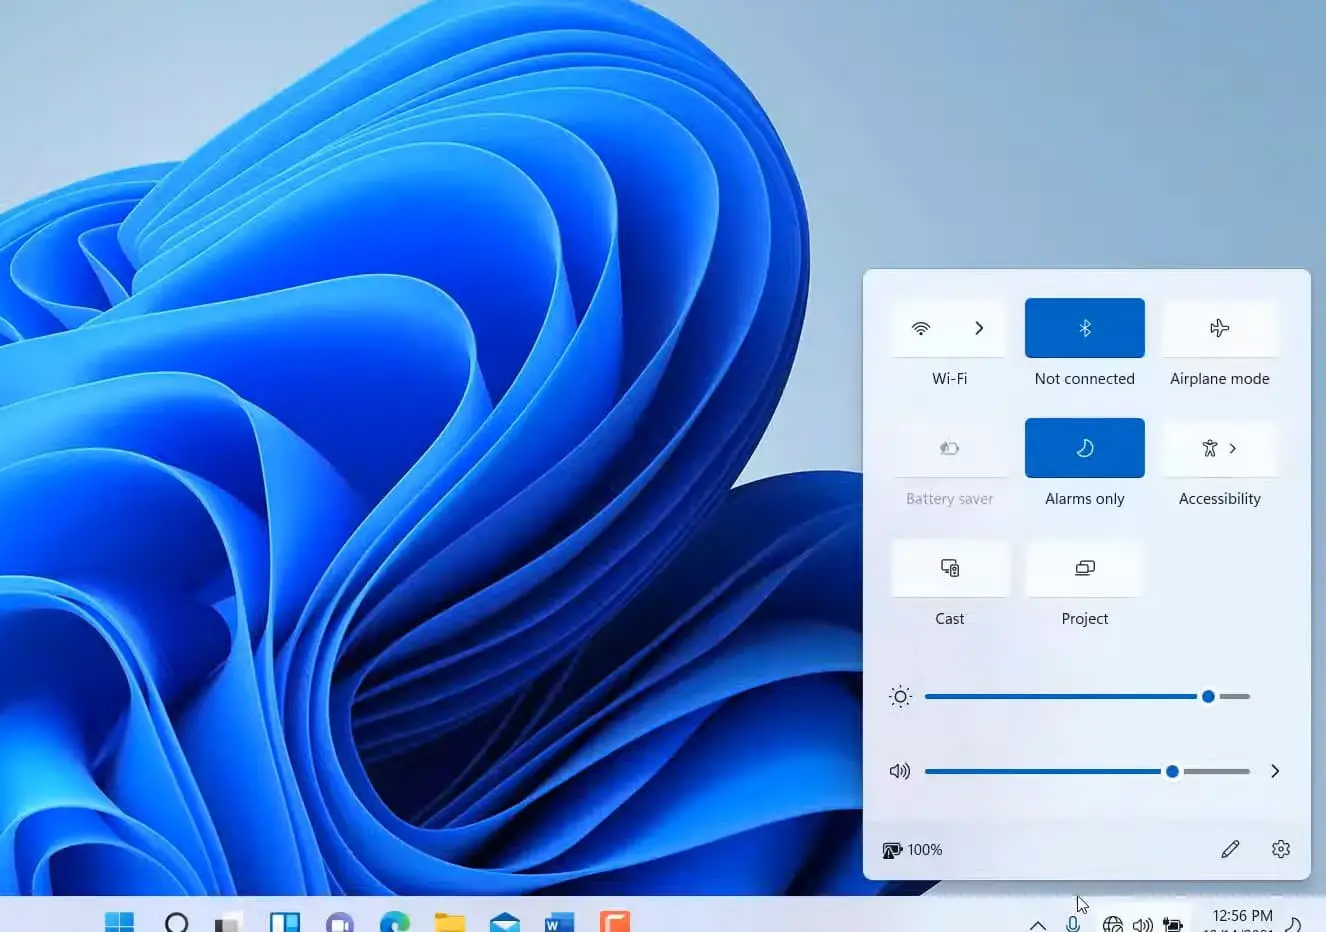
Press Windows key + A to open Action Center and ensure Airplane mode is disabled. Also, check if your laptop has a built-in switch to enable/disable the Wi-Fi.
Re-enable Wi-Fi adapter
The WiFi adapter on your Laptop is responsible for facilitating communication between your PC and wireless networks. If due to some reason, the WiFi adapter is disabled wifi may not show up on your Device. Again for a number of users Disable and re-enable the WiFi adapter help them fix the problem and restore internet access on their laptops.
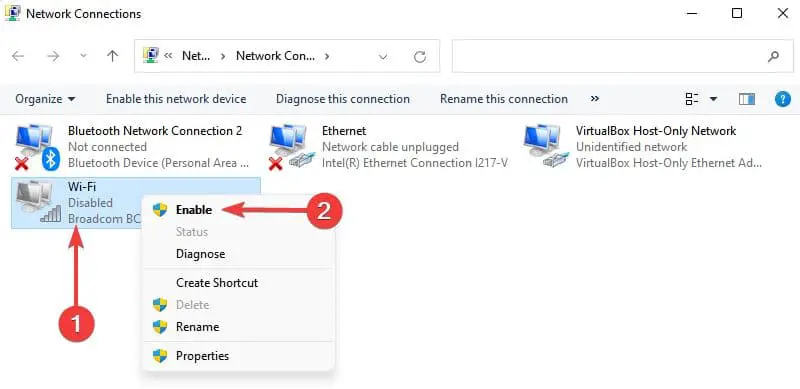
- Press the Windows key + R, type ncpa.cpl and click ok
- This will open network connections and Locate Wi-Fi adapter.
- If its disabled right click on it and select Enable.
- Or Try to disable and Re-enable the wifi adapter and check if this help.
Run network troubleshooter
Windows 11 comes with build in troubleshooting tools that help diagnose and fix minor issues on their own. Let’s run the built-in network troubleshooter that can help identify and resolve some specific issues that would prevent the Wi-Fi icon from showing on your
- Press Windows key + X and select settings
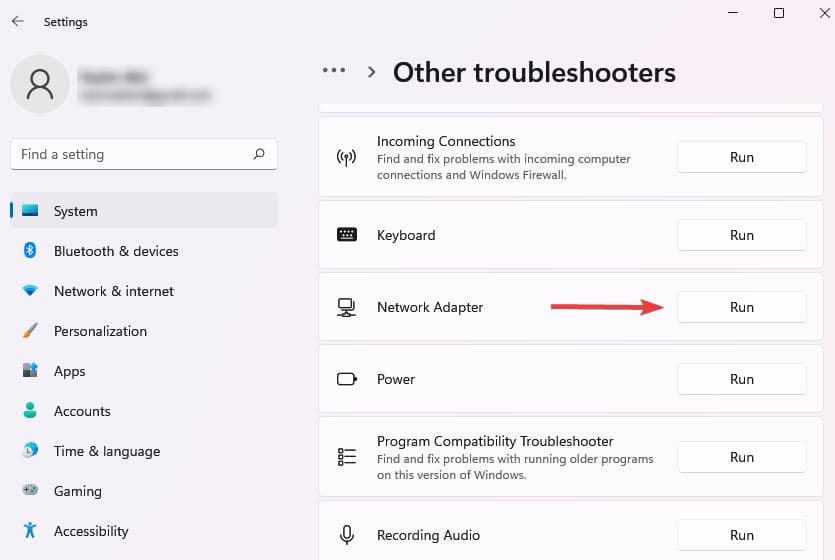
- Go to System then Troubleshoot and click on Other troubleshooters,
- Next, click Run next to the Network adapter to start to diagnose
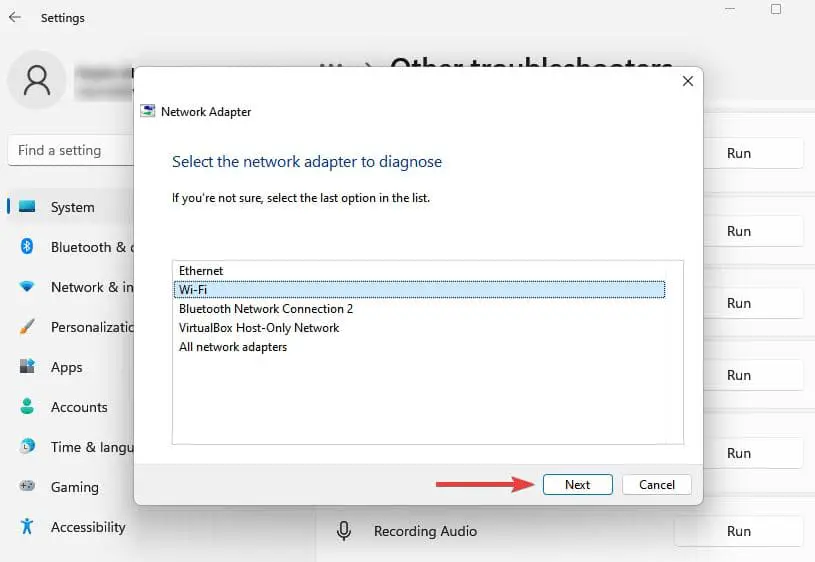
- In the ” Select the network card to diagnose ” window, select ” Wi-Fi “, and click ” Next “.
- Follow on-screen instructions and Let the troubleshooter find and fix issues related to the Wi-Fi icon disappearing in Windows 11.
Start WLAN Autoconfiguration Service
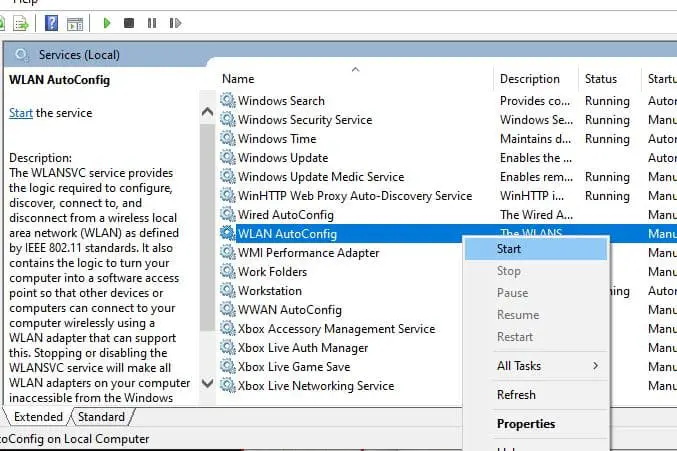
The WLAN auto-configuration service essential for proper Wi-Fi operation is currently running on your PC. And for a few users restart WLAN auto-configuration service help them get back Wi-Fi option on their laptop.
WLAN AutoConfig is a system service responsible for managing Wi-Fi networks on Windows.
- Press Windows key + R, type services.msc and click ok
- In the list of services, scroll down to WLAN Autoconfiguration Service “right-click on it and select Restart.
- If the service not running Double click on WLAN Autoconfiguration Service to open properties
- Here change the startup type Automatic and start the service next to service status.
- Click “Apply”, and “OK ” to validate the change.
Reset Windows 11 Network Settings
Incorrect network settings or Problems with Wi-Fi driver also cause the wifi Option missing in network and internet settings. Reset Windows 11 Network Settings reinstall and restore all network adapters setting default, clear glitches and most probably restore the Missing WiFi option on your Laptop.
Doing so will remove all the network adapters from your PC and reinstate all your network settings to their default values.
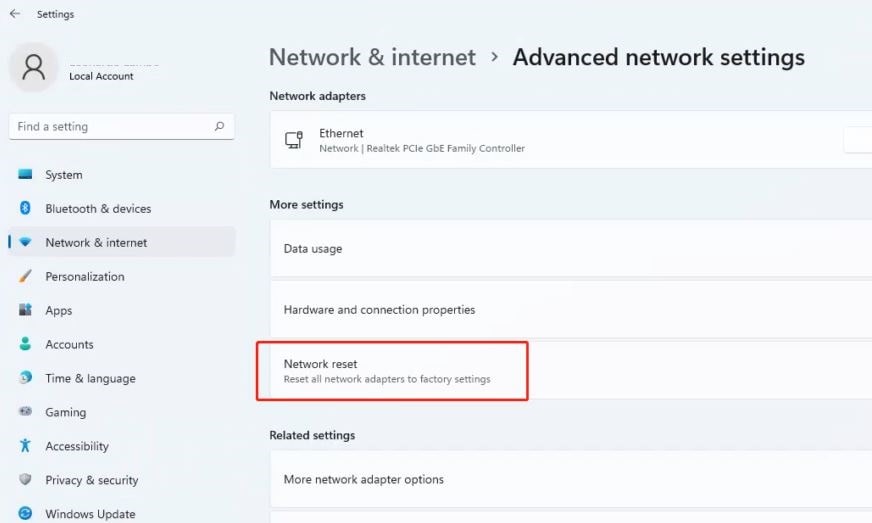
- Press the Windows key + I to open the settings app,
- Go to Network & Internet then click on Advanced Network settings
- Under “more settings”, click on “Network reset”.
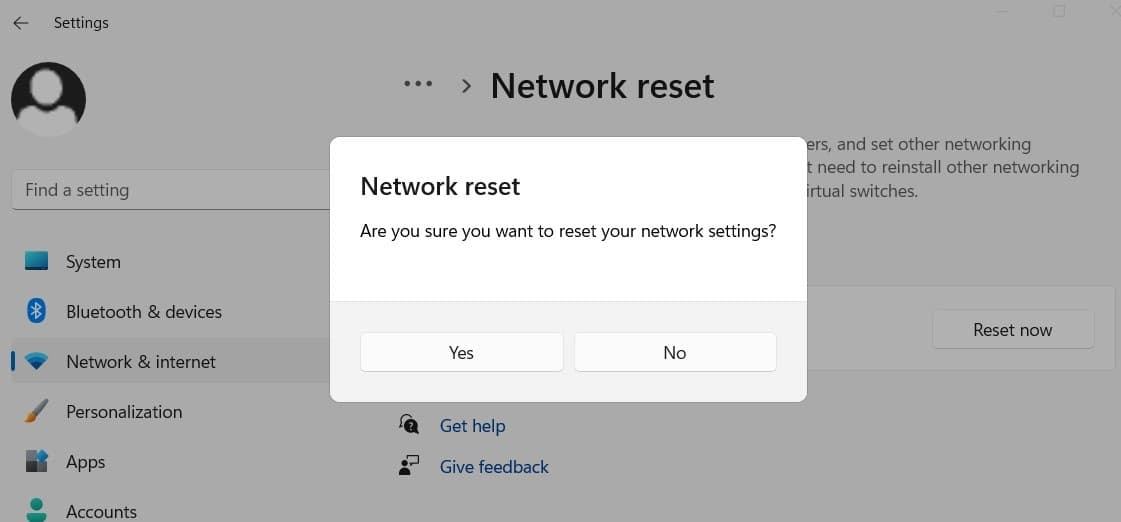
- Click on “Reset now”, and confirm the network reset by clicking on “OK”.
Wait while the network resets. When your PC restarts, check if the Windows 11 Wi-Fi icon disappeared issue is resolved.
Update Wi-Fi Driver
This issue is most likely caused by missing or corrupt drivers and update Wi-Fi driver probably fix the problem. If the above solutions fail to fix the problem you need to update the Wifi driver or reinstall the latest version from Manufacturer’s site.
Malfunctioning or outdated drivers can lead to all kinds of Wi-Fi issues on Windows 11.
You can visit the manufacturer’s website and search for the latest drivers available for your laptop’s model. Download and install the appropriate drivers, following the provided instructions. Alternatively, you can use the Device Manager on Windows to update the drivers automatically.
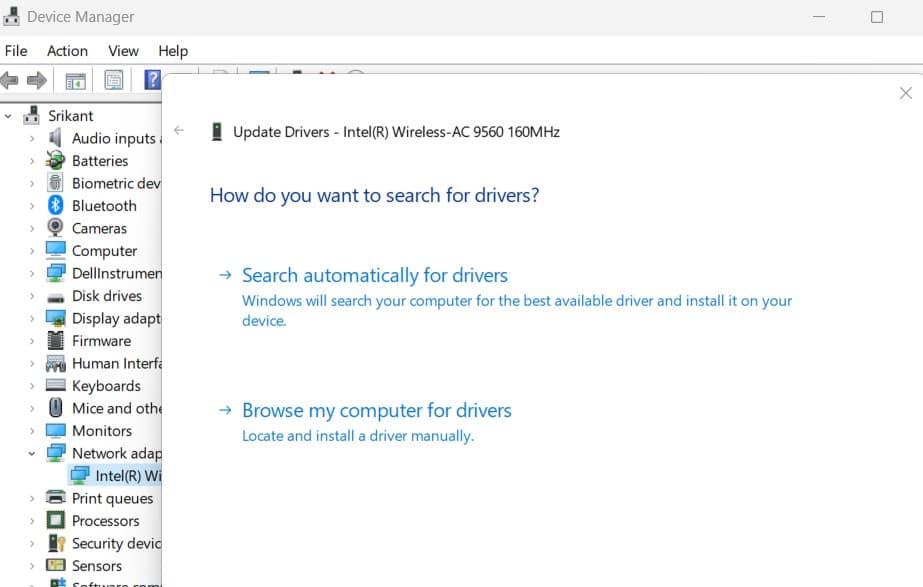
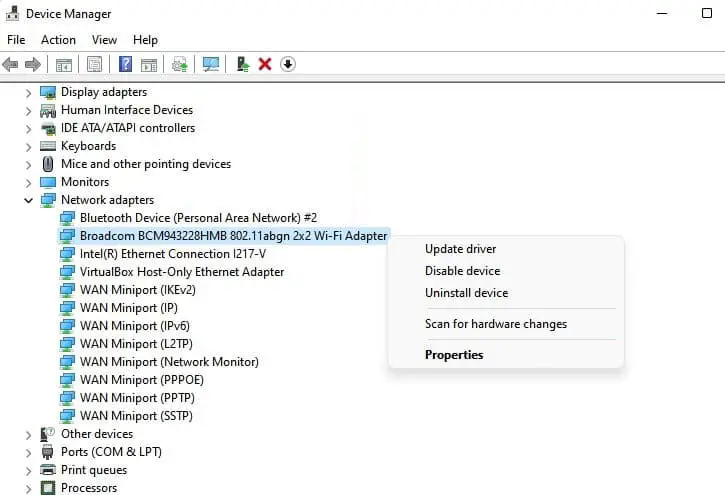
- Press the Windows key + X and select Device Manager
- This will display all devices and peripherals connected to your computer
- Locate and expand the network adapter, right-click on Wi-Fi device and select update driver from the context menu.
- Select “Search for drivers automatically” to automatically update the Wi-Fi driver
If you have the latest version of the wifi driver for wireless network driver, select ” Browse my computer for drivers ” to locate it. Once done reboot your PC and check if this helps.
Reinstall WiFi adapter driver
Also, reinstalling the corrupt driver will fix the issue..
- Again open Device Manager, expand network adapter
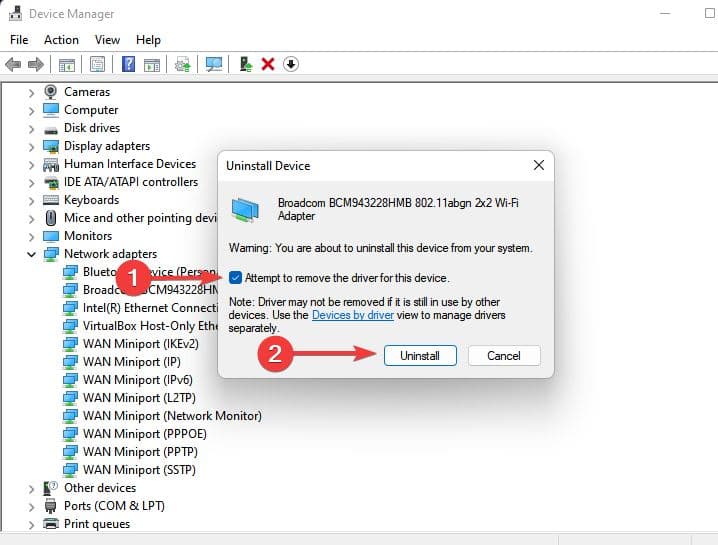
- Now right-click on wifi adapter and select uninstall from the context menu
- Click uninstall again when it prompts for confirmation
- Once done reboot your PC and open Device manager again.
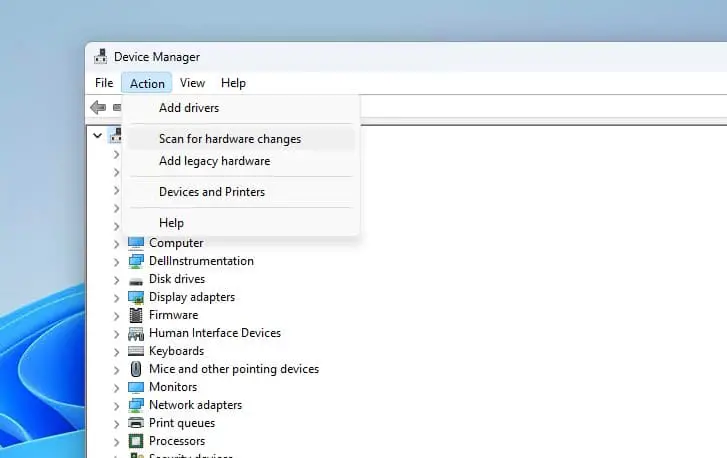
- Check the default Wifi adapter driver installed automatically, If not click on the action and select scan for hardware change.
Also, you can visit the official website of your PC manufacturer to download the latest Wi-Fi driver currently available for your computer. Then install the Wi-Fi driver manually.
Reset TCP/IP and flush DNS cache
Again Resetting the TCP/IP (Transmission Control Protocol/Internet Protocol) stack can help resolve various network-related issues, including problems with Wi-Fi connectivity.
Press Windows key + S and type cmd, right-click on command prompt select run as administrator. Now run the following commands
netsh int ip reset
netsh advfirewall reset
netsh winsock reset
ipconfig /flushdns
ipconfig /release
ipconfig /renew
Once the command finishes, restart your laptop to apply the changes. Now check if this help resolve network connectivity issues, including problems with the Wi-Fi option not appearing on your laptop.
If the problem started after a recent change such as a driver update, third-party app install or Windows upgrade, System Restore can help undo system changes that might have caused the Wi-Fi option to go missing.
Also read:
- Wi-Fi connected but no internet access after Windows 11 update [solved]
- Laptop Wi-Fi Not working after Windows 11 update (7 solutions)
- How to Fix Wi-Fi and Internet Connection Issues in Windows 11
- How to Check for and Install Windows Updates on your computer
- Solved: Bluetooth disappeared or not working on Windows 11
- Windows 11 sound not working after update? 8 solutions to apply
