As SSD is faster than HDD Most of Windows 10 users have made the switch from SATA hard drives to SSDs – whether by getting a relatively new PC or by doing the upgrade themselves. Also, Microsoft put a lot of effort into optimizing the OS under the assumption most of us are using SSDs; there is still room for improvement. if you have a Windows 10 or 8.1 or 8 system-based computer with a Solid State Drives SSD or planning to have one, here are our recommended ways of SSD (Solid State Drives) optimization for Windows 10 based computer system.
Make Sure TRIM is Enabled
TRIM command allows notifying the SSD to wipe out data from blocks that are no longer in use. Erasing those blocks reduces the Write speed and maintains optimum performance throughout the lifespan.
By default, the TRIM feature should be enabled in Windows 7, 8, 8.1 and 10, but sometimes it may not happen. Here’s how you can ensure that TRIM is configured properly:
- Type cmd on start menu search, Right click on command prompt select run as administrator.
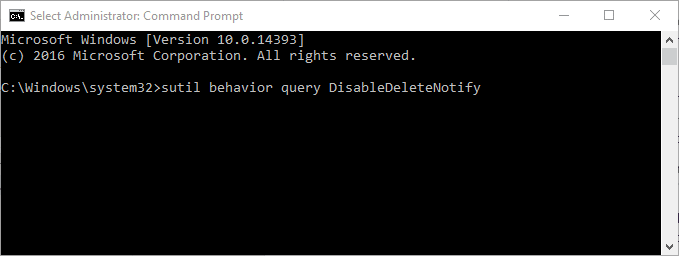
- Type in the following command and press Enter
sutil behavior query DisableDeleteNotify
After executing the command, you should get a result of zero (0), it means TRIM is enabled. If you get result as one (1), then it means TRIM is disabled.
When TRIM is disabled in the system you should do the following:
Open Command Prompt as an administrator, then Type in
sutil behavior query DisableDeleteNotify 0
It should enable the TRIM and you should get DisableDeleteNotify = 0
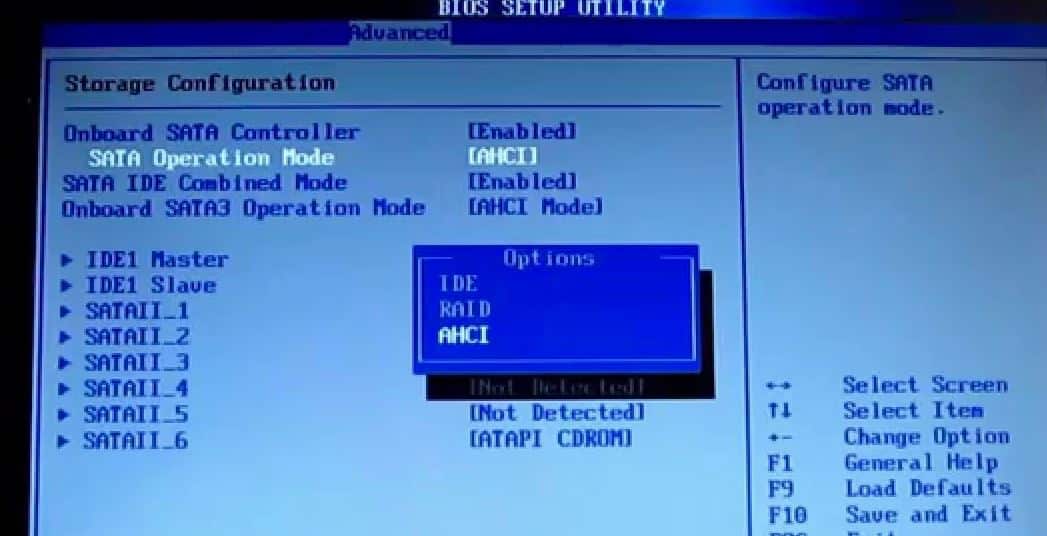
Set SATA controller to AHCI mode
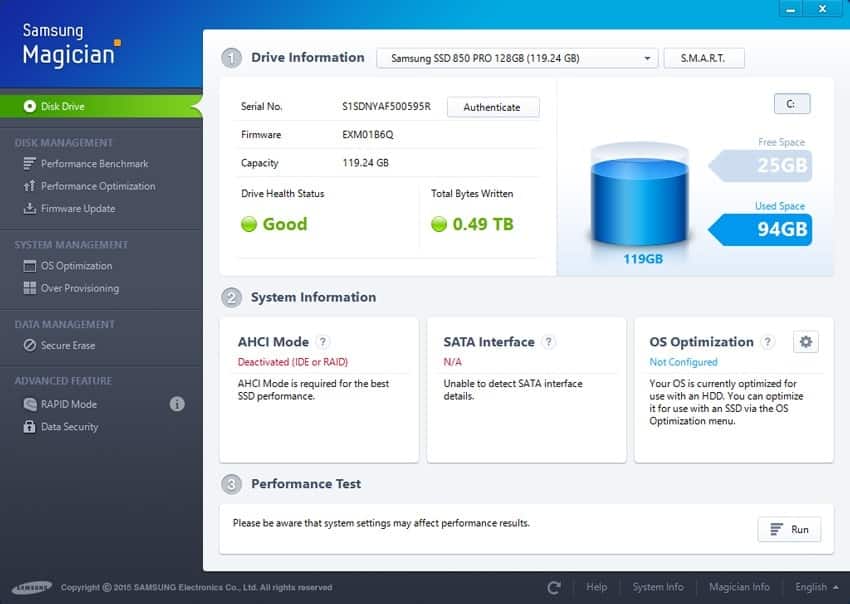
SSD works better with AHCI (Advanced Host Controller Interface) mode. Most of the modern motherboards SATA controller is set to AHCI by default, you can see it from Device Manager >> IDE ATA/ ATPI controllers.
If you see the SATA controller mode in IDE, do the following to change it from IDE to AHCI.
- Open System Configuration, using Windows + R shortcut key and type in msconfig
- Under the Boot tab, select Safe boot and press Apply
- This will start windows into safe mode.
- Now Open the Run menu by hitting the Windows key + R.
- Type in Regedit and hit enter to open Windows registry editor.
- Backup Windows registry database then navigate to HKEY_LOCAL_MACHINE\System\CurrentControlSet\services\iaStorV and modify the REG_DWORD Start from 3 to 0 by right-clicking it and hitting modify.
- Now navigate to HKEY_LOCAL_MACHINE\System\CurrentControlSet\services\msahci and follow the same procedure of modifying the Start value to 0.
- After those two changes are made to Regedit you must reboot your PC, enter the BIOS, and switch from IDE to AHCI mode. Now you’re done!
Update the SSD Firmware
To make sure your SSD is running as well as it can, it’s worth staying on top of firmware updates for it. Unfortunately, these aren’t automated; the process is irreversible and a bit more complex than, say, a software update.
Each SSD manufacturer has their own method for SSD firmware upgrades, so you’ll need to go to the official websites of your SSD manufacturers and follow their guides from there.
Disable Indexing
A good part of your SSD speed is consumed in indexing files for Windows search. This could be useful if you store everything you have on your SSD, but you might be annoyed by it if you experience slow-downs due to the periodic indexing process that occurs every time you add new data to the drive. You’re better off without it in an SSD because the speed boost from the indexing process is superfluous in such environments.
- Click your Start menu and click “Computer.”
- Right-click your SSD and click “Properties.”
- De-select the box labeled “Allow files to have contents indexed in addition to file properties” and click “OK.”
Once you do this the operating system will apply this to all the files and folders on the drive. If you see a dialog telling you that it couldn’t remove a file from the index, click “Ignore All.” That will streamline the process and ignore any errors.
Disable Prefetch and Superfetch
Windows sometimes places information in your physical memory and virtual memory belonging to programs that you don’t currently use but use very often. This is known as “Prefetch” and “Superfetch.” If you are stuck with having to cope with virtual memory on your SSD, you’re better off just doing away with these two features.
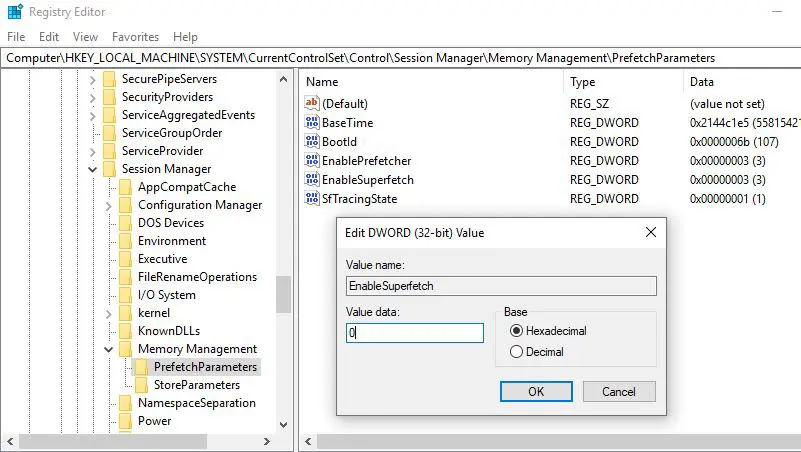
You can find them on your registry editor under
HKLM \ SYSTEM \ CurrentControlSet \ Control \ Session Manager \ Memory Management \ PrefetchParameters
As two values: “EnablePrefetcher” and “EnableSuperfetch.” Set both values to zero and be done with it!
Pagefile Managing
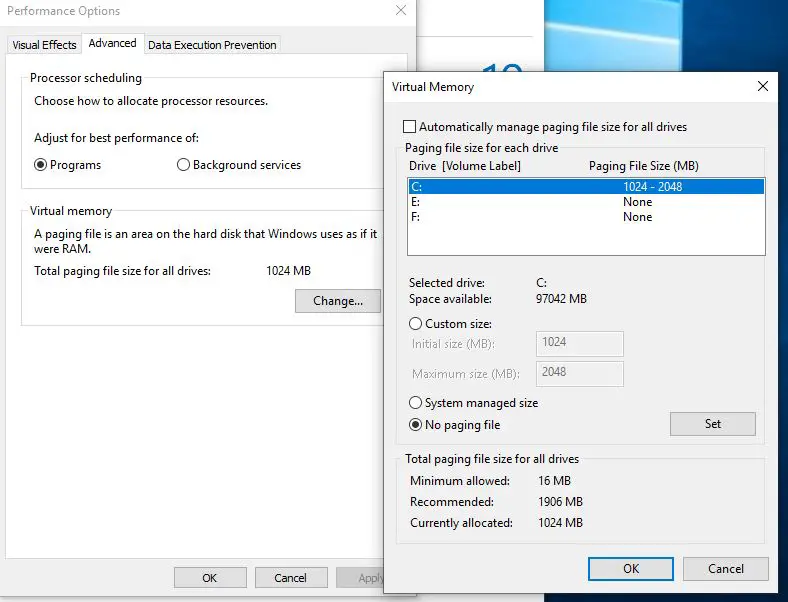
If you have a secondary drive, it’s best to put the pagefile on that drive rather than on your SSD. If you don’t have a secondary drive, you can reduce the pagefile size.
- Hold down your Windows Key and press Pause (Break), releasing both and just like magic up pops the System properties window.
- On the system windows, click advanced system settings.
- On the System Properties window and under the Advanced tab. Click the Settings inside the Performance box.
- On the Performance Options windows. Click Advanced tab then click Change.
- On the Virtual Memory windows. Uncheck the Automatically Manage Paging File Size on all Drives.
- Select your SSD and set it to No Paging File if you plan to move the paging file on your second drive or change the paging file size via Custom Size.
- If you plan to move it to your second drive. Select your second drive then click System Manage Size or set the paging file size on your won by setting it on Custom Size.
Disable ClearPageFileAtShutdown and LargeSystemCache
Windows is quick to implement things that are no longer necessary. An SSD operates on flash memory, making it possible to easily overwrite things on the disk. Therefore, the page file doesn’t need to be erased while the computer’s shutting down. This will make the Windows shutdown process much faster. LargeSystemCache, on the other hand, exists primarily in Server versions of Windows and tells the computer whether it should use a large cache for pages on the drive.
Both these options are found in your registry editor under
- Press Windows + R, type regedit and ok to open the windows registry editor.
- Then navigate to the following path
- Computer\HKEY_LOCAL_MACHINE\Current\ControlSet\Control\Session Manager\Memory Management
- Double click on memory management and set its value to 0
Restart Windows, you may now feel the difference, your computer running more smoothly. Also, apply these Windows 10 optimization tweaks that help to speed up your Laptop/Desktop PC.
