
Having trouble finding your Wi-Fi network on your Windows 11 laptop? This can be frustrating, especially if you rely on wireless internet for your work or entertainment. Several users report, WiFi Network not showing up in the list of available networks. It’s mostly because your laptop is not in wifi router range. However, Problems with the network adapter, Wifi driver incompatibility, and software glitches are also the reasons why Windows 11 Laptop can’t find the Wi-Fi network. Fortunately, there are also several solutions you can apply to troubleshoot and fix the issue. This article explores how to fix Windows 11 wifi not showing up issue and get your Wi-Fi network back.
Why WIFI option is not showing in Windows 11
This can be caused by a bunch of issues, both related to the hardware and software. If the problem started after upgrading to Windows 11, its most likely a software (WiFi driver) problem. However, if you notice WiFi frequent disconnect it could be a hardware failure or problem with the Wi-Fi router.
- Outdated or incompatible Wi-Fi drivers may prevent the system from recognizing and displaying available networks.
- Incorrect settings in the Network and Sharing Center may lead to the Wi-Fi option not appearing.
- Power-saving settings may turn off the Wi-Fi adapter to conserve energy.
- If essential services related to networking, like WLAN AutoConfig, are not running, it can result in the Wi-Fi option not being displayed.
Restart Your Router
Sometimes, the problem may not be with your Laptop, but with your router. A simple restart of your router can clear out any glitches or interference that may prevent your Wi-Fi network from showing up on Windows 11.
- To do this, just unplug your router from the power source, wait for about 30 seconds, and plug it back in.
- Wait for a few minutes until your router reboots and reconnects to the internet. We recommend restart your Laptop as well.

Again Weak Wi-Fi signals due to distance can result in connection issues or WiFi network not showing up. Being closer to the router can improve signal strength.
- Move your laptop closer to the Wi-Fi router and check if the Wi-Fi option becomes available.

In addition, Check if your router or modem has the latest firmware version. You can visit the manufacturer’s website or use the router’s web interface to check for updates and install them if available.
Toggle Airplane Mode on/off
Another easy fix is to toggle the airplane mode on your Windows 11 computer. Airplane mode disables all wireless connections, including Wi-Fi, Bluetooth, and cellular data. By turning it on and off, you can refresh your network settings and make your Wi-Fi network visible again.
- Press Windows + A to open the Quick Settings panel on Windows 11.
- Click on the airplane mode tile to turn it on.
- Wait for a few seconds and then click on the tile again to turn it off.
- Check if your Wi-Fi network shows up now.

Disable and Re-Enable Wi-Fi Adapter
Your Wi-Fi adapter is the device that allows your computer to connect to a wireless network. Sometimes, it may malfunction or get disabled due to various reasons, such as driver issues, system updates, or hardware conflicts. In that case, you need to disable and re-enable your Wi-Fi adapter to fix the problem.
- Press the Windows key + R, type ncpa.cpl and click ok to open the network connection
- Right-click on your Wi-Fi adapter and select Disable.
- Wait for a minute or so and then right-click on your Wi-Fi adapter again and select Enable.

In addition, Many laptops have physical switches or function keys that control Wi-Fi. If these are turned off, Wi-Fi won’t function. Locate the physical switch on your laptop or use the designated function key to enable Wi-Fi. Refer to your laptop’s manual if needed.
Restart WLAN AutoConfig Service
Essential services like WLAN AutoConfig need to be running for Wi-Fi to function properly. Usually, when you start Windows this series automatically runs in the background, however, if for some reason this service not started or stuck it can impact the WiFi network or connectivity.
- Press the Windows key + R to open the Run dialog, type “services.msc,” and press Enter.
- Locate “WLAN AutoConfig” right-click on it select restart,

- If the service not started, right-click on it select properties, change the startup type automatic and click on start.
- Finally, click on Apply -> OK, and you are done. You can restart the computer and see if WiFi has been fixed or not on Windows 11.
Run Windows Troubleshooters
Windows 11 has built-in troubleshooters that can help you diagnose and fix common problems with your system, including network issues. You can run the network adapter troubleshooter or the internet connection troubleshooter to let Windows scan and repair any errors that may prevent your Wi-Fi network from showing up.
Windows Network Troubleshooter is designed to automatically identify and fix common network problems.
- Press Windows + I to open the Settings app on Windows 11.
- Go to System > Troubleshoot > Other troubleshooters.
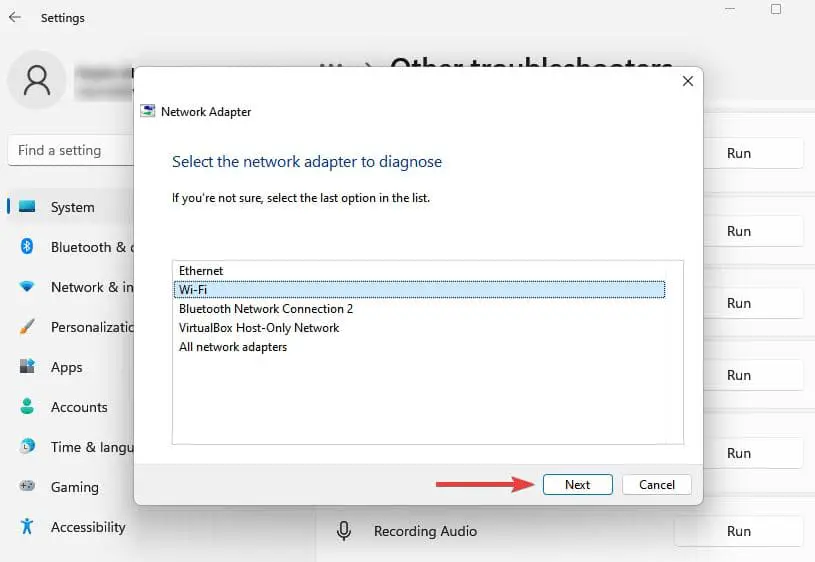
- Click on the Run button next to Network Adapter or Internet Connections.
- Select the WiFi option and Follow the on-screen instructions to complete the troubleshooting process.
Update or Reinstall Wi-Fi Drivers
One of the most common causes of Wi-Fi network not showing up on Windows 11 is outdated or corrupt drivers. Drivers are software components that allow your computer to communicate with your hardware devices, such as your Wi-Fi adapter. If they are missing, incompatible, or damaged, they can cause various problems with your wireless connection.
To update WiFi driver in Windows 11:
- Right-click on the Start button and select “Device Manager.”
- Expand the “Network adapters” category, and right-click on your Wi-Fi adapter, select “Update driver.”
- Select “Search automatically for updated driver software” and follow the on-screen instructions to install the latest drivers for your Wi-Fi adapter.

If you choose to uninstall the device, restart your computer and Windows will reinstall the driver automatically.
Also you can download latest wifi driver for your Laptop from the manufacturer’s website and install it manually.

Reset Your Network Settings
If none of the above solutions work, you may need to reset your network settings on Windows 11. This will restore your network configuration to the default state and remove any customizations or changes that may interfere with your Wi-Fi network. However, this will also delete your saved Wi-Fi networks and passwords, so make sure you have them backed up before doing this.
To reset your network settings:
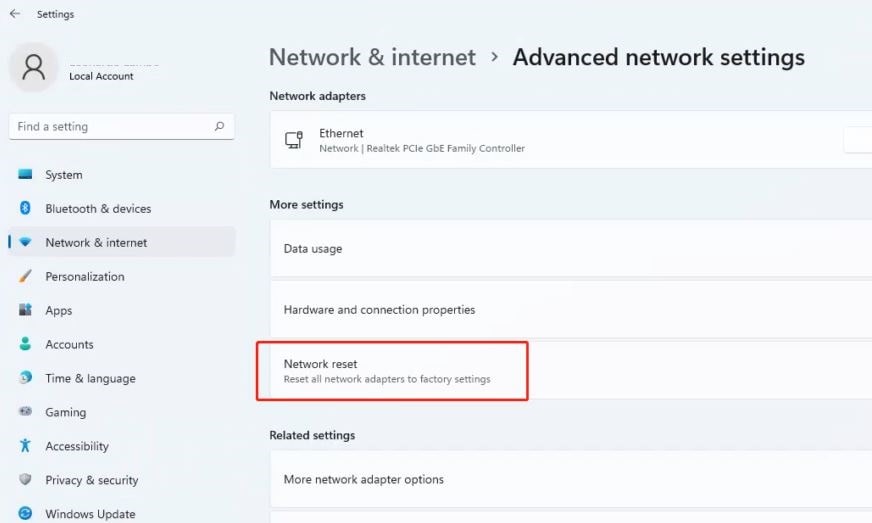
- Go to Settings > Network & internet > Advanced network settings.
- Click on Network Reset at the bottom of the page.
- Click on Reset now and confirm your action.

- Wait for your computer to restart and reconnect to your Wi-Fi network.
In addition, open the command prompt as administrator and perform the following commands.
- netsh int ip reset
- netsh winsock reset
- ipconfig /release
- ipconfig /renew
- ipconfig /flushdns
This will reset TCP/IP configuration and probably fix WiFi not showing problems on Windows 11.
Perform system restore
System Restore allows you to revert your system to a previous state where the Wi-Fi was functioning correctly. This can be particularly useful if the issue started after a recent change or update.
- Open the Control Panel and navigate to “Recovery.”
- Click on “Open System Restore” and follow the prompts to choose a restore point.
- Confirm the restore process and allow your system to revert to the selected point.
Again third-party applications, especially security software, can sometimes conflict with the normal operation of Wi-Fi. Disabling or uninstalling these applications can help pinpoint the source of the issue.
Also read:
- Fix Windows 10 Wi-Fi keeps disconnecting (5 working solutions)
- Wi-Fi option disappeared after the Windows 11 update (solved)
- How to Install Driver for your Network Adapter Windows 11 /10
- WIFI says connected But no internet Access on the Windows 10 laptop
- Tweak these 7 settings to make Windows 11 faster
