Did you find yourself unable to connect your PC/Laptop to the internet? Or is your system internet connection showing “ No Internet Access” or “Limited Internet Access” error message? There are several causes that can trigger this type of issue, according to some users they start receiving “No Internet Connection” or unidentified network no internet access error after installing the latest Windows 10 updates.
Some other report After upgrade to the latest Windows 10 version, when they try to connect their computer or laptop to the internet or access the internet in any way then they will face different scenarios such as No network access, wifi no internet, wireless network connection not connected, No wireless network connection, unidentified network no internet access, no internet access etc…
No Internet Access Windows 10
Well, there are many factors that can cause the No Internet Access issue but some of them are corrupted, outdated or incompatible network adapter drivers, incorrect network configuration, hardware issues, network account issues, corrupt profiles etc. If you are suffering from any of the above-discussed scenarios. Here are some applicable solutions to fix the issue, make your PC/Laptop to the normal state and enjoy the Internet.
Disable Security Software: Start with basic temporarily turn off your security software (firewall, antivirus software, etc) and check if the problem is resolved.
Restart your modem and router: There may be something going wrong with your router that leads to your no Internet access issue. Power cycling your router may help fix the issue.
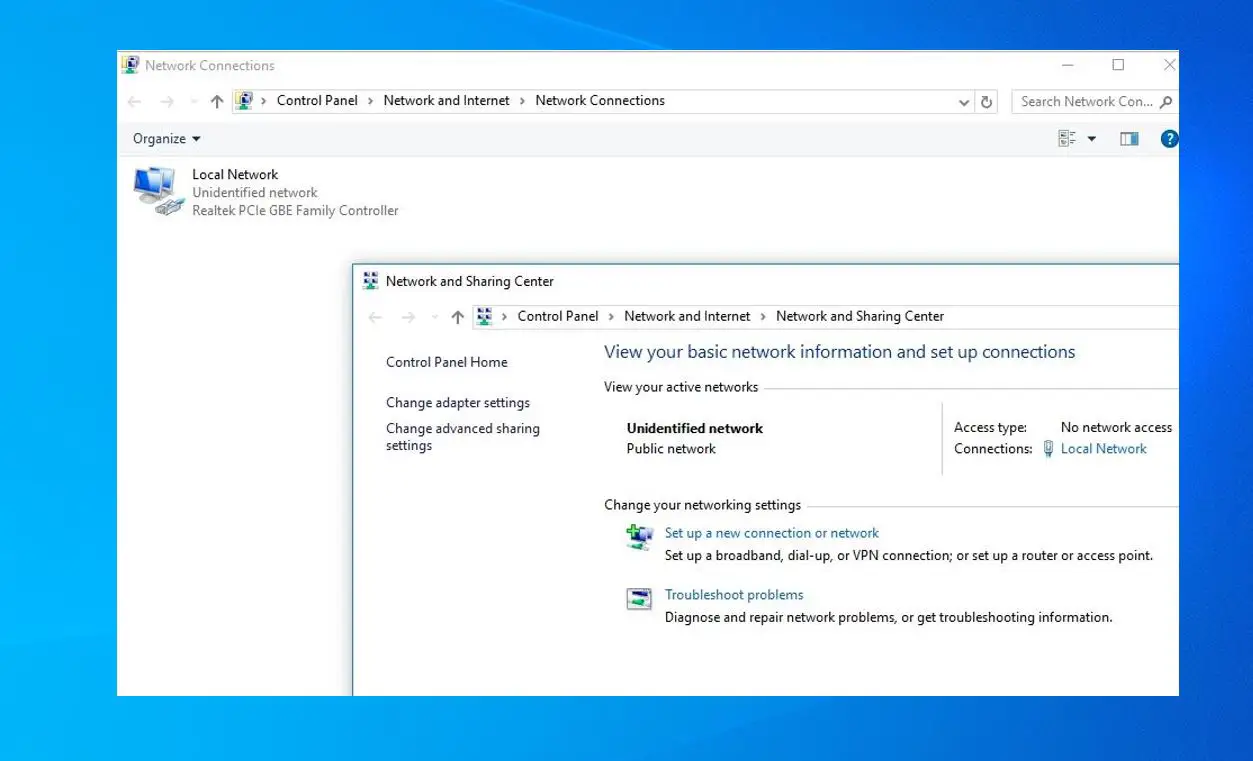
Turn off and then on Network Adapter: To do this press the Windows key + R, type ncpa.cpl and hit the enter key. Right-click on the currently active network adapter and choose Disable. After turning the Wireless adapter off, now you need to turn it on again. Right-click on the adapter and this time select Enable. At last, reboot your PC and again try to connect to your wireless network.
Reset your network: Resetting your network can set the settings of your network adapter to the defaults. This can help you fix network issues. To reset your network: Select the Start button. Then select Settings. Select Network & Internet. Select Network Reset. Click Restart now.
Use Network Troubleshooter
Windows have an inbuilt troubleshooter to check and fix network and internet connection problems. We recommend running the troubleshooter and let windows to fix the problem itself.
To run the Network Troubleshooter you need to right-click on the network icon -> choose Troubleshoot Problems. And follow the on-screen instructions.
Flush DNS and Reset TCP/IP
Flush DNS cache and Reset TCP/IP configuration to the default setting is very helpful to fix most of the network and internet problems. To do this open Command Prompt with Admin privilege.
Here on the command prompt type the following command and hit enter after each command:
- ipconfig /release
- ipconfig /flushdns
- ipconfig /renew
- netsh winsock
- nbtstat –r
- netsh int ip reset
Restart your computer. Normally it should work by now. After flushing DNS you will see that No Internet Connection issue gets fixed and you can now enjoy your internet connection.
Configure network functions
When you encounter a no Internet access issue, you can try configuring some network functions to fix it. To do so you need to use Command Prompt.
Open Start menu and type “cmd“. Right-click on Command Prompt in the result and select Run as administrator.
In Command Prompt, type the following lines one by one and hit Enter after each.
- netsh int tcp set heuristics disabled
- netsh int tcp set global autotuninglevel=disabled
- netsh int tcp set global rss=enabled
Configure DNS address manually
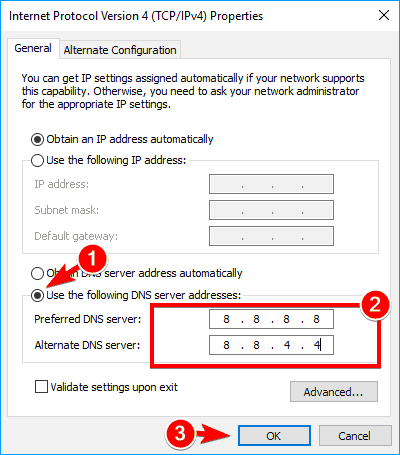
If the above solutions failed to fix, try to configure the DNS address manually (Google open DNS ).
- To do this Press the Windows key + R, type ncpa.cpl hit the enter key.
- This will open the network configuration window, and right-click on the currently active network adapter select properties.
- Click on Open Internet Protocol Version 4 (TCP/IP) properties.
- Make sure everything is set to DHCP (If you are using DHCP in your network). Otherwise, check your static configuration.
You should especially check the DNS configuration. Change the DNS IPs to 8.8.4.4 and 8.8.8.8 (Google DNS) and check if you get rid of the limited connectivity error.
Disable Power Saving for Network Adapter
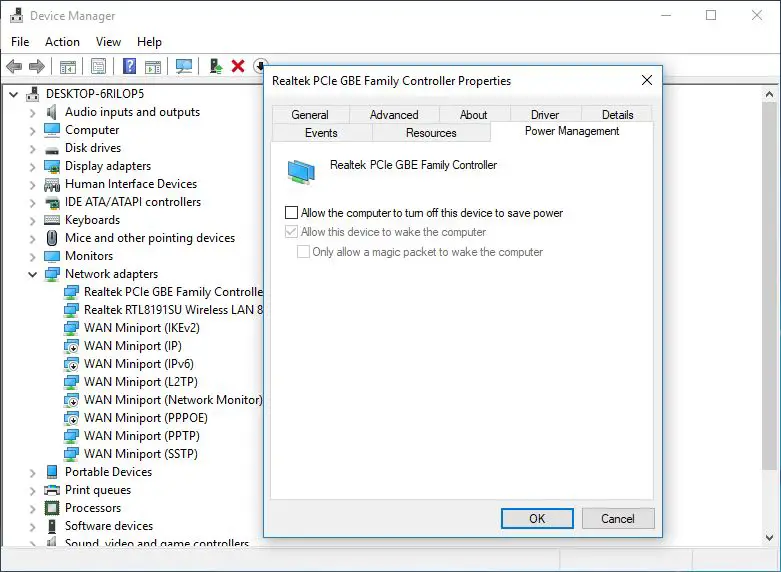
- To do this open the device manager by pressing windows + R, type devmgmt.msc and press the Enter key.
- Click on the Network adapters to expand its option.
- After that right-click on the installed network adapter and choose Properties.
- Go to the Power Management Tab and uncheck Allow the computer to turn off this device to save power option.
- Click Ok and exit from the Device Manager.
If you are using a WiFi connection:
After it presses Windows + I keys to open the Settings option then Click System > Power & Sleep. On the bottom click Additional power settings. Click on the “Change plan settings” option available next to the power plan. Now, click on the “Change advanced power settings” option present at the bottom. Click on the Wireless Adapter Settings, to expand its option and then again expand Power Saving Mode.
Now, here you will find two modes, ‘On battery’ and ‘Plugged in.’ set both of them to Maximum Performance. Click on the on and then Apply. Reboot your PC.
Update the Network Adapter Driver
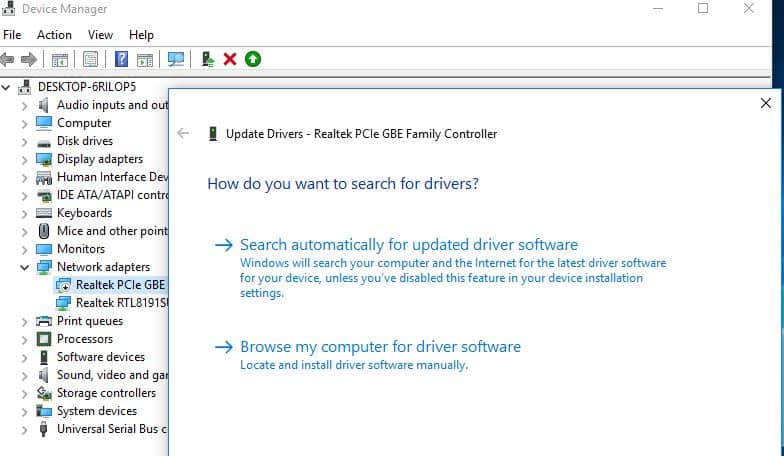
By updating the network Adapter Driver you can fix the internal issues of your system. In order to update this specific system driver, Press Windows Key + R then type devmgmt.msc and hit Enter. Here on the device manager expand Network adapters then right-click on your installed network adapter and select Update Driver Software. Then choose Search automatically for updated driver software.
Reboot your PC to save changes, If the problem still persists then follow the next step. Again select Update Driver Software but this time choose ‘Browse my computer for driver software. Next, at the bottom click ‘Let me pick from a list of device drivers on the computer.’ Select the latest driver from the list and click Next. Let the Windows install drivers and once complete close everything. Reboot your PC to save changes and you may be able to Fix No Internet Connection after updating to Windows 10 20H2 Update.
Reinstall Network Adapter Driver
Again open the device manager. To do this first you need to press Windows Key + R and then in the run dialogue box, you need to type “devmgmt.msc” and press the Enter key. Click on the Network Adaptor to expand its option and then right-click on the Network Adaptor and choose Uninstall Now. If any confirmation window will appear then choose Yes.
Restart your PC to save all the modifications and then try to reconnect your wireless.
Conclusion
These are some most effective solutions that will help you to fix unidentified network no internet access, Limited Internet Access, wireless connection but no internet access etc in Windows 10,8.1 and 7. No matter why your PC is showing No Internet Access error message, simply follow the given fixes one by one to make your PC normal. If you found any difficulty or have any queries, or suggestions feel free to discuss on. comments below.
Also Read


