With regular windows updates, Microsoft ensures the operating system is up to date and has the latest security patches and bug fixes applied. But sometimes you may experience the printer not working after windows 11 update. Few users report, the computer detects the printer but it just gives an error while trying to print a document. Well, there are several things you need to check if you can’t print anything on windows 11. Issue with the physical connection or Outdated printer drivers is some common reason behind this problem. Again It could be something wrong with the print spooler or the print job sent to the wrong printer and more. Here this article introduces some possible solutions, apply to fix printer not working problem on Windows 11.
Contents
How to fix Printer not working on Windows 11
To fix printer problems on windows 11 you can restart the device, Run the printer troubleshooter, check the connection, reset the printer spooler, and reinstall the printer.
Restart your computer and printer
Let’s first restart your computer and Turn off and on the printer, this will refresh the device and clear minor glitches that may prevent complete the print job on windows 11.
check printer is connected properly
In addition, check and Make sure the USB cable is well plugged or In the case this is a wireless printer, make sure that the wireless functionality is turned on and working on the printer.
- Make sure there is paper in the tray of the printer.
- Check if the ink or toner cartridge is empty, or Replace the cartridge of the printer.
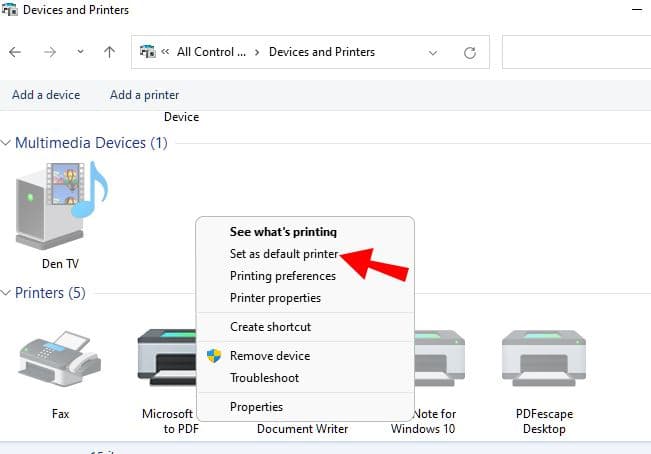
Set as default printer
Open Control Panel and go to Devices and Printers, Right-click the target printer and set it as the default printer.
Run Windows Printer Troubleshooter
Running the printer troubleshooter, iron out some minor issues with the software, restarts the print spooler and its dependence services and, clear stuck print jobs
and help restore the printing job on windows 11.
Running the Printer troubleshooter resolve common driver and settings problems or issues after an update with the wireless or USB printer.
Here’s how to use the troubleshooter.
- Press the Windows key + X and select settings from the context menu,
- Go to System, click on Troubleshoot the select other troubleshooters option
- This will display a list of available troubleshooters, scroll down to locate the printer and click Run next to it
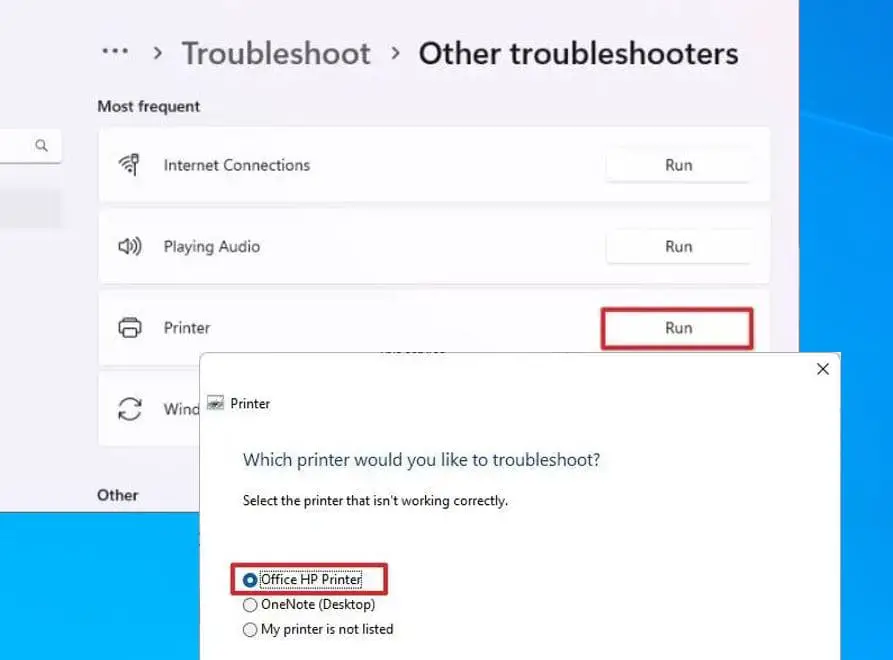
- Select the printer, causing the problem to complete print job, and click next,
- The troubleshooter now run a series of scripts to resolve the printing problem
- If there are any problems impeding your printing process, the troubleshooter will try to resolve them or show you how to fix it.
Restart the Print Spooler
Print spooler manages print jobs on your computer. If for some reason the print spooler service stop running you may experience the printer not working on windows 11. Let’s restart the print spooler service and clear the spooler cache which most probably fixes the printer problems and allows complete print jobs on windows 11.
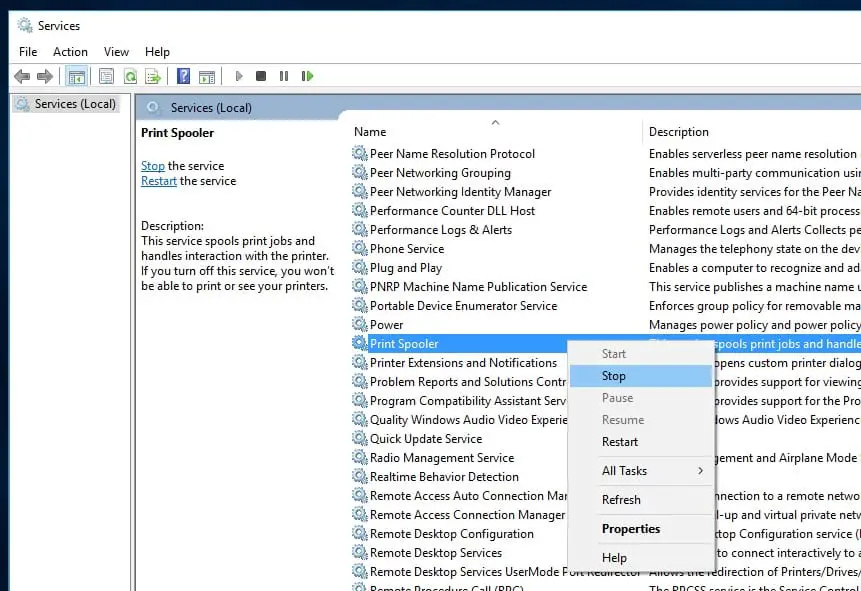
- Press Windows key + R, type services.msc and click ok to open the services window,
- Scroll down to locate print spooler service right click on it select stop,
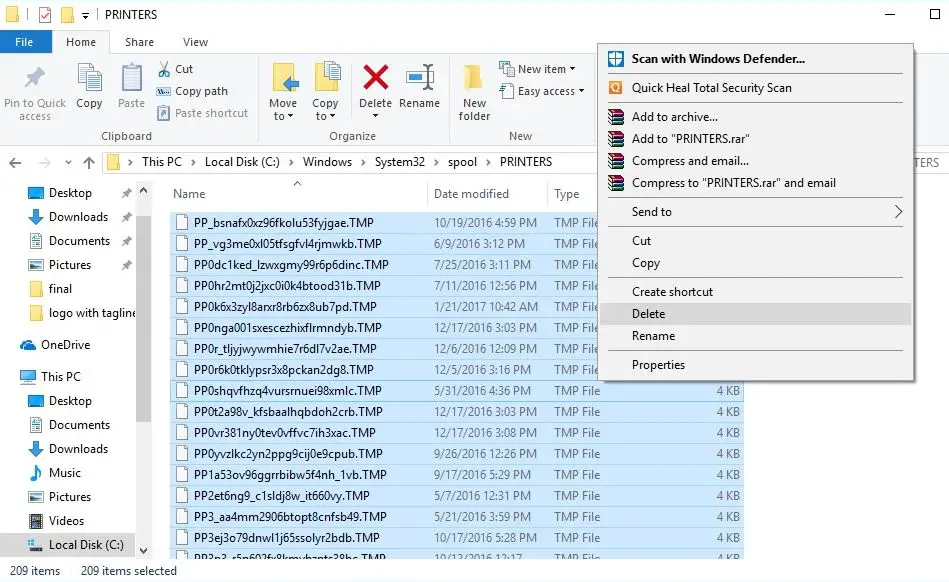
- Now press the windows key + E and navigate to C:\Windows\system32\spool\printers Here delete all the files present in the folder.
- Now, all you have to do is go back to Services and manually start the print spooler service again then Restart your PC.
Update Printer Driver on Windows 11
Printer drivers enable the device to communicate with the computer, but If the printer driver is outdated or missing, the printer may not work. Updating the related drivers might be one of the most efficient solutions for printer problems.
- Press Windows key + X and select Device manager
- This will display all devices and peripherals connected to your computer
- Locate and expand the Print queues section, right-click on the listed printer and select Update driver.
- Click on Search automatically for drivers to get the latest printer driver download from the Microsoft server.
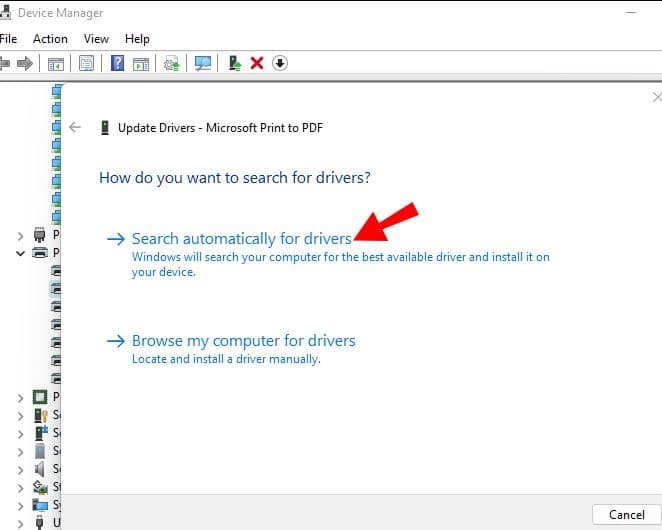
Reinstall the printer on windows 11
Still, the problem is not resolved, Let’s uninstall the printer driver and add the printer again with the latest printer driver.
To remove the printer on Windows 11
- Press the Windows key + X and select settings
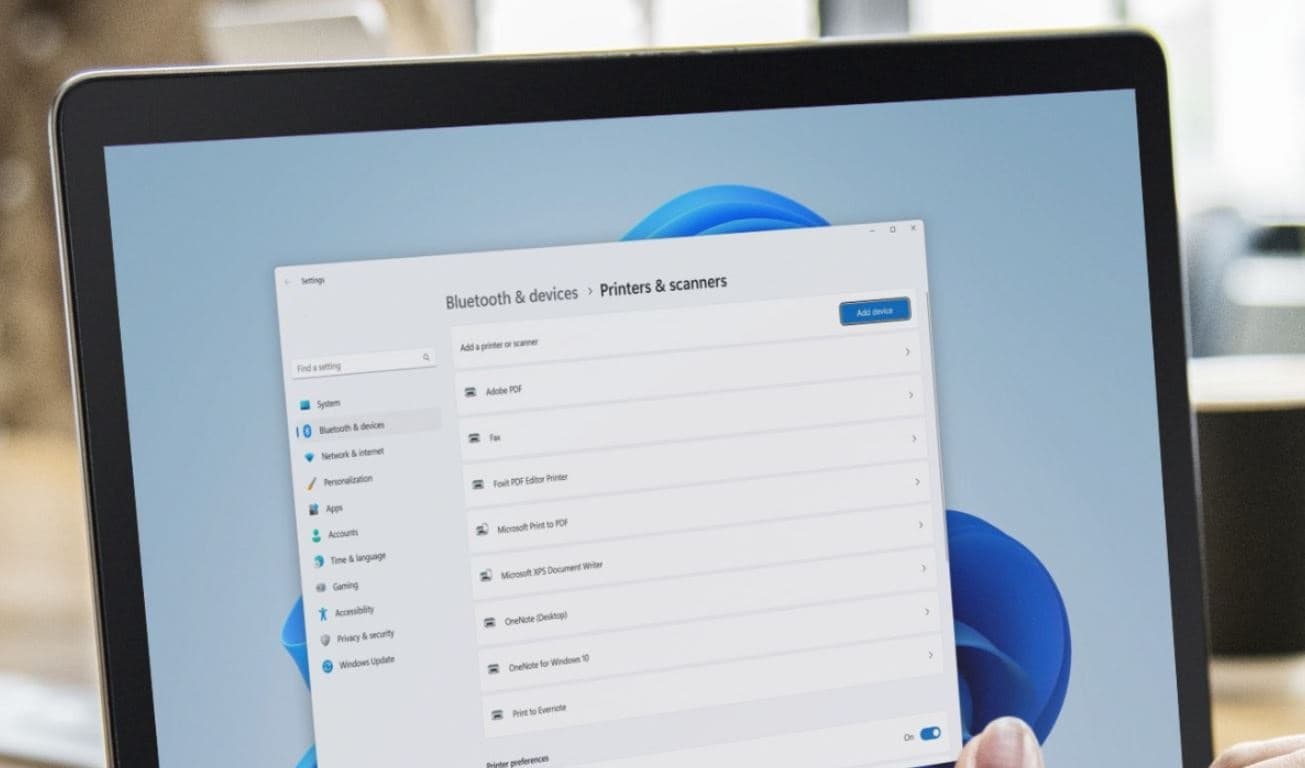
- Click on Bluetooth & devices then Click the Printers & scanners page on the right side.
- Now select the printer to open its properties and Click the Remove button.
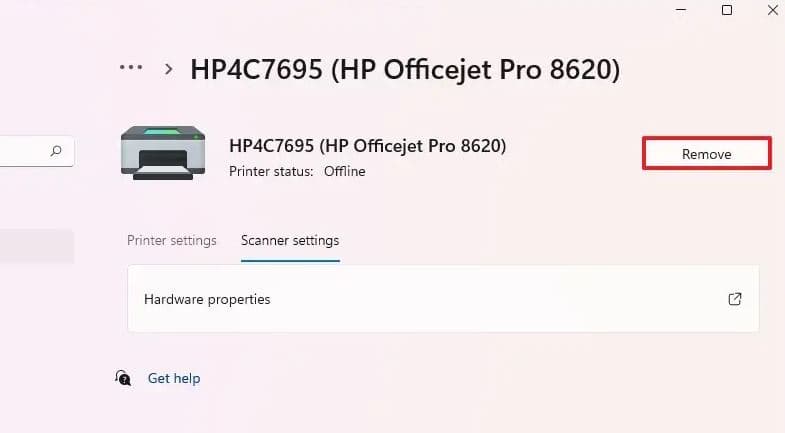
- Next press the Windows key + X and select device manager,
- Locate and expand Expand the Print queues section, right-click on the printer if present there and select Uninstall device.
- Click yes on the configuration popup window, disconnect the printer cable form your computer and reboot your PC.
Download the latest printer driver
Next, do a google search for printer model with the brand name, visit the manufacturer’s site and download the latest printer driver for windows 11.
Install the printer again
Now connect the printer cable to your computer USB port, and windows automatically detect and install the required driver to function the printer.
- If windows fail to detect the printer then open windows 11 settings,
- Click on Bluetooth & Devices than the printer & scanner page on the right side.
- Here Click on the “Add a printer or scanner” button.
- Click Add device to install the printer on Windows 11.
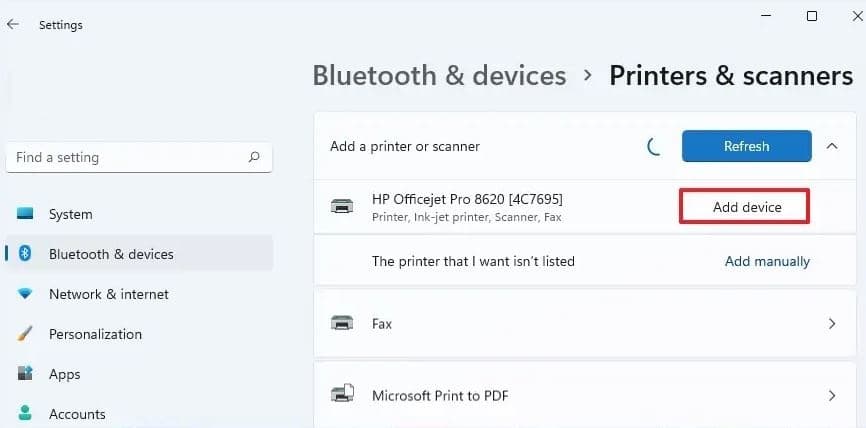
If windows fail to detect the printer then select the add manually option and follow on screen instructions.
Also, you can locate the printer driver you downloaded previously, right-click on it and select run as administrator. And follow on-screen instructions to detect the printer and install the correct printer driver to function the printer.
Repair system file
In addition, corrupt or damaged system files may cause all kinds of issues including printer issues. Run the System File Checker (SFC) that helps scan your system files and repair missing or corrupted system files on windows 11.
- Press Windows key + S and type cmd, right-click on the command prompt select run as administrator,
- Type sfc /scannow and press enter key to execute the command
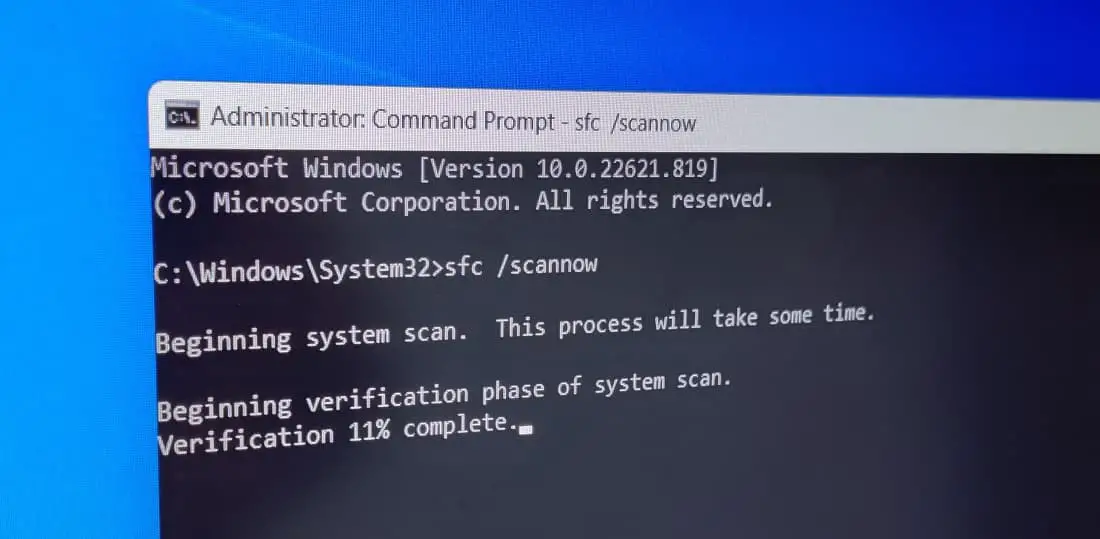
- The SFC utility starts to scan all protected system files on your computer.
- If found the utility replaces corrupted files with a cached copy that is located in a compressed folder at %WinDir%\System32\dllcache.
- Wait for the scanning process to complete, once done reboot your PC to take effect the changes.
Check for New Windows Updates
If your Windows system has some glitches, it may cause the printer not working issue. And to address such issues Microsoft regularly releases windows updates, lets’s update your computer to the latest version to see if it helps fix the issue.
- Press the Windows key and click on the Settings icon.
- Head over to Windows Update, then Click on Check for Updates.
- If pending updates are there allow them to download and install on your computer,
- Once done you need to reboot your computer to apply them.
If the problem started after upgrading to Windows 11 23H2 and tried the above solutions but still printer won’t print pages. It’s time to utilize the system restore feature and revert back system settings to a previous working state where the printer function normally.
Did the above solutions help fix printer problems on windows 11? Let us know on the comments below.
Also read:
- HP Printer Not Printing or documents in the queue, not printing [Troubleshooting Guide]
- Solved: Can’t print documents, Printer Driver is unavailable in Windows 10
- Solved: Page fault in nonpaged area error on windows 10
- Wi-Fi option disappeared after the windows 11 update (solved)
- Computer Won’t Wake Up From Sleep on Windows 11

