Corrupt system files are the most common reason for a whole host of problems on windows 10. Laptop or PC startup or shutdown takes longer than expected, windows updates fails to apply, windows 10 freezes frequently or crashes with different blue screen errors all these are symptoms of system file corruption. There are lots of possible reasons why your Windows files or system files can become corrupted. Power outages, hardware failure, virus malware infection, botched windows updates, virus malware infection or Problems with the disk drives or bad sectors on the disk drive are some common reasons that lead to file corruption on windows 10. If you are experiencing the similar problem you can use Windows built-in tools to repair corrupted files on windows 10. Here is how.
system files are core files that keep Windows working the way it’s supposed to.
How to Repair Corrupted System Files in Windows 10
The most effective way to repair corrupted system files on windows 10 is run the SFC (System File Checker) and DISM (Deployment Image Servicing and Management) commands. In addition, you can run the CHKDSK command to repair the disk drive errors to prevent further file corruption. Installing the latest windows updates also replaces the corrupted file and fixes the problem for you.
Run System file checker utility
SFC or System File Checker is a built-in command line tool that scans all protected system files for problems. If SFC tool found any problem there, the utility automatically replaces corrupted files with a cached copy that is located in a compressed folder at %WinDir%\System32\dllcache. And this is the official and most effective way to identify the problems and repair missing or corrupted system files in Windows 10.
System File Checker (SFC) is a Windows built-in tool that allows users to scan for and repair corrupted Windows system files.
How to Run the SFC Scan to Repair Corrupt System Files
- Press the Windows key + S and type CMD, from the search results right click on the command prompt and select run as administrator,
- Type the command SFC /scannow and press Enter key to execute the same

- The command-line utility will start scanning the system files for problems and try to repair them,
- Depending on the data, the process may take longer wait until the scanning completes 100%
After the SFC scan is complete if you get the output Windows Resource Protection did not find any integrity violations which means system files are clean, and no corrupt files were found during the scan.
But if sfc scan results, “Windows Resource Protection could not perform the requested operation” then perform the System File Checker scan in safe mode. Also make sure that the PendingDeletes and PendingRenames folders exist under %WinDir%\WinSxS\Temp.
Well if you get scan result, Windows Resource Protection found corrupt files but was unable to fix some of them. Then you need to run the DISM restore health command.
Run DISM restore health command
Deployment Image Servicing and Management (DISM.exe) is a command-line tool that can be used to service and prepare Windows images. Running DISM restore health command scans and patches faulty files in the component store of the Windows system image, allowing SFC to function correctly. Whenever sfc scan fails to repair corrupted system files we recommend run the DISM command to enable SFC to do its job.
DISM uses Windows Updates to fix corrupted system files.
- Again open the command prompt as administrator and run command DISM /Online /Cleanup-Image /RestoreHealth
- This will scan the system image for component store corruption and perform repair operations automatically using Windows Update as the source
- This can take around 10-15 minutes up to a few hours to finish depending on the level of corruption.

Let the DISM scan enough time to complete, and after that run the sfc /scannow command again.
And once it is finished reboot your computer, it should automatically replace any damaged or corrupt files and fix problems on your computer.
Install Windows 10 Updates
Microsoft regularly drops windows updates with various bug fixes and security enhancements. It means installing the latest version of windows ensures that you have to latest bug fixes that might fix or replace corrupted system files alongside the latest security updates. That not only address previous problems but also improve your system’s performance and stability.
- Press the Windows key + X and select settings from the context menu,
- Navigate update & security than windows update and hit the check for updates button,
- This will check for available updates and try to download and install them automatically,
- Also If optional updates are pending there allow them to download and install on your device,
- Once done reboot your computer to apply the updates.

Use the CHKDSK Utility
Problems with the disk drive or bad sectors on your drive also may be the primary reason behind system file corruption. Running the CHKDSK command line utility checks the integrity of the file system and attempts to fix any logical file system errors and bad sectors. In simple, the check disk command repair disk error and prevent future file corruption.
- Open command prompt as administrator,
- Running chkdsk command only scans for disk drive errors, but won’t repair them.
- You need to add some extra parameters to fix disk drive errors, you can get these parameters using the command chkdsk /?

- Let run the command chkdsk C: /f /r and press enter key, and Type Y and press enter key when it asks for schedule to perform disk repair on the next start.

Here C: is the drive letter where to perform scan, /f files errors on disk drive and /R locate the bad sectors and recovers readable information on the drive.
Once you reboot your PC this will start scanning dirve C for errors and try to repair disk errors. Once the repair completes it automatically restart to normal window.

Use the System Restore feature
If you have system restore feature enabled, that keeps snapshots of critical system file changes and that can be restored in case of a calamity. Performing system restore, revert your PC to a prior state and undo recent system changes you’ve made. But it’s only possible if you have a system restore point before the start of the corruption issue.
- Press Windows key + R, type rstrui.exe and click ok to open the system wizard,
- Select the recommended option or choose a different restore point manually then click next
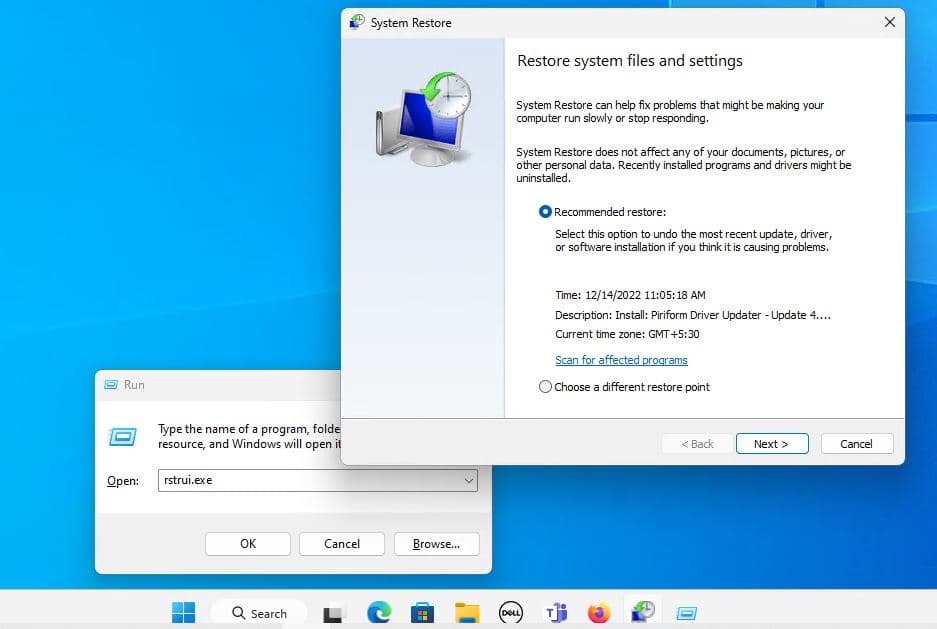
- Click on finish and Select Yes in the warning prompt, and the process will begin.
Note – system restore will only reset the system files, configurations, and programs, it won’t affect your personal files.

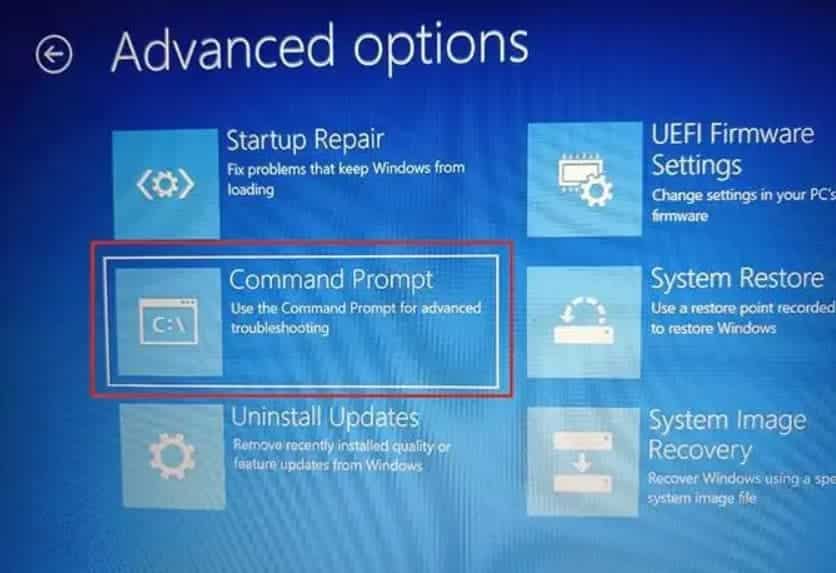
If due to corrupted system files your computer won’t start normally you can access the advanced option. Then use the command prompt to run sfc /scannow command or DISM restore health command. And also you can perform a system restore from there.
Alternatively, there’s always just performing a system reset or reinstalling Windows, too. On Windows 10 you can perform a “Reset this PC” operation to reset Windows to its default state. You’ll have to reinstall your programs after, but you won’t lose any personal files.
Did the above solutions help to fix and repair corrupted system files in windows 10? lets us know in the comments below, also read:
- Windows 10 laptop Freezes Applications Not Responding on Startup? Let’s fix it
- Fix Windows 10 freezes randomly And Restarts Automatically
- Windows 10 Freezes continuously and Auto Restart with BSOD
- Run System file checker Utility on windows 10 !!!
- Top 5 Free Antivirus Software for Windows 10, 8.1 and 7