Did you know by clear windows update cache you can fix most of Windows update download and installation problems such as Windows 10 update stuck downloading, fail to install with different errors and more? When you check for Windows updates, your system automatically caches all the Windows update installation files, which can come in handy when you need to re-apply the update. But sometimes buggy updates or corruption on the cache folder hit the entire process and results Windows updates stuck downloading for hours or fails to install with different errors.
If you are also having trouble with some updates not loading or installing on windows 10 laptop clear Windows update cache is probably a good solution for you. Clearing the Windows update cache removes old update files and downloads fresh update files from the Microsoft server. And fix if windows update fails to install because of the buggy update file. Here in this post we have three different ways to clear the Windows update cache.
Clear Windows update cache not only fixes various windows 10 update installation problems also free up a huge amount of disk space as well.
Contents
Where is the Windows Update cache folder?
The Update Cache is a special folder that stores update installation files. It is located at the root of your system drive, in C:\Windows\SoftwareDistribution\Download.
Delete Windows update files windows 10
It’s pretty easy to delete all cached update files on all supported versions of Windows, including Windows 7, Windows 8.1 and Windows 10. Here in this post, we have three different ways to clear the windows update cache or you can say reset Windows update components easily.
Delete downloaded Windows Update files
- Press Windows + R keyboard shortcut to open Run
- Type services.msc and click ok to open the Windows services console,
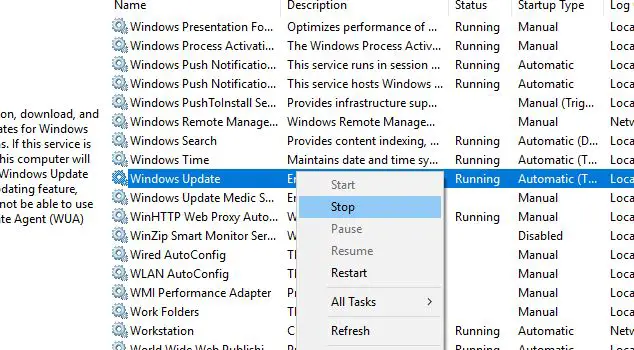
- Scroll down and locate the Windows update service, Right-click on it select stop,
- Again locate Background Intelligent Transfer Service, Right-click and stop the service.
- Now open Windows Explorer using the keyboard shortcut Windows + E,
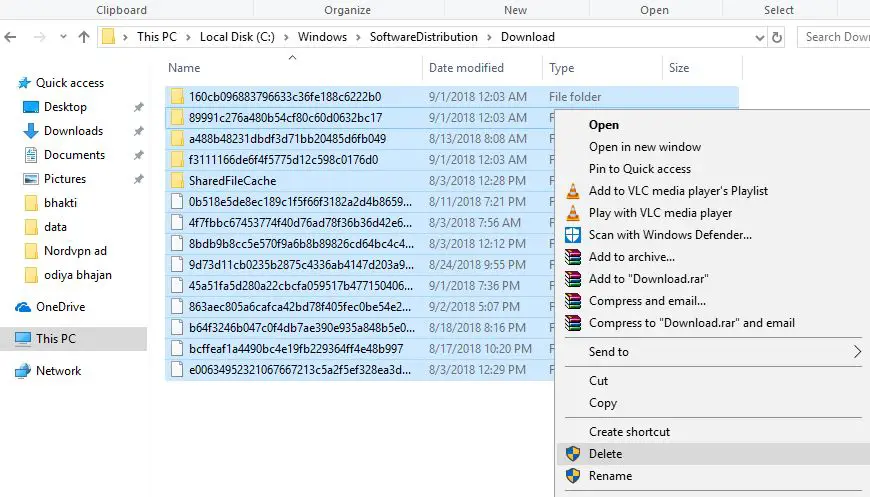
- Then Go to C:\WINDOWS\SoftwareDistribution\Download
- Select all files inside the download folder, (you can do the same using the keyboard shortcut Windows + A)
- And Hit the Delete key on the computer keyboard.
- Again back to the Windows services console,
- Locate the Windows Update service, right-click, and select start the service,
- Do the same with the BITS service as well.
That’s all, Restart your PC, Next time when Windows check for updates this will download fresh update files from the Microsoft server. That is most probably error-free, download and install without any problem.
Clear Windows Update cache from the command line
You may also clear the Windows Update cache from the command line as well.
- Open the command prompt as administrator,
- Accept the UAC prompt that Windows displays.
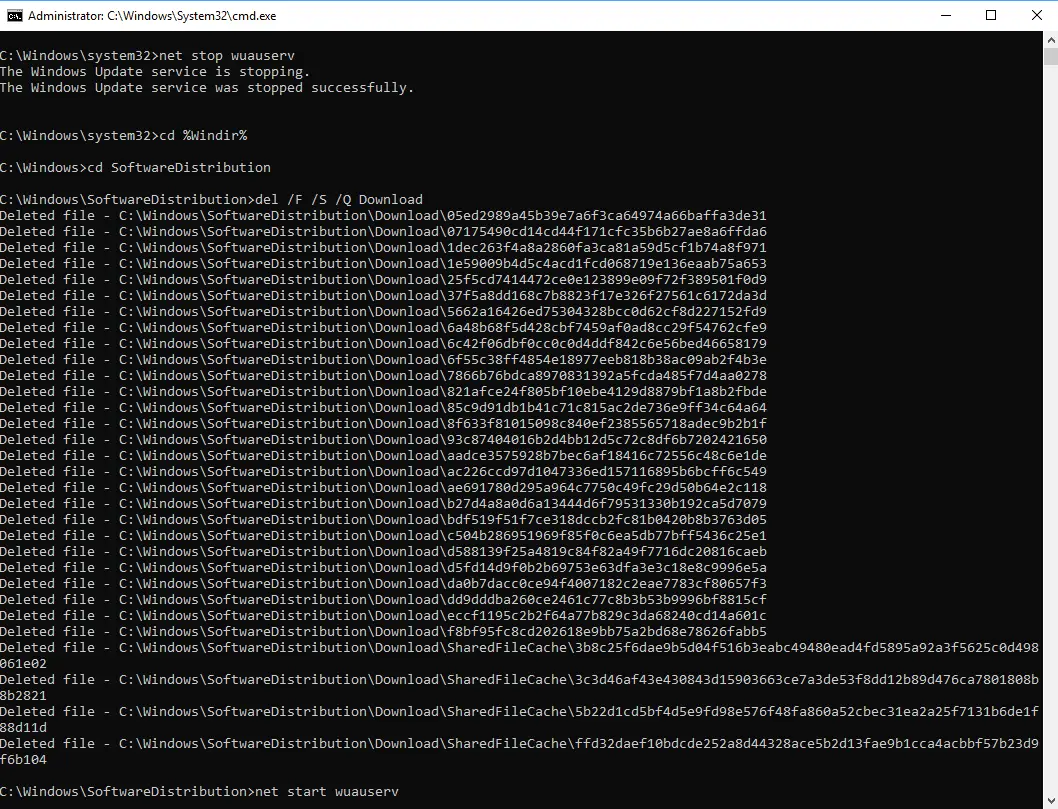
- Run the following commands and hit enter after each line:
- net stop wuauserv (This stops the Windows Update service)
- cd %Windir%\SoftwareDistribution (performing this command Switches to the SoftwareDistribution directory of the Windows installation)
- del /f /s /q Download (Deletes the Download folder of the SoftwareDistribution directory with /f — force the removal of read-only files, /s — include files in subdirectories and /q — in quiet mode to surpress prompts.
- net start wuauserv — (Starts the Windows Update service.)
Reset Windows Update components
Also, you can reset Windows Update components fix Windows Update and get security patches, drivers, and features downloading again on your computer.
- Open the command prompt as administrator,
- Next, we need to Stop the BITS, Cryptographic, MSI Installer and Windows Update Services. To do this, type the following commands at a command prompt. Press the “ENTER” key after you type each command.
- net stop wuauserv
- net stop cryptSvc
- net stop bits
- net stop msiserver
- Now rename the SoftwareDistribution and Catroot2 folder. You can do this by typing the following commands in the Command Prompt. Press the “ENTER” key after you type each command.
- ren C:\Windows\SoftwareDistribution SoftwareDistribution.old
- ren C:\Windows\System32\catroot2 Catroot2.old
Now, let’s restart the BITS, Cryptographic, MSI Installer and the Windows Update Services. Type the following commands in the Command Prompt for this. Press the ENTER key after you type each command.
- net start wuauserv
- net start cryptSvc
- net start bits
- net start msiserver
Type Exit in the Command Prompt to close it and then restart the computer. That’s all next time when you check for windows update this will download fresh update files from the Microsoft server.
Also read:
- Fix Service Registration Is Missing Or Corrupt In Windows 10, 8.1 and 7
- How to Fix ntoskrnl.exe High Memory Usage In Windows 10
- Microsoft Edge Crashes or Not Working after Windows 10 1909 update !!!
- Solved: Windows 10 Automatic Repair Loop “Your PC Did Not Start Correctly”
- Solved: Unknown Hard Error on Windows 10 / 8 / 7 (5 Working Solutions)

