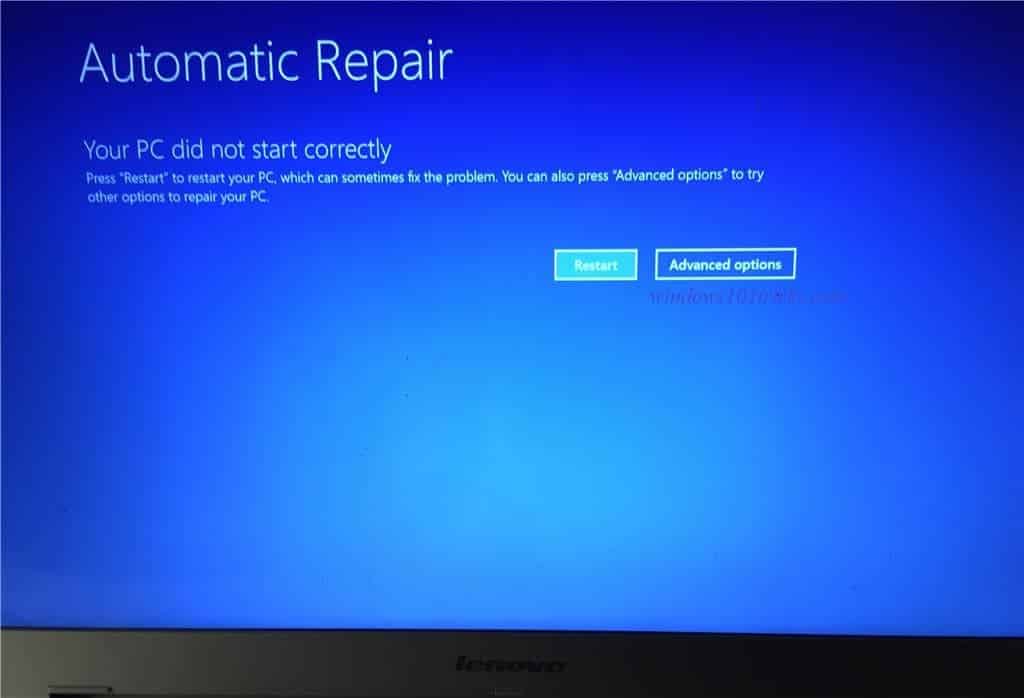
Getting windows Startup error Your PC did not start correctly after a sudden power failure or upgrading your PC to a newer version? While turning on your computer, instead of booting to Desktop normally, Windows 10 displays an Automatic Repair screen with the message Your PC did not start correctly. As the screen mention itself that if you hit the Restart button, the problem may solve automatically. But if this continues to happen after every reboot, you need to perform additional troubleshooting steps to solve this problem.
The problem mostly occurs if the Boot Configuration Data (BCD) files are corrupted or missing. There is a chance Due to power failure or while the system upgrade process the Master Boot Record (MBR) file gets corrupted or missing. Some other Reasons are Any hardware changes such as re-installation of hard-drive, corrupted system files etc.
Your PC Did Not Start Correctly Startup problem
If you are also struggling with similar problems, windows unable to start normally, Windows Perform Automatic repair for hours and result your PC didn’t start correctly. Here some applicable solutions to fix automatic repair your pc did not start correctly on Windows 10 and 8.1 computers.
Access to Advanced options
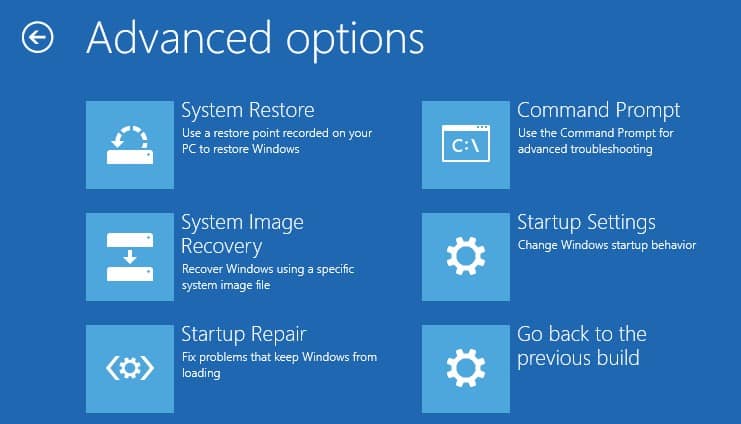
As windows is unable to start normally, we need to access advanced options. Where you can get various tools to fix windows Startup problems. Either you can click on Advanced options on the error screen, Or you can follow these steps to access windows Advanced options.
Perform Startup Repair
Here on the Advanced options screen click on the Startup repair option. When you select startup repair this will restart the window and start the diagnostic process. And analyze the various settings, configuration options, and system files Especially look for :
- Missing/corrupt/incompatible drivers
- Missing/corrupt system files
- Missing/corrupt boot configuration settings
- Corrupt registry settings
- Corrupt disk metadata (master boot record, partition table, or boot sector)
- Problematic update installation
After complete, the repair process windows will Restart and start normally. If you still have the same problem, showing your pc did not start correctly follow the next solution.
Run System File Checker Utility
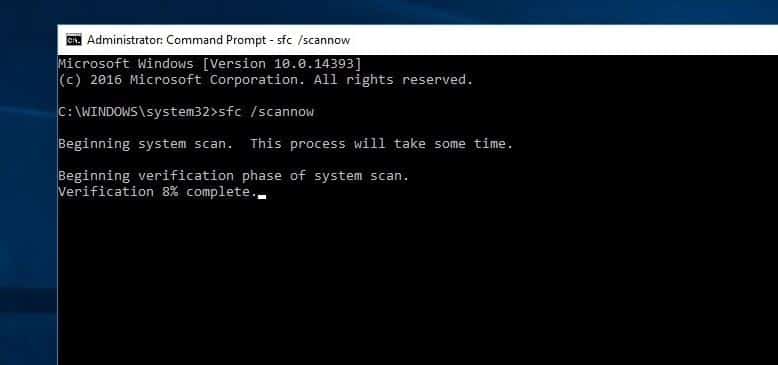
If startup repair is unable to fix the problem, Then try to run the SFC utility that scans and restores missing, corrupted system files. Fix the problem if any corrupted system file causes this startup problem and your pc does not start correctly. To do this again access Advanced options And click on Command prompt. Here on the advanced command prompt type the command sfc /scannow and hit the enter key to run the system file checker.
The SFC utility checks for missing corrupted system files and if found any the utility restores them from a special folder located on %WinDir%\System32\dllcache. Wait until 100% complete the scanning process After that restart the windows and check system start normally on the next boot.
Run DISM command
If the SFC scan results Windows Resource Protection found corrupt files but was unable to fix some of them then Run the DISM Tool which repairs the system image and enables SFC utility to do its job. To do this on the same command prompt screen type dism.exe /online /cleanup-image /restorehealth and hit the enter key to run DISM Tool.
Rebuild Master Boot Record
MBR or Master Boot Record is the data that is present in the first sector of any hard disk. It tells where the operating system is located so that it can be loaded. If the Master Boot Record (MBR) file is corrupted this may cause startup problems such as your pc did not start correctly.
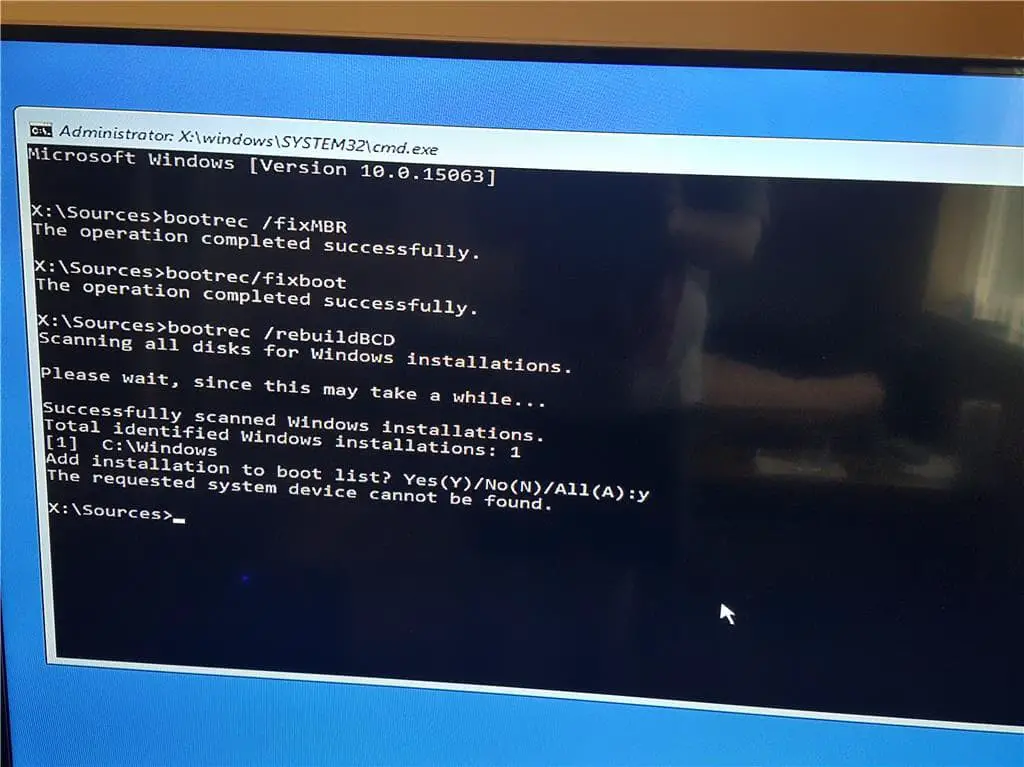
After running the DISM command Restart windows and check Windows start normally. If not then we need to repair the BCD Error by performing the following command below. Again open the command prompt from Advanced options and type the command below one by one and hit the enter key to execute the same.
- bootrec /fixmbr
- bootrec /fixboot
- bootrec /ScanOS
Boot Configuration Data
BCD or Boot Configuration Data is a firmware-independent database file that has boot-time configuration data. It is required by Windows Boot Manager and replaces the boot.ini that was used by NTLDR earlier. If this Boot Configuration Data (BCD) file get corrupted you may face different startup problems. If perform above solution didn’t solve the issue then try to rebuild the BCD file which may very helpful to Fix Your PC Did Not Start Correctly startup problem in Windows 10
To rebuild the BCD file, in the Command Prompt, type the following command and hit Enter:
bootrec /rebuildbcd
This will scan for other operating systems and lets you select the OS’s you want to add to BCD. Now there are two scenarios you can encounter:
(1)Total identified Windows installations: 0. Perform the next commands below.
(2)Total identified Windows installations: 1. Type Y hit Enter and reboot your computer.
Type the commands below and hit Enter:
- bcdedit /export c:bcdbackup
- attrib c:bootbcd -h -r -s
- ren c:bootbcd bcd.old
- bootrec /rebuildbcd
Type Y and hit Enter.
That’s all you have successfully Rebuild the Boot Configuration Data file. Simply close the command prompt and restart Windows. check This time windows started normally without any startup errors.
Some Other Steps to Fix Your PC Did Not Start Correctly
If after performing startup repair, running SFC and DISM Tool, Rebuild MBR and BCD file Didn’t fix the startup problem. Then try to boot into safe mode, where Windows start with minimum system requirements and allows to perform troubleshooting steps.
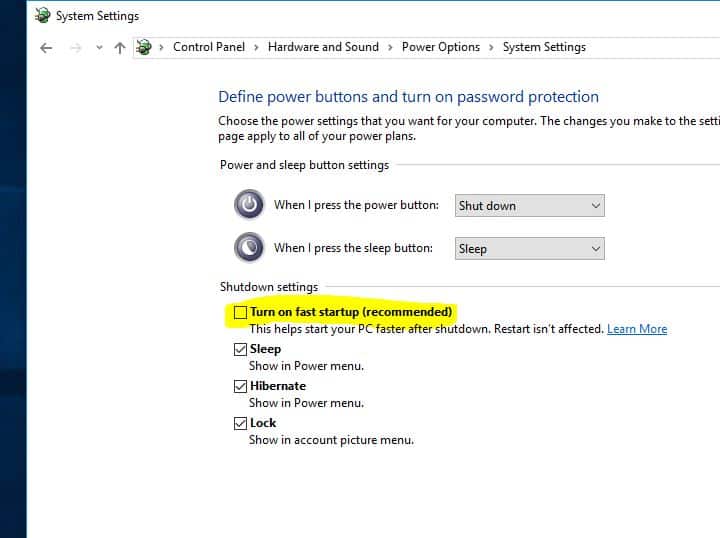
When you boot into safe mode first Turn off the Fast Startup feature
- From Control Panel search for and select Power Options
- choose what the power buttons do
- Click on change settings that are currently unavailable
- Now uncheck the Turn on fast startup option.
- Perform Windows clean boot to diagnose and fix if any third party service/ startup application causes the issue.
- If you notice the problem started after installing a third-party application, simply uninstall the same from the control panel -> program & Features -> right-click the recently installed application and uninstall.
- Also, open the Device Manager and check any driver with a yellow triangle mark. If found any uninstall and re-install the driver. And update the drivers especially the Display driver To get rid of most of the startup problems.
These Are some most applicable solutions to fix the Windows automatic repair loop your PC did not start correctly startup error message in Windows 10/8/7. I hope to apply these solutions and also fix the problem for you. Still, have any queries or suggestions about this post, or face any difficulty while applying the solutions feel free to discuss in the comments below.
Also, Read
- Fix Windows 10 Frequently Disconnect Internet Connection
- Solved: Unknown Hard Error on Windows 10 / 8 / 7 (5 Working Solutions)
- How To fix Windows 10 High disk usage Problem on Startup
- Solved: Kernel Security Check Failure Windows 10 Blue Screen Error
- Fix This App Has Been Blocked For Your Protection in Windows 10
