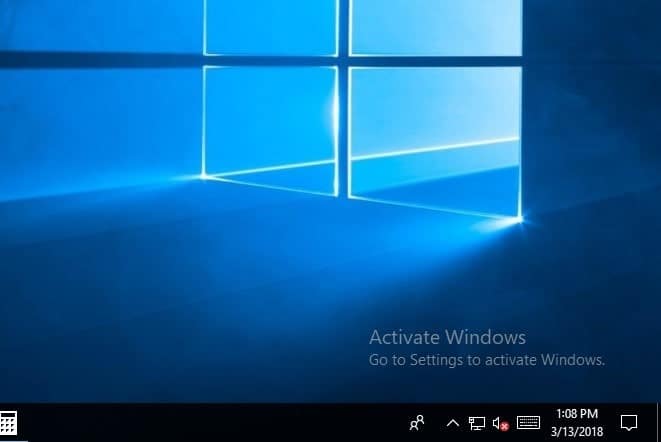
Are you getting the “Activate Windows- Go to settings to activate windows” watermark on your desktop? Or Looking for a way to remove Activate Windows watermark permanently from your desktop? This is because your Windows license has expired. If you have a product key then you can activate it directly, to remove activate Windows watermark. But if you don’t have one, here is how to remove Activate Windows 10 watermark without a product key.
Here are the reasons why you might be seeing the “Activate Windows” watermark on your desktop:
- It is most commonly because Your Windows 10 operating system has not been activated with a valid license key.
- If you were using a trial version of Windows 10, the trial period has likely expired.
- The license key entered may be incorrect or invalid or There may have been an issue during the activation process.
- Again Significant hardware changes to your computer may trigger a reactivation prompt.
- You might be using a pirated or unauthorized version of Windows, which lacks a valid license.
- If there are network issues during the activation process, it may not complete successfully.
Contents
- 1 How to remove the Activate Windows watermark?
- 1.1 Check Your Activation Status
- 1.2 Enter Your Product Key
- 1.3 Troubleshoot Activation Issues
- 1.4 Reset the license status
- 1.5 Remove the active Windows watermark with help of cmd
- 1.6 Registry Tweak to remove Activate Windows watermark
- 1.7 Video how to remove windows watermark
- 1.8 Windows watermark remover tool
- 1.9 Disable Activate Windows Watermark by using Ease of Access
How to remove the Activate Windows watermark?
To remove the “Activate Windows” watermark in Windows 10, you can follow a few straightforward steps.
Check Your Activation Status
The first step is to ensure you have a valid Windows 10 product key. To do this, go to “Settings” by clicking on the Windows icon in the taskbar, then select “Update & Security” > “Activation.” Here, you can check if Windows is activated. If it’s not, you’ll need to enter a valid product key.
Enter Your Product Key
If your Windows 10 is not activated, you can enter your product key to activate it. Go to “Settings” > “Update & Security” > “Activation” and click on “Change product key.” Enter your valid product key, and Windows should activate. After activation, the watermark should disappear.
Troubleshoot Activation Issues
If you’ve entered a valid product key and the watermark persists, you might need to troubleshoot activation issues. You can click on “Troubleshoot” in the “Activation” settings, and Windows will attempt to resolve any activation problems.
Reset the license status
If the watermark still lingers, you can try using Command Prompt to force activation. Open Command Prompt as an administrator. Run command slmgr /rearm to reset the licensing status of your Windows. After running it, restart your computer.
Remove the active Windows watermark with help of cmd
With a simple notepad trick, you can easily remove Activate Windows 10 Watermark from your desktop. Let’s see how to do it.
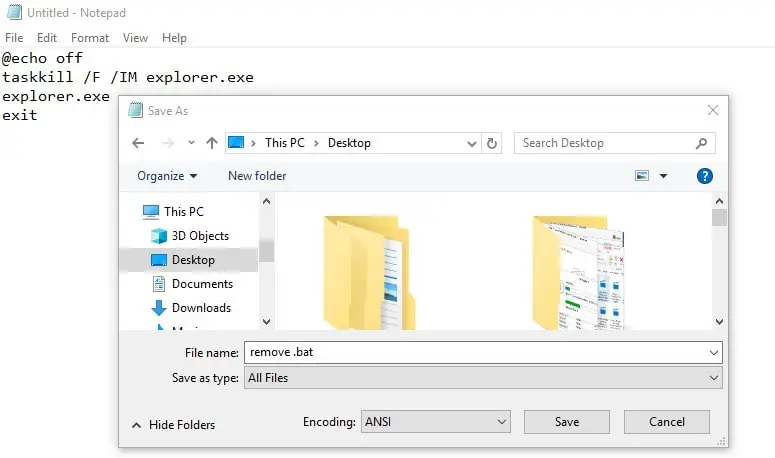
- First, open Notepad on your PC, You can do this by clicking on the start menu search type Notepad and hit the enter key. Now on Notepad type, the below commands :
@echo off
taskkill /F /IM explorer.exe
explorer.exe
exit
- Go to File and click “Save as”. Here select the location where you want to save the file. Then Change the save as type to All Files (*.*) and Give the file name as “ remove.bat”
- Now open the file location where you saved it. You will see a file as shown below image. Right-click on the remove.bat file and click on “Run as administrator”
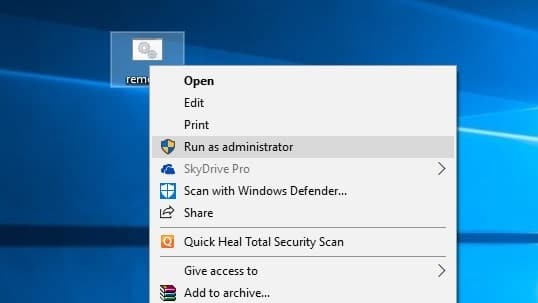
A command prompt will be opened and closed itself, Now restart your laptop or desktop. That’s all there is no more “activate windows go to settings to activate windows” on your Desktop.
Registry Tweak to remove Activate Windows watermark
Here is another tweak to remove Activate Windows 10 watermark using the Windows registry editor.
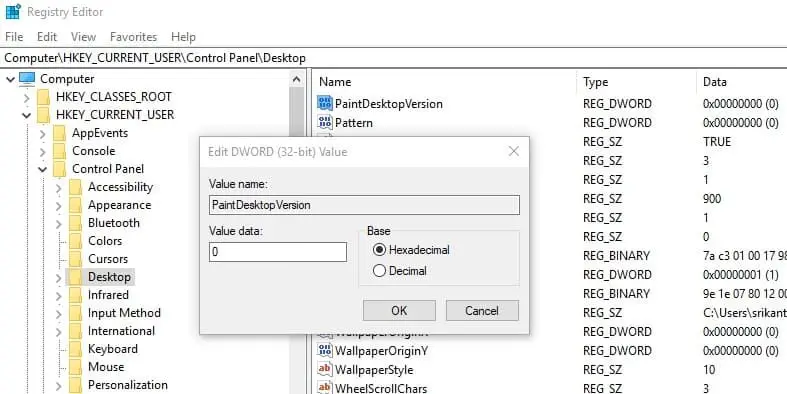
- Open the Windows registry editor by Press Windows + R, type regedit, and hit the enter key.
- Then expand HKEY_CURRENT_USER\Control Panel\Desktop
- Double-click on the value “PaintDesktopVersion” in the right-hand window.
- Change the value “1” to a “0” and click OK to save changes.
- Close the registry editor and any other programs and restart your computer.
Video how to remove windows watermark
In addition, refer to this video for one more registry tweak that helps remove Active Windows watermark on Windows 10.
Windows watermark remover tool
Still, Activate Windows watermark keeps coming back. You can use a third-party Windows watermark remover tool, “Universal Watermark Disabler 1.0.0.6” which helps remove all kinds of watermarks in Windows 10.
Running this tool didn’t delete any branding strings (for example does not modify system files) only remove watermarks including Test Mode, Build string in the evaluation and pre-release builds,
- Download ‘Universal Watermark Disabler’ here,
- locate and unzip the file in the download folder
- save and close all applications running on your computer
- Finally, double-click on uwd.exe to run the tool, Click yes if UAC prompts for permission,
- Click on install, The application will run and automatically restart your computer.
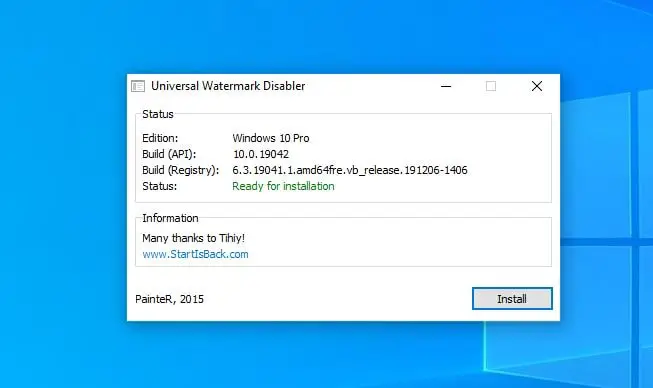
- On the next start when you log in back to your machine you will notice the remove windows activation message disappear.
Disable Activate Windows Watermark by using Ease of Access
Yes, you can also remove the Windows 10 activation watermark from the ease of access options.
- Press the Windows key + S type control panel and select the first result,
- Go to Ease of Access Centre (to get this option make sure to Change the control panel view by large icons)
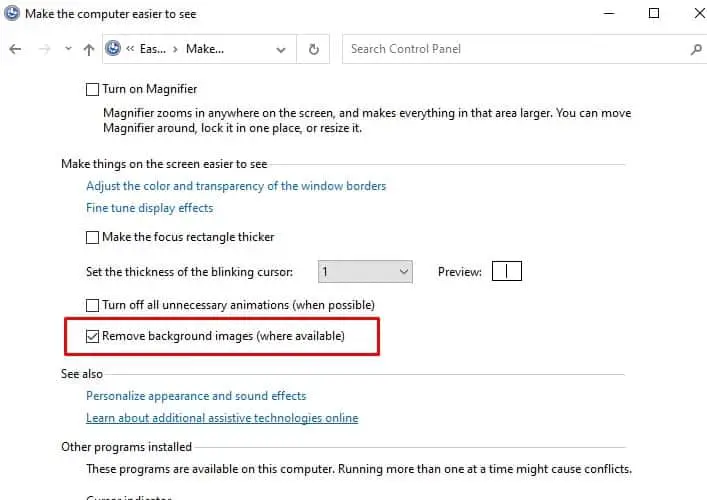
- Click on Make the computer easier to see, scroll down to the bottom and check the mark on Remove background images (where available)
- Click ok and restart your PC and check the status of remove the Windows 10 activation watermark.
That’s all, did the above solutions help remove Activate the Windows watermark on Windows 10? Let us know in the comments below.
FAQ:
Why is there an “Activate Windows” watermark on my desktop?
- The watermark appears when your Windows operating system is not activated with a valid license key.
How can I activate Windows and remove the watermark?
- You can activate Windows by entering a valid license key. Go to Settings > Update & Security > Activation, and select “Change product key.” Enter your valid key to activate.
What if I don’t have a valid license key?
- You’ll need to buy a valid license key from an authorized retailer or directly from Microsoft.
Can I use Windows without activating it?
- Yes, you can use Windows without activating it, but there are limitations. You won’t be able to customize certain settings, and you’ll receive periodic reminders to activate.
Are there any free alternatives to obtaining a valid license key?
- No, Buying a valid license key through legal means is essential. Avoid using unauthorized or pirated keys, as it’s against Microsoft’s terms of service. In addition, the tips mentioned this post may help remove activate watermark on Windows 10.
I’ve entered a valid key, but the watermark is still there. What should I do?
- If you’ve entered a valid key and the watermark persists, try restarting your computer. If the issue persists, Run the troubleshooter or contact Microsoft Support for assistance.
Can I remove the watermark without activating Windows?
- While there are methods circulating online, it’s important to note that using such methods may violate Microsoft’s terms of service and could lead to legal consequences. It’s recommended to activate Windows through official channels.
Can I transfer my Windows license to a new computer?
- It depends on the type of license you have. Retail licenses can be transferred, but OEM licenses are typically tied to the original hardware.
What if I’m using a trial version of Windows?
- If you’re using a trial version, you’ll need to purchase a valid license key to activate Windows and remove the watermark.
I upgraded from an older version of Windows. Do I still need to activate it?
- A10: If you upgraded from a genuine, activated version of Windows, your license should carry over. However, if prompted, you may need to re-enter your license key.
Also, read:
- Laptop Buying Guide – What to Look for When Buying a Laptop
- SSD vs HDD Speed and Performance Comparison
- What Is The Difference Between A VPN And A Proxy and how do they work?
- How To Enable and configure Hyper V virtualization on Windows 10
- What is the Difference Between 32-bit and 64-bit Windows 10 and Processor (CPU)











YAY! The first one worked. Thank you it was driving me nuts.
Curiously, it was already set to 0 when I opened it, and yet the watermark still seems to be present.
Thank you for your help. However, as of 12/24/2020 these have become only a temporary fix. The watermark comes back roughly 3 hours after restarting.
Method 1 worked for a while–but then the watermark reappears.
None of these work