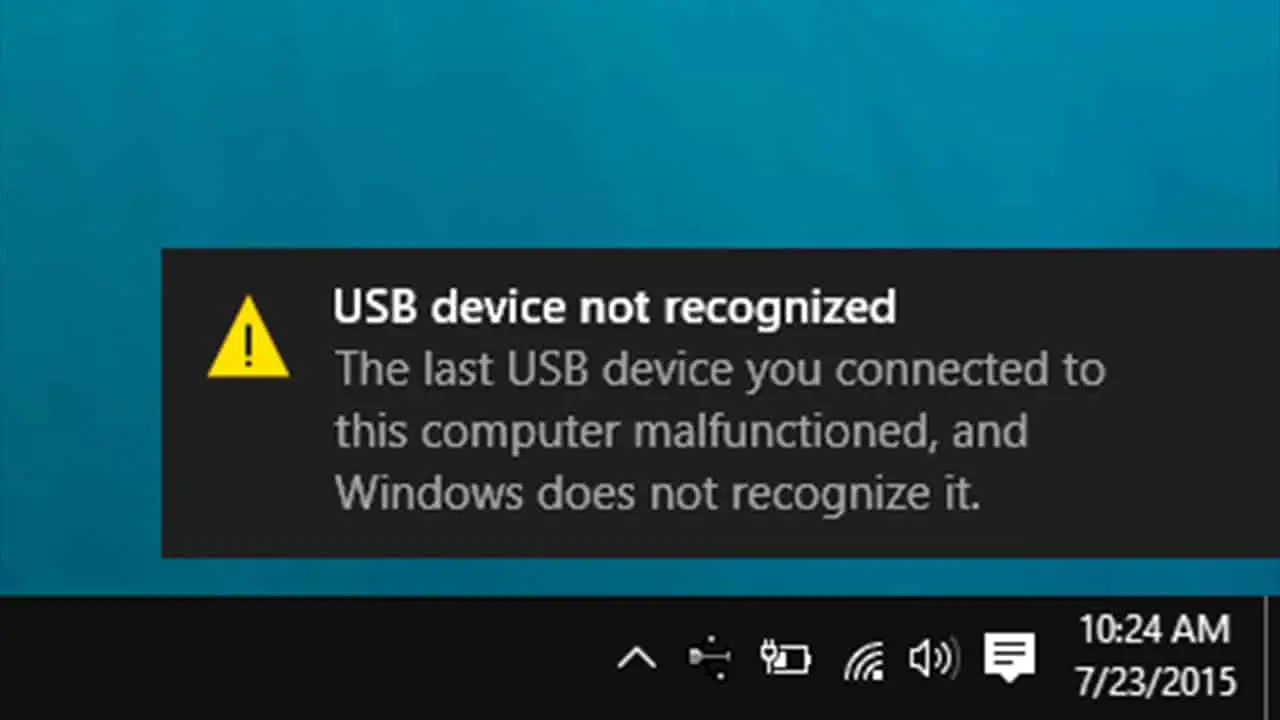
Sometimes while trying to access data on an external USB hard drive, you may receive the following error: “USB Device not recognized: One of the devices attached to this computer has malfunctioned and windows does not recognize it.” Even “USB device not recognized” error occurs while plugging in a USB mouse, keyboard, camera, or other devices. This is because currently loaded USB driver has become unstable or corrupt, the external drive may be entering selective suspend or the USB controllers may have become unstable or corrupt. If you also have similar problems here effective solutions to fix USB device not recognized windows 10.
USB device not recognized
Note: Solutions below also applicable to fix:
- USB Device not recognized
- Unrecognized USB device in Device Manager
- USB Device driver software was not successfully installed
- Windows has stopped this device because it has reported problems.(Code 43)
- Windows can’t stop your “Generic volume” device because a program is still using it.
- One of the USB devices attached to this computer has malfunctioned, and Windows does not recognize it.
- A simple system restart might be helpful. Just remove your USB device, restart your Windows computer, then again plug in your USB Device see if it works or not.
- Also, Disconnect all the other USB attachments restart computer then try to check whether USB is working or not.
- For some users, If previously the USB device has not been properly ejected it may cause this Error on next connect. In This Cause plug your device into a different PC, let it load necessary drivers on that system and then properly ejecting it. Again plug in the USB into your computer and check.
- Additionally try to connect the USB device on Different USB port especially Use computers backside USB port this is very helpful for some users which fix USB not recognized issue for them. If you still getting the same fallow next solution.
Reinstall USB Device Drivers
Most of the time corrupted USB drivers may cause this Device not recognized issues, Especially after Windows 10 Upgrade. Update or reinstall the USB driver to the latest version will help to fix this.
Update USB device driver
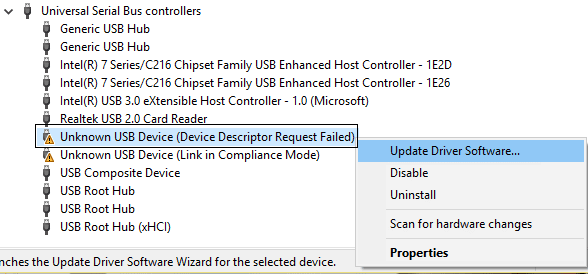
- Press Windows + x and select Device Manager,
- Expand Universal Serial Bus Controllers at the bottom and look for the Unknown Device.
- Right-click on the Problematic USB (should be marked with Yellow exclamation) then right click and click “Update Driver Software.”
- Then Allow Windows to automatically find and update that driver by select Search Automatically for updated driver software.
- Windows automatically check and install the latest driver if available.
- Now remove the USB device simply restart windows
- Let’s re-connect the USB device check worked.
Reinstall USB device driver
If update USB driver didn’t fix the problem, try to reinstall the USB device driver by following steps below.
- Again open device manager,
- Expand Universal Serial Bus Controllers
- look for the Unknown Device, Right click and select uninstall.
- Confirm it by checking the box labeled Delete the driver software for this device.
- Restart Windows and reconnect the USB device, check this helps
Finally, if none of the preceding steps worked, you need to check your motherboard chipset drivers. Identify the make and model of motherboard, visit the manufacturer’s website and locate the latest chipset driver. Install the very latest drivers and reboot your computer.
Change USB Root Hub Setting
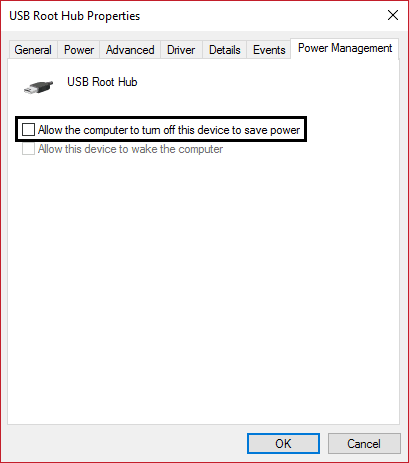
If the above method fails to fix the change the USB Root Hub Settings by unchecked Allow the computer to turn off this device to save power option will help to fix the issue.
- Again open device manager using Windows + X keyboard shortcut
- Then Expand Universal Serial Bus Controllers at the bottom,
- Look for USB Root Hub option, Right click on it and select properties.
- A new popup window will open move to Power Management tab
- Here uncheck the Allow the computer to turn off this device to save power.
- click ok to save changes.
Note: If you have more USB Root Hubs, you need to repeat this operation a couple of times.
Change the USB Selective Suspend Settings
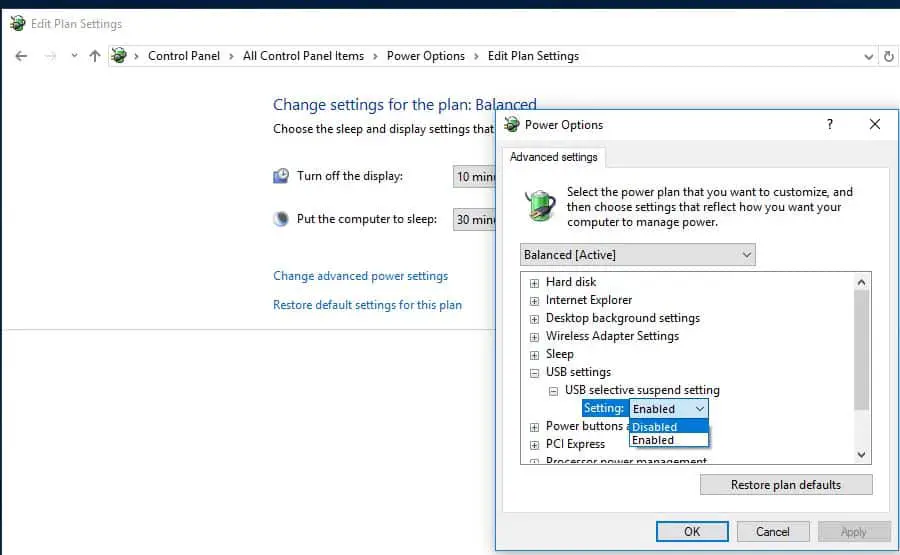
Also Changing the USB selective suspend settings on power options will help to fix USB device not recognized error on Windows 10 computer.
- Press Windows key + R type powercfg.cpl and ok to open the Power Options window.
- Click on Change plan settings on your currently select power plan,
- Then click on Change advanced power settings.
- A new popup window will open here expend USB Settings
- Then again Expand USB selective suspend settings As shown below image.
- Here Disable both On battery and Plugged in settings.
- Then Click Apply and Restart your PC.
Disable Fast Startup
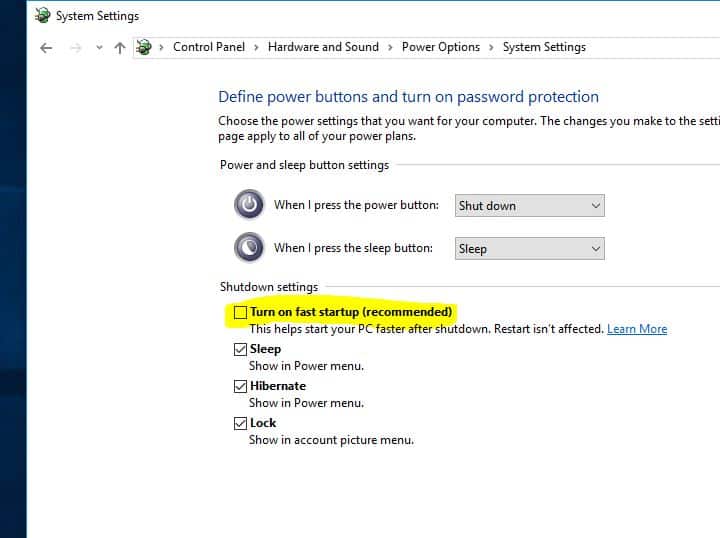
Some Of windows users report After disable the Windows 10 fast Startup Feature on power option the problem USB device not recognized Error fixed for them.
- Open Control panel,
- Search for and select power options,
- On Left side Click on Choose what the power button does,
- Then Click on Change settings that are currently unavailable.
- Here Uncheck Turn on fast startup As shown below image and press Save changes.
Registry Tweak To Fix Device not recognized Error
If all above methods fail to fix USB Device not recognized Error then We need to perform some advanced Tweak to fix this issue.
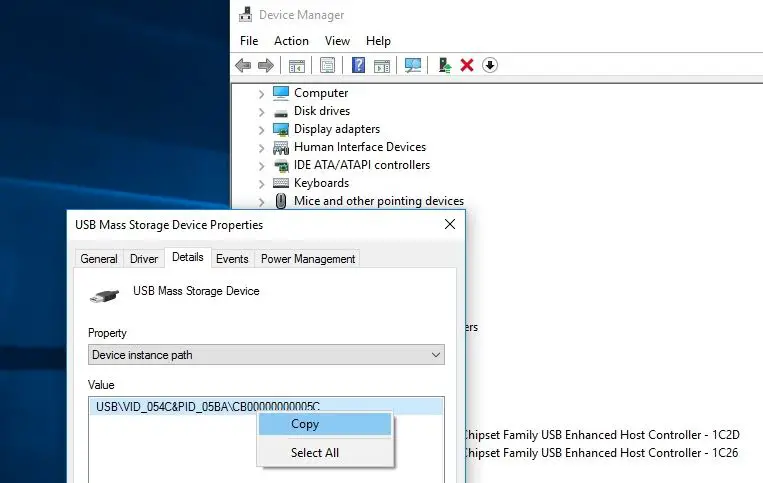
- First plugin the problematic Device, then open Device manager
- Now expand Universal Serial Bus controllers
- Right click on yellow triangle marked USB device which one causing the problem and select properties.
- On Device property move to the Details tab.
- Here bellow Property drop-down, select Device instance path.
- And In the Value section, highlight the value and right click it, select Copy.
For example: As shown below my device instance path is USB\VID_054C&PID_05BA\CB00000000005C.
Tweak on Windows registry editor
After copy the device instance path open windows registry editor
Press Windows + R, type regedit and ok
Then navigate to the following key.
HKEY_LOCAL_MACHINE\SYSTEM\CurrentControlSet\Enum\<Device Instance Path>\Device Parameters
Note Device instance path: USB\VID_054C&PID_05BA\CB00000000005C ( Highlighted one is Device Instance Path.) May for you Device instance path is different change it as per yours.
So For me the registry path is :
HKEY_LOCAL_MACHINE\SYSTEM\CurrentControlSet\Enum\ USB\VID_054C&PID_05BA\Device Parameters.
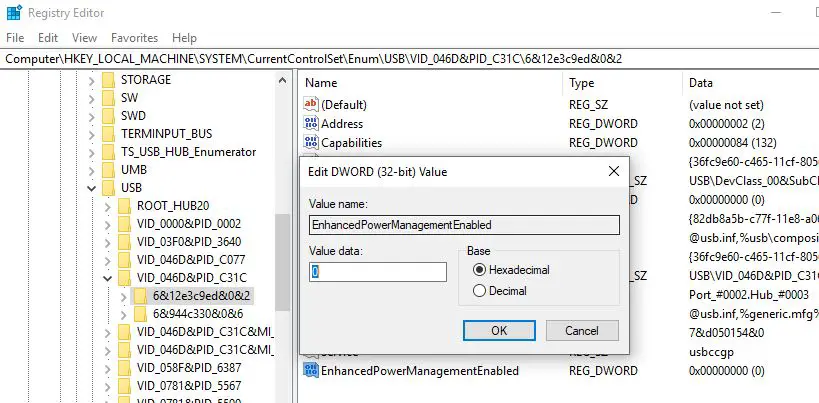
- Here select Device Parameters registry key
- on middle pane, Right click New > DWORD Value and name it to EnhancedPowerManagementEnabled.
- Again Double click on it and on value field set 0.
- click ok and Close Registry Editor.
- Now Remove the USB device and simply Restart the windows.
- When next time you plug in the device this will work without any error.
Did these solutions help to fix USB device not recognized windows 10? Let us know on comments below, also read:
- Fix Computer Sound Volume Too Low in Windows 10/8.1 and 7
- Printer only print one page then hangs until reboot Windows 10
- Windows 10 Freezes frequently while playing Games
- Windows cannot initialize the device driver for this hardware (Code 37)
- Solved: Windows 10 System Service Exception BSOD (bug check 0x0000003B)
