The latest Microsoft Windows 11 is Especially optimized for Gaming performance through improved CPU, GPU utilization, and DirectStorage technology. However, there are times when you need to fix game lag on Windows 11. A number of users report, “All Games Recently Started Lagging” since the Windows 11 update, most of the games installed on their computer stuttering without any obvious reason. Similar problem “Games start lagging a few seconds after launch” was reported while playing online Games on Windows 11. There are multiple reasons behind this problem, Here in this article we explore What Causes Games to Stutter on Windows 11 and how to optimize Windows 11 PC for Gaming.
Contents
How to optimize Windows 11 for gaming
There are multiple reasons why you might experience Games to Stutter on Windows 11, Hardware compatibility or an Outdated Graphics driver installed on your PC are common. Again you might haven’t updated the Windows operating system for a while, or Some relevant gaming services consuming system resources and may causing the issue.
And to fix the lagging problem and optimize Windows 11 for gaming you need to ensure the minimum system requirements for the Game. In addition, updating or reinstall the graphics driver, change power settings to “High-performance mode”, disabling background process and resource usage, and Adjusting the in-game graphics settings can help improve Gaming performance no Windows 11.
Note – If you are playing online game, and notice lagging issue on Windows 11 you need to check and ensure the Internet connection is stable.
Update Your Graphics Card Driver
One of most primary reasons for experiencing game lag on Windows 11 is your graphics card or GPU driver. The Graphics card driver communicates with the graphics card to render the game’s graphics, and process effects, and provide the necessary resources for smooth gameplay. The latest Graphics driver ensures the latest optimizations, bug fixes, and compatibility updates for specific games. And most of time updating the Graphic driver or reinstalling it with the latest version fixes the Game lag issue on Windows 11.
An outdated or incompatible drivers may result in poor performance, graphical glitches, or even game crashes.
To update the Graphics driver on Windows 11:
- Press Windows key + X and select the device manager
- Expand the Display adapters tree, right-click your graphics card, and select Update driver
- Choose the option to search automatically for a driver or browse your computer for one to update the driver manually.
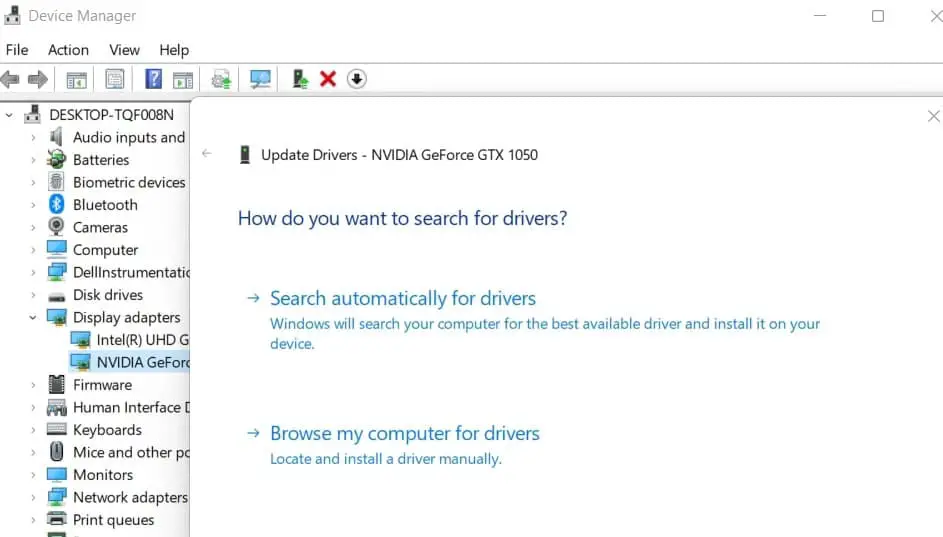
Also, you can visit the GPU manufacturer’s software for driver updates if a new driver isn’t found. For example, NVIDIA’s GeForce Experience software often finds the most current and best driver updates.
Reinstall the Graphics driver on Windows 11
- Press Windows key + R, type devmgmt.msc and click ok to open the Device manager
- Expand the Display adapters option, right-click on Graphics driver and select properties
- Here under the Driver tab, locate and click on uninstall device option,
- Click uninstall again when it prompts for confirmation, and reboot your PC.
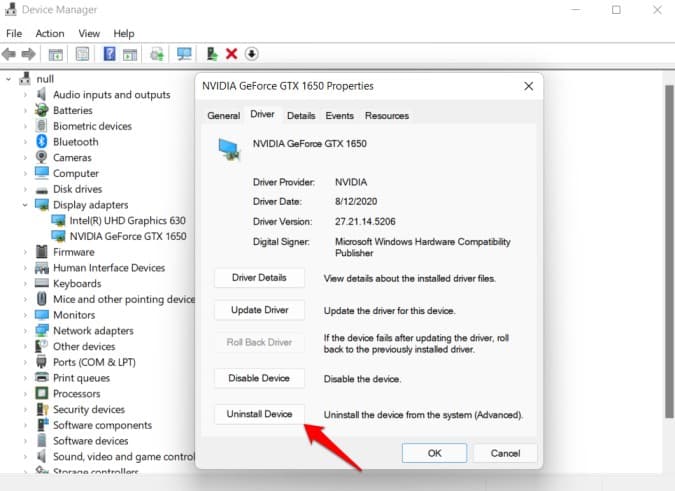
Once done visit the Device manufacturer’s official site to download and install the latest Graphics driver on Windows 11.
Update Windows 11
Again if you have not updated the Windows operating system for a long time, it might potentially contribute to lag or performance issues in games. Usually, Games often rely on DirectX, a collection of APIs (Application Programming Interfaces) provided by Microsoft, to handle graphics, audio, and input. And running older versions of Windows might not have the necessary DirectX version installed, resulting in performance issues or incompatibility with certain games. Install the latest Windows update help fix If there is a system bug causing gaming to lag and optimize Windows 11 for Gaming.
- Press Windows key + X and select settings
- Click Windows Update in the left column and select the Check for Updates button on the right.
- If pending updates there allow them to Download and install from the Microsoft server
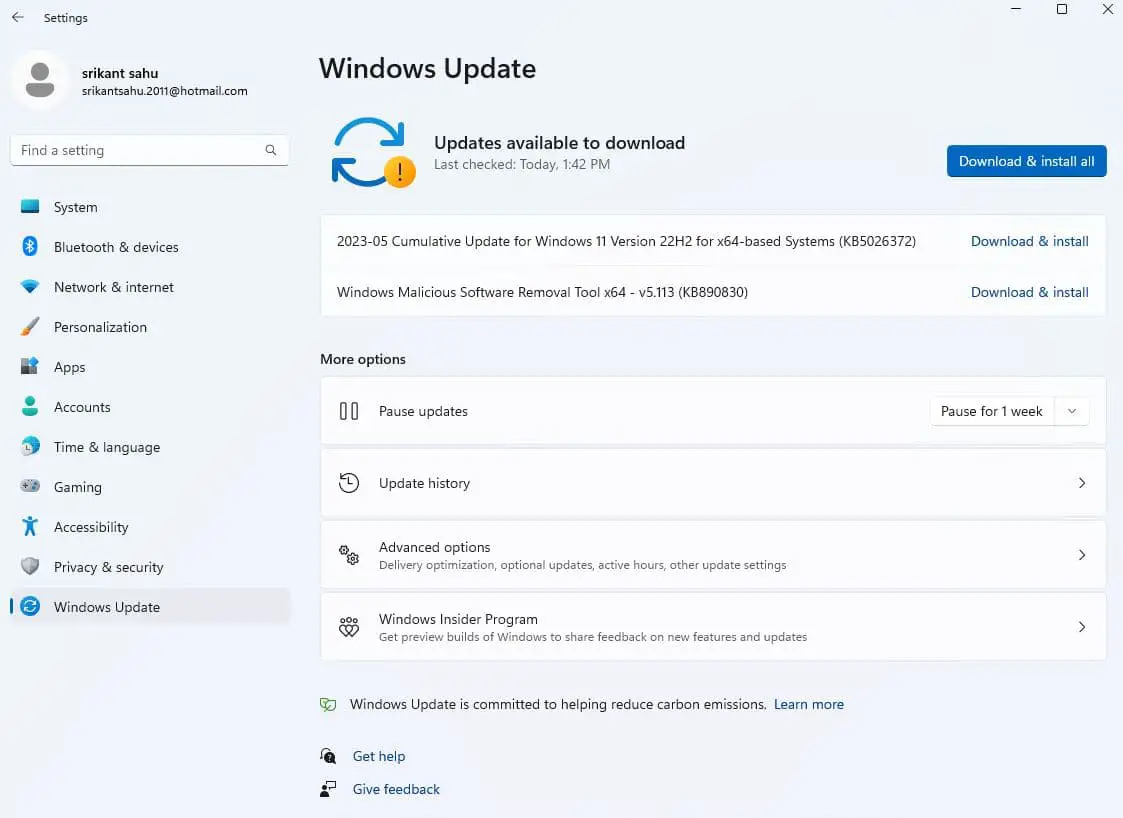
- In addition, click on Advanced options then optional updates, If any updates are pending there allow them to download and install.
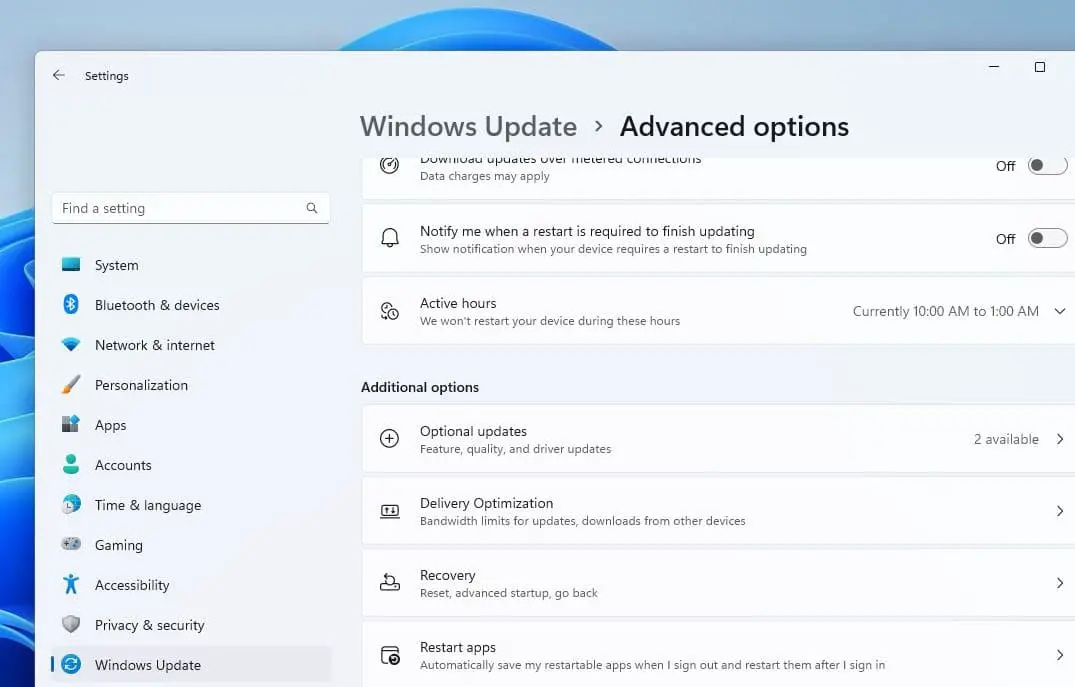
- And finally, you need to restart Windows 11 to complete the update process.
Tweak windows registry
For a number of users tweaking certain registry keys help to fix Windows 11 stuttering in games.
- Press Windows key + R, type regedit and click ok to open the registry editor,
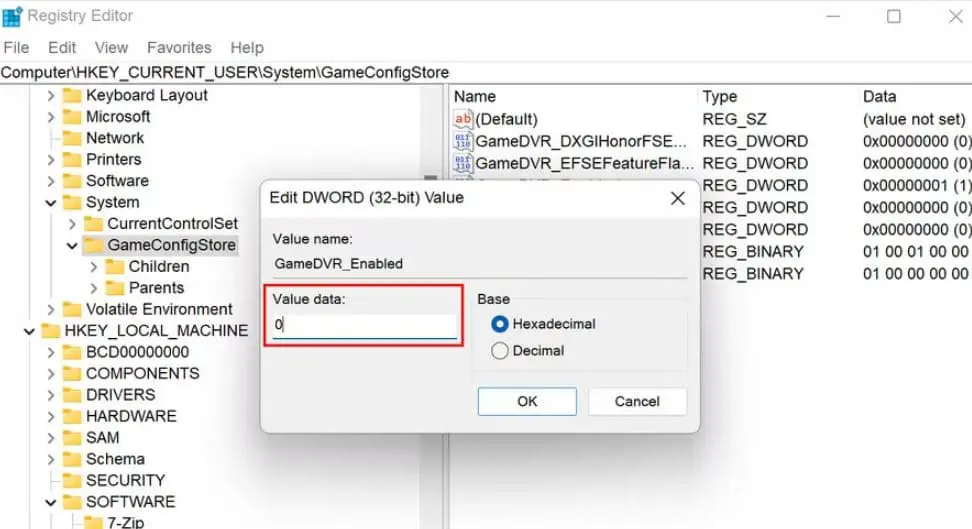
- Now navigate, Computer\HKEY_CURRENT_USER\System\GameConfigStore.
- In the right-hand pane, double-click on the GameDVR_Enabled key, and change the value data to 0 and click ok to Save the change.
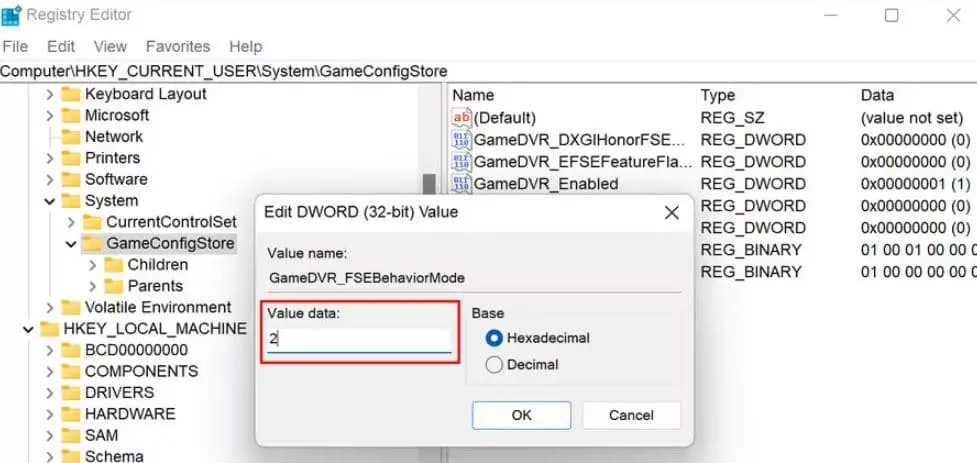
- Next Double-click on GameDVR_FSEBehaviourMode and change its value to 2
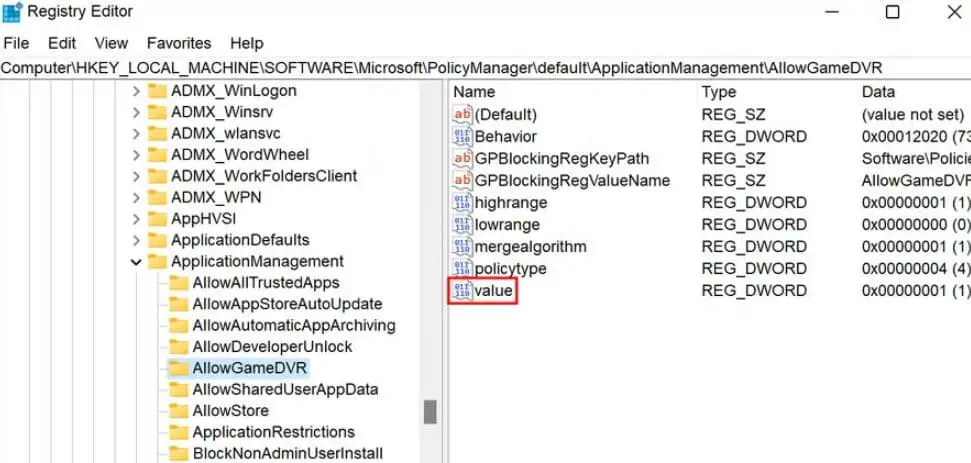
Go to Computer\HKEY_LOCAL_MACHINE\SOFTWARE\Microsoft\PolicyManager\default\ApplicationManagement\AllowGameDVR.
- On the right side of the window double-click on the Value key and Change its value to 0.
- Finally, restart your PC and upon reboot, check if the issue is resolved.
Disable High Precision Event Timer
Also, you can fix game lag on Windows 11 by turning off the High Precision Event Timer (HPET) device. The High Precision Event Timer (HPET) is a hardware timer in modern computers that provides more accurate timekeeping capabilities. And incorrect or conflicting HPET settings can potentially contribute to Game performance issues on Windows 11.
- Press Windows key + X and select Device Manager
- This will display a list of devices and peripherals connected to your computer,
- Locate and expand the system devices section
- Right-click on High precision event timer, and select Disable from the menu
- Click Yes when the verification notification appears.
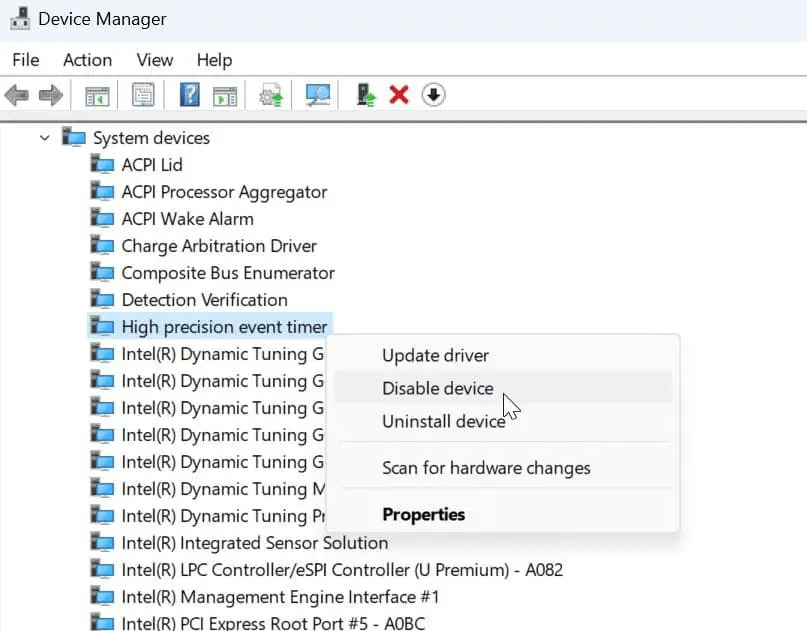
Now launch your game and see if its FPS and other performance areas have improved
Disable the Memory Integrity Feature
Memory Integrity security features protect your device from high-level attacks from malicious code. However, sometimes this feature may hit the gaming performance including lagging. If the above solutions didn’t help, Disable the Memory Integrity Feature following steps below and check if this helps.
- Press Windows Key + S, type Windows security and select the top result.
- Navigate Device security then core isolation details,
- And finally, Toggle off the Memory integrity switch.
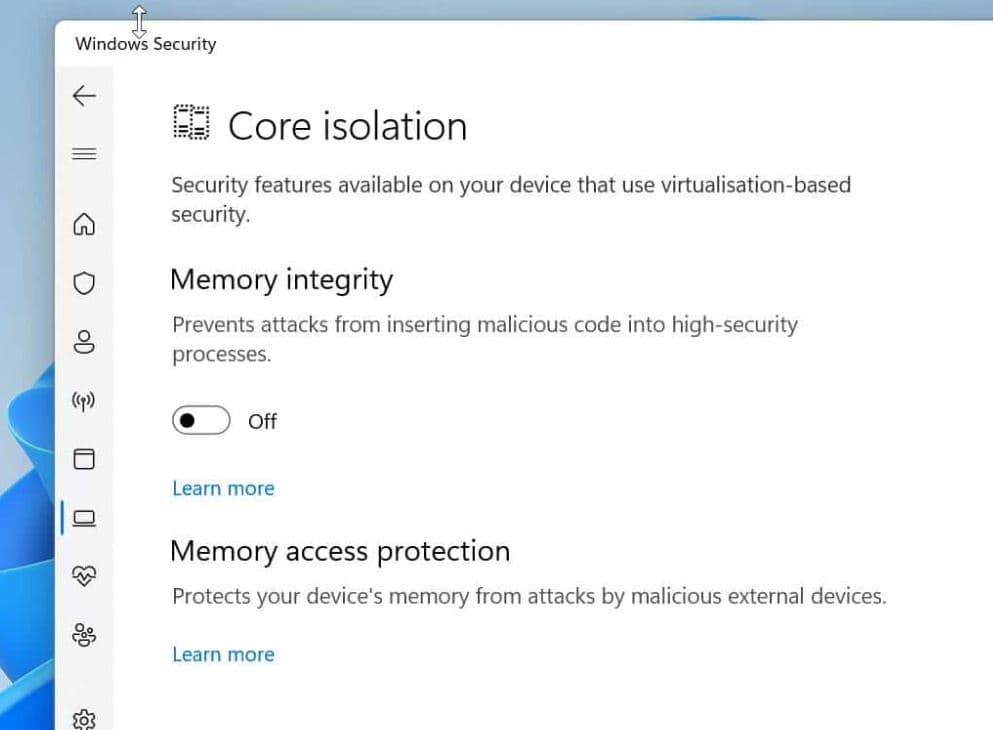
Now close Windows security and reboot your PC, Let’s start your gaming session to check the game lagging issue is resolved on Windows 11.
- In addition, you should Close Unnecessary Background Apps, and perform a full system scan to check and remove any viruses or malware infections.
- Press Windows key + R, type powercfg.cpl and ok to open Power Options here select the High performance or ultimate power plan.
- Also, check if CPU gets hotter, it starts throttling its performance, slows down processing and can create stuttering while gaming.
- In some cases the user account profile is the reason why games or apps not perform well, Create a new user account and check if this helps.
These are a few best tips and tweaks to optimize Windows 11 for gaming and fix lagging issues.
Also read:
- What are the differences between Windows 10 and Windows 11?
- Improve Your Windows 10 PC Performance with These 15 Simple Steps
- Windows 10 Computer restarts when playing Games [solved]
- Windows 11 settings you should change now for better user experience
- Netflix Not Working with VPN? Try these 8 solutions to fix it

