
Windows 11 is available as a free upgrade for compatible devices with a number of new features and improvements. There is a newly redesigned start menu taskbar, an improved Microsoft store with Andriod app support, Integrated Microsoft teams, snap layout, widgets and more. But in addition to big news and features officially presented by the Redmond giant, Windows 11 contains a lot of small changes which, at first glance, may not seem obvious. Here in this post, we unpacked a few Hidden Windows 11 Features You Should Know About.
Move the Start Menu back to the left
Windows 11 introduces a major interface change: the Start menu and taskbar are now centered by default. In addition to the aesthetic aspect, this choice was carefully considered by Microsoft, which wanted to optimize and simplify its OS so that its use is as ergonomic as possible regardless of the device on which it is installed. But If this new configuration does not please you, it is possible to move the menu. To do this,
- To do this, click on the Start menu, enter the Settings,
- Go to the Personalization section, then taskbar,
- Then click on Taskbar Behavior, then change Taskbar Alignment to Left.

Enable the Hidden Old Context Menu
On Windows 11 when you right-click on the desktop you will notice right-click menu has very few options in comparison to the previous ones. And you need click on click on “Show more options” to see the other options like the refresh button.
Just click on Shift + F10 on any PC or just F10 on some PCs to open the show more options menu.

In case you want to permanently restore the old context menu on Windows 11, follow the registry tweak.
- First create a restore point then press the Windows key + R, type Regedit and press enter key to open the registry editor.
- Navigate to Computer\HKEY_CURRENT_USER\Software\Classes\CLSID
- Under the CLSID folder right click select new -> key and name the new key {86ca1aa0-34aa-4e8b-a509-50c905bae2a2}
- Next, right-click on the new entry on the left pane and choose New -> Key and name it InprocServer32
- Now, move to the “InprocServer32” folder and double-click on “Default” on the right pane.
- After that, click on “OK” without changing any values.

Enable HDR
In order for the colors of our games or in your favorite movies to be brighter, brighter and more vivid, we must activate the HDR of Windows 11. Of course, we must make sure that the monitor is compatible with the high dynamic range HDR10.
If we want to enable them, we must do the following:
- We open the Windows 11 Settings and in System click on Display.
- Now click on HDR.
- So we enable both Streaming HDR video playback and Use HDR.
Dynamic refresh rate
With the dynamic update frequency, the system will be able to go from one frequency to another depending on what it needs at any given time. The DDR system will make the battery last longer (in the case of a laptop ) and will improve the performance of our computer.
It just makes Windows 11 so smooth while navigating across the UI and interacting with different OS elements.
- Open the Settings app using Windows key + I.
- Go to System, then select Display and then Advanced Display.
- Click Choose a refresh rate and select Dynamic (60Hz or 120Hz).
more emoji
Windows 11 has more than 1,500 emojis that we can use at all times when we are writing. On top of that, Windows has added the Fluent-style emojis. In order to take advantage of them, we must have the latest version of windows 11 installed on our computer.
If so, just press Windows + the period key (.) and we will see the selector, where there will also be GIFs or special characters.

Take screenshots easily
Windows 11 includes a brand new screenshot tool that you can open from the Start menu as before but above all using a very useful keyboard shortcut: Windows-SHIFT-S. This directly opens a context menu where you can select the area or window you want to screen. Once completed, your capture is directly available in your clipboard (copy-paste) that you can use in another app.

Smart monitoring
Windows 11 has incorporated really interesting security features like Smart App Control, which provides protection against malware, by preventing harmful or untrustworthy applications from being installed or run.
- Press Windows key + S and type windows security and press enter key,
- Go to App and browser control, then click on repuration based protection settings,
- And toggle on protection for check apps and files, smart screen for Microsoft edge, and potentially unwanted app blocking options.

Use multitasking to easily tidy up your windows
Whatever the size of your screen, multitasking can always be interesting to easily share your screen between your different windows. Microsoft has therefore included snap layout in its functionality, automatically adjusting the layout of open windows according to certain defined schemes. To set it up, hover your mouse cursor over the maximize button of your window and choose one of the templates offered by Microsoft.

Easily scroll up or down
When you have two windows open in Windows, one next to the other, you will only be able to move from top to bottom through the one you have marked.
Well, so that, by moving the cursor in any open window, we can scroll through any of the two windows, saving us a good number of clicks, we can enable a new Windows 11 function.
- We open Windows Settings.
- We go to Bluetooth and devices and then click on Mouse.
- in the new window, we only have to activate the switch next to Scroll inactive windows on mouseover.
Use keyboard shortcuts to navigate more easily
In addition to the existing shortcuts, Windows 11 brings a lot of new keyboard shortcuts to make using the operating system easier:
- Windows+a: access quick settings (volume control, Wifi, Bluetooth, brightness, concentration assistant, etc.)
- Windows+n: to open the notification center
- Windows+w: to open the widgets menu
- Windows+z: to easily snap windows thanks to the Snap Layouts function
- Windows+Shift+s: to open the new screen capture tool
Enable dark theme
By default Windows 11 uses a light theme, but you can now modify it to save your little eyes from too harsh a light, especially at night.
- To do this, go to the start menu then settings and click on Personalization in the left side menu.
- In the Themes section, select the dark theme that suits you best.
- If you want to add some, you can also add some via the Microsoft store using the Browse themes button.

Share Any Window From the Taskbar
In addition to the universal microphone switch, Microsoft has also brought a seamless way to share screens during video calls. If you are using Microsoft Teams, you can now hover over an app or an active window on the Taskbar and choose “Share this window”. This will instantly share the particular window, offering a hassle-free screen sharing option. Keep in mind that you need a work or school account associated with Microsoft Teams to use this feature.

Create and separate workspaces
Since Windows 10, Microsoft has already offered the creation of virtual desktops. In Windows 11, virtual desktops have been revised. They become accessible with 1 click on the Task View icon located in the taskbar. This therefore activates the functionality to divide your workspaces into several independent virtual entities. A new virtual desktop can be easily created by clicking on New desktop when the task view is open or via the keyboard shortcut ctrl-Windows-D You can change the virtual desktop via a simple keyboard shortcut: Ctrl-Windows-Right arrow or left.
Shake to Minimize (Aero Shake)
Earlier known as Aero Shake, Windows 11 also includes the Shake to Minimize feature that lets you minimize all the open windows except for the active one by shaking the title bar (see GIF attached below).
If you have too many windows open and want to focus on one particular window, simply select it and shake the title bar. It will minimize all the open windows except for the one you are currently working on.
- The feature is disabled by default, and you can enable it from Settings -> System -> Multitasking.
- Here, turn on the “Title bar windows shake” toggle.

Focus Session
Focus Session is the next Windows 11 hidden feature that not many are talking about. For users who wish to remain productive and disciplined when using their Windows 11 computer, Focus Session can help them achieve a lot.
Focus Sessions is available within the native Alarms and Clock app. You can add your Microsoft account, and it will list all your tasks from Microsoft To-Do. There is support for timers, notification customization, and more. You can also integrate your Spotify account and listen to your favorite music while completing your tasks.
DNS Over HTTPS
DNS Over HTTPS is a hidden setting that improves privacy on windows 11 PC. It encrypts all DNS queries made by pc include browsers, apps and services. For example, when you visit any website, your PC first resolves the domain name and for this, it connects to DNS resolver and this communication has largely remained unencrypted. But with DNS over HTTPS enabled all queries will be encrypted using the HTTPS protocol that makes your communication protected and private.
DNS Over HTTPS is a hidden setting on Windows 11 PCs that not many people are aware of, but it’s a vital feature that can improve your privacy. It lets you encrypt all the DNS queries made by your PC, including browsers, apps, and services. Basically, when your computer wants to resolve a domain name, it connects to a DNS resolver and this communication has largely remained unencrypted.
With DNS over HTTPS, even DNS queries will be encrypted using the HTTPS protocol making all communication on your Windows 11 PC protected and private.
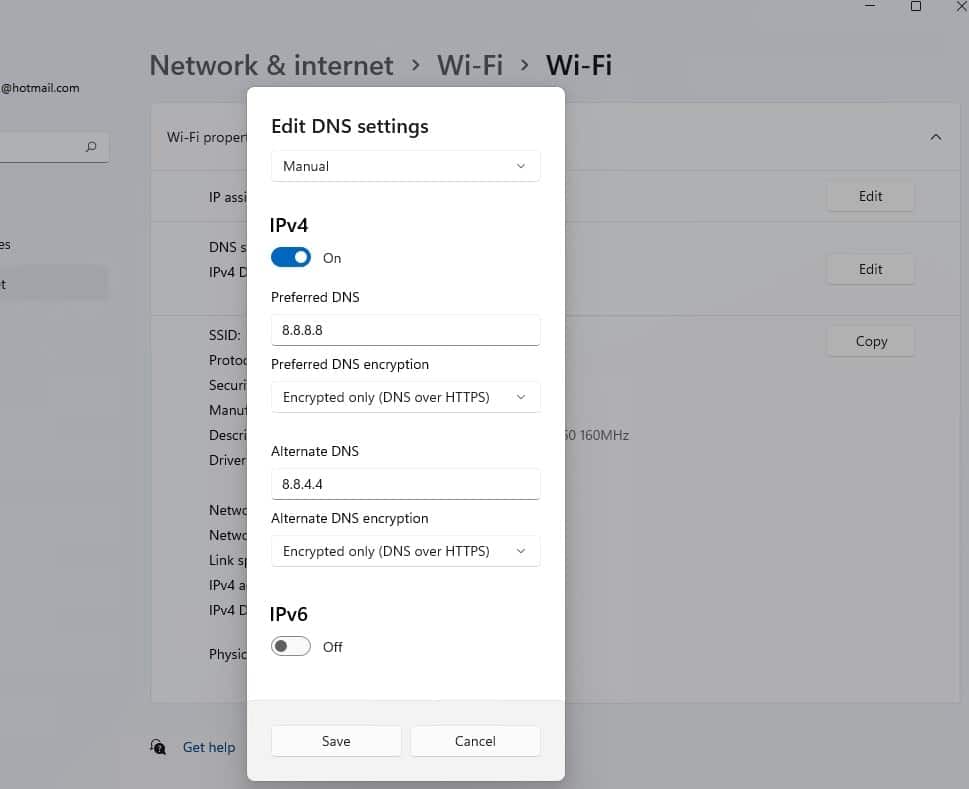
- Open settings using windows key + I and go to network & internet
- Now click on wifi or Enternet (depending your internet connection) then hardware properties,
- click on “Edit” next to “DNS server assignment”.
- Here from the drop down menu at top choose manual and turn on IPv4
- Set preferred DNS 8.8.8.8 and alternate DNS 8.8.4.4 And select preferred DNs encryption “Encrypted only (DNS over HTTPS)” option and do the same for Alternative DNS encryption.
- After that, click on “Save” to save the changes, and you are done.
These are the main functions that Windows 11 has and that are not visible to the naked eye, which must be enabled to take effect.
Also read:
- The best Windows 11 antivirus to install on your computer
- No Audio after Windows 11 Update? 7 solutions apply to fix it
- Solved: Google Chrome Not Downloading Files on Windows 10
- 7 Ways to Fix Windows 10 Start menu and taskbar not working after update
- Windows 11 Laptop freezes randomly? Try these 11 solutions
- Windows 11 privacy settings you should change now (protect your privacy)
