Windows 11 black screen with cursor, is one of the most difficult problems that may occur especially after Windows 11 23H2 update. Users report Windows starts normally but the login screen or after enter the password the screen remains black with a blinking cursor. So what causes Windows 11 black screen after login? It’s the display driver, mostly an outdated graphics driver causes this problem. Again Issues with the hardware, most likely the monitor or Loose or incorrect connections also cause Windows 11 black screen problems.
- Outdated, incompatible, or corrupted drivers, especially for graphics cards, most commonly lead to a black screen on startup.
- Incompatible or incorrect display settings can result in a black screen, especially when switching between monitors or displays.
- It may be Certain software or applications may conflict with Windows 11, causing display issues and resulting in a black screen.
- Some updates may not install correctly, leading to issues with the display and causing a black screen.
- A faulty or failing graphics card can cause display problems, including a black screen. or Critical system files may become corrupted, leading to startup problems, including a black screen.
How to fix Windows 11 Black Screen problem?
Before proceeding further make sure the monitor is turned on, and properly connected to the power source. Also, check the VGA cable for loose connection.
In addition, press the Windows + P key combination and make sure the PC screen-only option is selected there.
Simultaneously press the Windows key + Ctrl + Shift + B (you may hear a sound) and you will notice the screen flashing automatically. This means the graphics driver was reset. Some of the users reported that doing this help them fix the black screen problem on their Windows 11 computers.
Pro tip: If you notice a white cursor blinking on your desktop that means your monitor is Trun on and everything is connected properly. in such case restart Windows Explorer following the steps below.
- Use the Ctrl + Shift + Esc keyboard shortcut to open Task Manager.
- Under the Processes tab, select the Windows Explorer service, and click the Restart button from the bottom-right corner.
Now check if you are able to reaccess the normal desktop or not.
In addition, again open task manager using Ctrl + Shift + Esc
- Click the File menu then select the Run new task option.
- Type command explorer.exe and checkmark on create this task with administrative privileges.
- Finally, click on ok to get back to your normal desktop screen.
Restart your PC
There are chances, due to some third-party application, your system became non-responsive, let’s shut down or restart your PC. Restart your computer refresh the operating system and eliminate any bugs that are causing the black screen issue.
- You can force-shut down your computer by pressing and holding the power button for 3 to 5 seconds.
- Then press the power button to turn it back on.
- Now enter your password and check if there is no more black screen on Windows 11
Disconnect your peripherals
In addition, disconnect all external devices connected to your PC to check if it’s causing due to faulty or incompatible hardware connected to the system.
- First, turn off your computer and disconnect all peripherals (Such as printer, scanner, speaker, webcam etc)
- Now turn on your computer again, check this time your PC start without any problems.
- If yes it means one of the peripherals you removed is causing the black screen issue. plug the devices one after one to identify which one causing the issue.
If still getting Windows 11 black screen at the start, we recommend starting your PC in safe mode and apply the solutions listed below.
Booting in Safe Mode starts Windows with a minimal set of drivers and services, helping to identify and resolve issues.
Update Windows OS
It is always important to fix the bugs, which will make things worse for the user experience. There are chances this black screen problem causing due to a bug and Microsoft may release the bug fix with the latest Windows update. That’s why we always recommend check and install the latest Windows updates regularly.
Ensuring that Windows is up-to-date with the latest updates and patches can resolve compatibility issues.
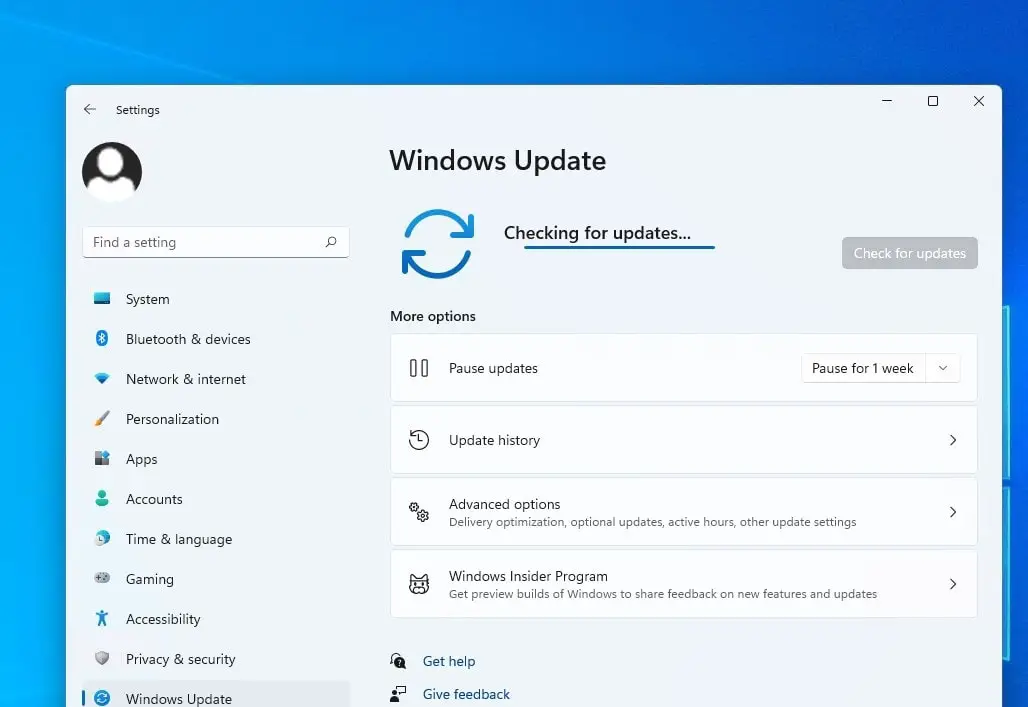
- Press the Windows + I shortcut keys to open the settings page.
- Then on the bottom left panel, click on Windows Update.
- Next, click on Check for Updates.
- If an update is available, then the system will prompt you to install it.
- There will be an option Download Now, Click on it to proceed with the update installation.
- Once done reboot your computer to apply the changes,
Keeping Windows up-to-date ensures that you have the latest security patches and bug fixes. After updating, check if you are still facing the black screen issue on your PC.
Update the Graphics Driver
As discussed before, outdated or faulty graphics drivers mostly cause black issues on your Windows 11. And to keep your graphics chipset working correctly with the latest Windows 11 it’s recommended to install the latest Graphics Driver update.
Graphics drivers facilitate communication between the operating system and your graphics card. Outdated or incompatible drivers can lead to display issues.
To Update the Graphics Driver:
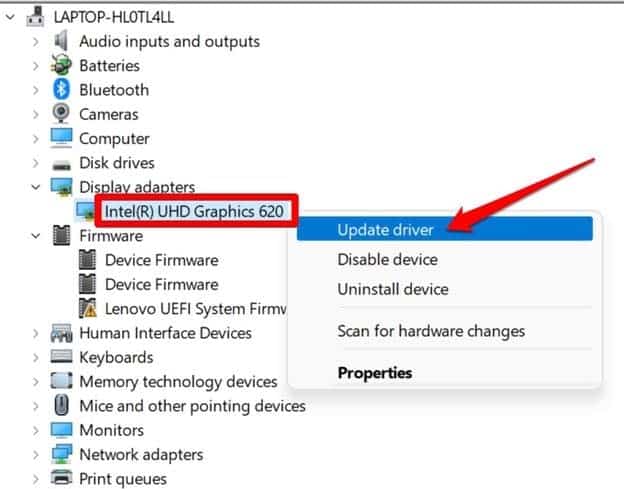
- Press Windows key + X and select Device Manager from there,
- This will display all installed device driver lists, scroll down to locate to Display Adapter and expand it.
- Inside the Display Adapter, you will be able to see the name of the graphics driver, which runs your computer’s display.
- Right-click on the graphics unit name and select the option Update Driver.
- When the Update Driver dialog box shows up, click on Search Automatically for Drivers.
- The system will search for available drivers from the internet and install the same.
After upgrading the graphics driver, it will fix the black screen of Windows 11.
If updating didn’t work, uninstalling and reinstalling the graphics drivers may resolve the issue.
Install Graphics Driver from the Manufacturer’s Website
Instead of automatically letting the system upgrade the graphics driver, you can manually download and install graphics from the official website of the same brand of graphics driver installed on your computer.
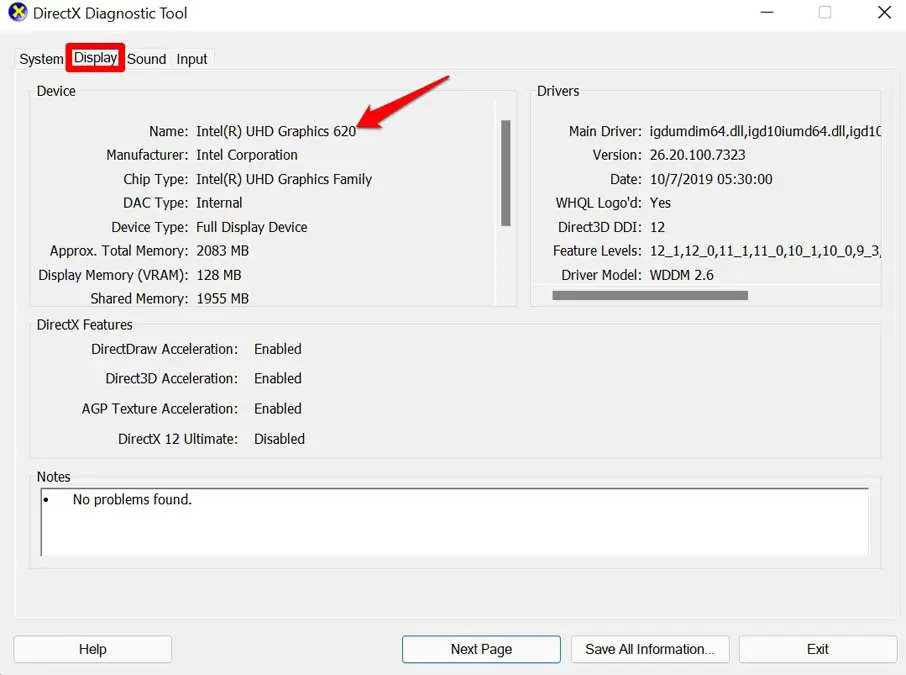
- Press the Windows key + R, type dxdiag and click ok to open the DirectX Diagnostic Tool dialog box.
- Move to the display tab, here You will see the complete information about the graphics unit installed on your computer.
- Visit the official website for the graphics unit brand installed on your PC. All these graphics driver makers have repositories from where you can download the drivers suitable for your computer.
- Enter the computer model number, processing unit, and other details and download the latest build of the graphics unit that is available in the repository.
After manually updating the graphics driver, the black screen will no longer show up on your computer.
Uninstall the latest Windows update
In addition, if the problem started only after a recent Windows update, you can try to uninstall the recent Windows update and check if this helps. here is a video guide on how to uninstall the latest Windows update from the boot screen.
Check Display Settings
incorrect display settings, such as resolution or refresh rate, can cause display problems.
- Right-click on the desktop and select “Display settings”.
- Check that the resolution and refresh rate are appropriate for your monitor.
- Adjust settings if necessary.
Perform System Restore
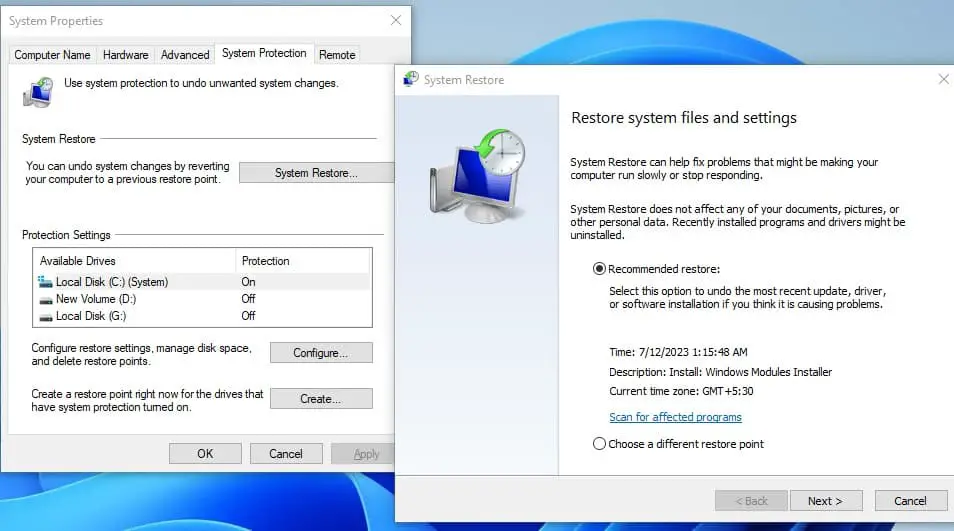
System Restore allows you to revert your system files and settings to a previous, working state. This can be useful if the issue started after a recent change or update.
- Search for “Create a restore point” in the Start menu and open it.
- Click “System Restore” and follow the prompts to choose a restore point prior to the issue.
Ensure all hardware components, such as the monitor, graphics card, and cables, are functioning properly. Faulty hardware can lead to display problems.
Sometimes Corrupted files can cause various issues, including display problems. Run sfc /scannow command its built-in tool that checks for and repairs corrupted system files.
Also read:
- Netflix Black Screen on Windows 10 Computer [8 Solutions to Fix it]
- Discord not working on Windows 10, 8 or 7? Here quick solution
- Windows 10 Stuck Preparing Automatic Repair? Here is how to fix
- Fix We can’t install some updates because other updates are in progress
- Free VPN and Paid VPN, what is the real difference between them?
