Whenever you come to a situation, Windows Audio not working, or especially sound not working in windows 10. We recommend Run the built-in Audio troubleshooter just to identify and fix the sound-related issues directly from the system. But what if the audio troubleshooter fails to solve your issue, few users report running the Audio troubleshooter results “Audio device is disabled“.
Contents
Audio device is disabled windows 11
Since Windows 11 upgrade I Didn’t hear sound from my Laptop. when I try to troubleshoot the “Play Audio” device, it says a problem has been found: Audio device is disabled. Is there anyone out there with a simple fix?
This error message usually means that the computer is detecting your audio device but, the device itself is disabled. This might be because of some bad configurations, Driver conflict, or Audio Device compatibility issues or you may manually disabled the Audio Device.
There are many reasons cause sound is disabled on your Windows computer, but outdated or corrupt audio drivers is most common.
Whatever the Reason here some solutions you may apply to fix Audio device is disabled” or sound not working in windows 10.
Make sure audio dependency services are running
This is the first thing you must check if the Audio Not Working After Upgrading To Windows 10 or windows 11.
Press Windows + R and type services.msc in the Run dialog box, hit the Enter key to open Services snap-in.
In the Services window, make sure that the following services have Running Status and their Startup Type is set to Automatic.
- Windows Audio
- Windows Audio Endpoint Builder
- Plug and Play
- Multimedia Class Scheduler
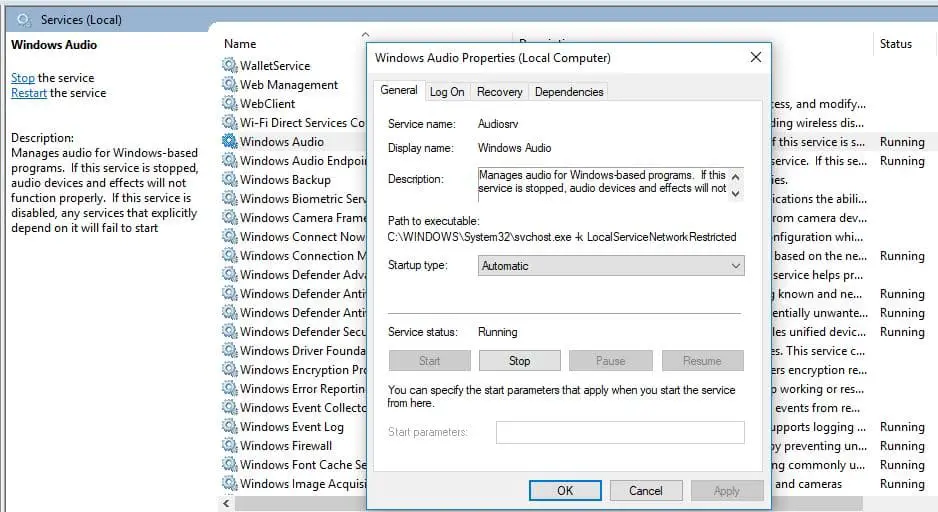
If you find any of these services don’t have Running Status and their Startup Type is not set to Automatic, then double-click the service and set this in the service’s property sheet. Check after performing these steps, if the audio started working or not. Also, check this post If you find the Microphone not working after install windows 10.
Check the status of Speakers under Playback devices
If due to any reason you have disabled the audio device, then you might not see it under the list of playback devices. Or especially if the problem started after the recent windows 10 upgrade there is a chance due to incompatibility issues or bed driver windows automatically Disable the audio device, then you might not see it under the list of playback devices.
- First Open Control panel.
- Click Hardware and Sound and then click on Sounds.
- Here Under the Playback tab, right-click on the empty area and make sure “Show Disabled Devices” and the “Show Disconnected Devices“ has a checkmark on it.
- If headphones/Speakers are disabled, they will now show up in the list.
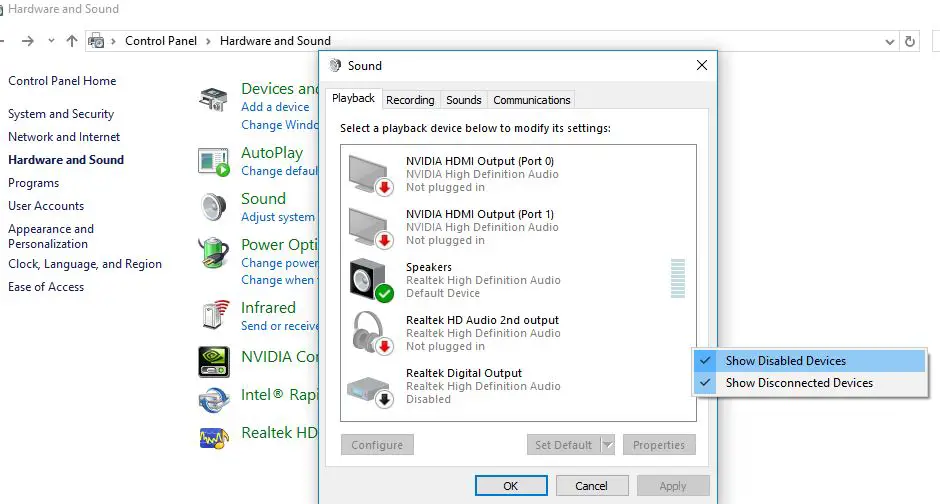
Right-click on the device and Enable it Click OK. and also select “Set Default”. Check if it helps.
Enabling audio device in the device manager
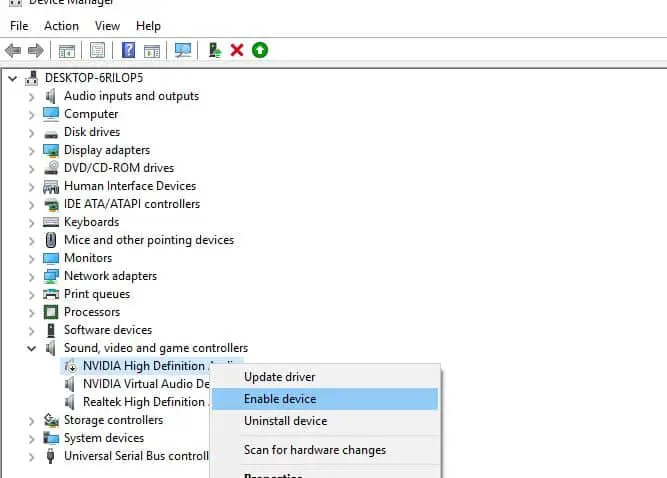
- Press Windows + R, type “devmgmt.msc” in the dialogue box and press Enter.
- Once in the device manager open, expand sound, video and game controllers.
- Then right-click on the audio device which is disabled and select “Enable device”.
- You can instantly see which device is disabled by checking the black arrow beside it pointing downwards.
Uninstall and then reinstall the sound drivers
This is another effective way to fix most of windows 10 Sound related problems. As discussed incompatible Device drivers also Cause disable the Device which results no sound or audio device is disabled on Windows 10.
- Press the Windows key + X, and choose Device Manager.
- Expand the Sound, Video and Game controllers device. The soundcard driver list will come up.
- Right-click on the sound driver and click on Uninstall.
Restart the computer and let Windows install the generic drivers. Now check if there is correct sound output. If there is, you can stop here. If there isn’t any sound, you can continue to install the latest Audio drivers.
To do this simply visit your Device manufacturer’s website ( Such As laptop manufacturer HP, Dell, Asus, Lenovo etc. If you are using a Desktop computer visit the motherboard manufacturer’s website (for example Gigabyte ) Download and save the latest available Audio driver for your PC.
Install the latest driver you download from the manufacturer’s website, restart windows, and check windows 10 Sound started working.
Perform System Restore
If all the above solutions didn’t fix the problem, windows sound not working then it’s time to utilize the system restore feature. This option takes your PC back to an earlier point in time, called a system restore point. Restore points are generated when you install a new app, driver, or Windows update, and when you create a restore point manually. Restoring won’t affect your personal files, but it will remove apps, drivers, and updates installed after the restore point was made.
- Select the Start button, type control panel and then choose it from the list of results.
- Search Control Panel for Recovery.
- Select Recovery > Open System Restore > Next.
- Choose the restore point related to the problematic app, driver, or update, and then select Next > Finish.
Did these solutions help to fix the audio device is disabled, the sound not working in windows 10? Let us know which option worked for you,
Also read:


