
Microsoft regularly releases Windows updates with various security improvements and bug fixes. Recently the company released Windows 11 version 23H2 update with a number of new features and improvements. This release is an enablement package download via Windows update. Microsoft always recommends immediately install Windows updates to keep your Windows 11 PC up to date and healthy and it usually does. But unfortunately, several users complain, that Windows 11 Update failed to install certain updates. Or Stuck downloading Windows 11 version 23H2 at 0% or at 99%. This article explores reasons behind this and troubleshooting steps to fix windows 11 update problems.
Windows 11 Update failed to install
Also, several users reported Windows 11 update was downloaded and installed successfully, and on the next reboot, it shows the last update failed to install with Error codes 0x800f0900 and 0x80070005.
There are multiple reasons that may cause this problem, from internet connection to corrupted system files, the problem with Windows update service, security software or VPN, and more.
- Slow or unstable internet connections can lead to update failures.
- Third-party software or drivers can conflict with the update process, causing it to fail.
- If your computer doesn’t have enough free storage space, the update may fail to install.
- Security programs can sometimes interfere with the update process.
- Outdated or incompatible software and drivers can conflict with the update installation.
No matter what issue prevents Windows 11 23H2 updates install, If you encounter the issue Windows 11 Update Won’t Install or Updates are stuck downloading apply the solutions listed below.
Check internet connection
Windows updates require a stable internet connection to download Windows 11 23H2 files from Microsoft server. A poor or unstable internet connection can disrupt the update process. The first thing you need to check that you have a stable and fast internet connection.
- You can visit Speed test websites like Ookla (https://www.speedtest.net/) or Google “speed test” to measure your download and upload speeds.
- Also, running the Ping command can help check the stability and responsiveness of your internet connection. Press the Windows key + R, type ping google.com -t and press enter key.
- If possible, connect your device directly to your router using an Ethernet cable, and take your laptop Close to WiFi router for better signal strength.
- Sometimes, a simple restart of your modem and router can improve connection stability.
If you are unable to access any web pages or ping requests display “Request Timed Out” messages, you need to fix the Internet connection before downloading updates.
Try to install the Windows update again
The first and most working solution to fix the Windows 11 update installation problem is to restart your computer and check for Windows updates again.
In addition, Check and correct your date & time zone on your computer, and importantly disconnect from VPN if configured on your computer.
Look at your system drive (Windows installed drive it’s basically C: drive) has enough free space to download and install Windows updates on your computer.
Temporarily disable or uninstall third-party antivirus if installed on your computer to confirm antivirus protection does not interfere with Windows updates.
Open the Windows service console using services.msc. Scroll down to locate the Windows update service, Right-click on it, and select restart.
And finally, check for updates again by following the steps below.
- Press the Windows key + I to open the Settings app,
- Go to Windows Update, then hit the check for updates button
- This will start to download and install Windows update files from the Microsoft server
- If still windows update stuck downloading or fail to install apply the solutions listed below.
Start windows into clean boot State
Clean boot your computer may also help If any third-party software causes conflict to download & install Windows updates. Here’s how to do this:
- Press the Windows key + S, type msconfig and select the first result,
- This will open the system configuration window, go to the services tab,
- Checkmark on Hide all Microsoft services then click on Disable all.
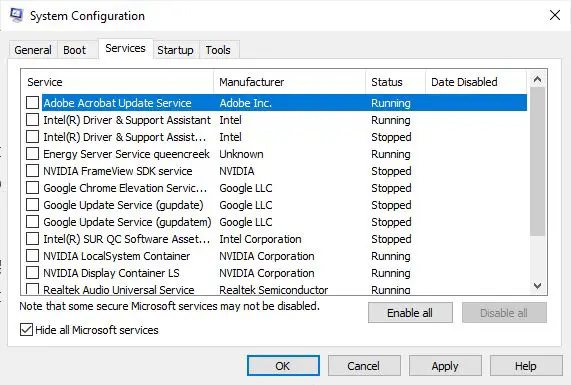
- Next move to the Startup tab then click on Open Task Manager
- Here Disable all the unnecessary services running there. Restart your computer and check for updates.

Clear Buggy update files
If disabling the Security application & perform a clean boot didn’t fix the problem still windows update failed to install or stuck downloading. Then let’s follow the steps below to clear the buggy updates files that may be causing the issue.
- First of all, we need to stop the Windows update service,
- To do this open the command prompt as administrator,
- Type and execute the command net stop net stop wuauserv to stop the Windows update service.
- Then type net stop bits to stop the background intelligent transfer service.
Then Go to the following location. C:\Windows\SoftwareDistribution\Download

- Delete everything in the folder, but do not delete the folder itself.
- To do so, press CTRL + A to select everything and then press Delete to remove the files.
- Again use net start wuauserv and net start bits to restart the services that you previously stopped.
Run Windows Update Troubleshooter
After clearing Buggy update files simply run the Windows update troubleshooter to check and fix if any other problem prevents the Windows update to download and installing.
- Press Windows + I to open Windows 11 settings app
- Scroll down in the right window and click Troubleshoot.
- Next, click on Other Troubleshooters to display a list of troubleshooter tools related to different hardware and devices.
- Select Windows update from there then click Run the troubleshooter
The Windows Update Troubleshooter will run automatically to detect and fix problems that prevent you from updating Windows 11.

Wait a few minutes and let Windows update the troubleshooter Diagnose and fix the problems if there are any. After that, Restart Windows and now check for updates from settings -> update & security -> Windows update and check for updates. I am sure this time Windows update installs successfully without any error or update download stuck.
Run DISM and System file checker
If the system files get corrupted or missing you may face different errors including Windows update fails or stuck downloading. Run DISM restore health command and SFC utility that prepares the Windows image and restores missing system files with the correct one.
- Open the command prompt as administrator,
- Type DISM restore health command: DISM /Online /Cleanup-Image /RestoreHealth
- After completing the process run the command sfc /scannow
- Let the system file checker utility detect and restore missing system files.
- Restart windows after 100% complete the scanning process.
- And after that again check for the Windows update, I hope there are no more errors.

Switch to Google DNS
Here is another solution, that works for most users and fixes Windows update installation problems on Windows 11.
- Press Windows key + R, type ncpa.cpl and click ok
- This will open the network connections window,
- locate your active network adapter, right-click select properties,
- Double-click on the Internet Protocol Version 4 (TCP/IPv4) option to open its properties,
- Select the Use the following DNS server addresses option, Type your “preferred” and “alternate” DNS addresses. 8.8.8.8 and 8.8.4.4
Click apply, ok to save changes and check whether it helps fix Windows update problems in Windows 11.
- Cloudflare: 1.1.1.1 and 1.0.0.1
- Google Public DNS: 8.8.8.8 and 8.8.4.4
- OpenDNS: 208.67.222.222 and 208.67.220.220

Windows 11 Installation Assistant
The above solutions fail to fix the problem, and you are stuck downloading Windows 11 version 23H2. you can use the Installation Assistant to Get install windows 11 23H2 on your PC.
- Go to Microsoft’s software download page and locate the Installation Assistant. Download the file to your computer.

- Locate the downloaded file and double-click on it to run the program.
- Once the Installation Assistant opens, you will likely encounter a prompt with an “Accept and Install” button.
- Click on “Accept and Install” to initiate the feature update installation process.

- Depending on your system’s performance and internet speed, the upgrade process may take some time. Ensure your computer is plugged in and connected to a stable power source.
That’s all after installing the updates simply restart the computer to apply the changes.
Also, Read
- What are the differences between Windows 10 and Windows 11?
- Speed Up Windows 11 and Improve Performance (7 effective tips)
- Top 10 Tweaks to make windows 10 run faster on old computers
- Windows 11 Stuck on the Welcome Screen? 5 working solutions to fix it
- Blank or black screen with cursor after signing in to Windows 10


")


")

")


I was having this problem (windows 10 version 1709 error 0x80070bc2 kb4103727 repeat/retry/repeat installation failure) and did the above instructions. The clean boot did NOT fix my issues, but using the new Update Troubleshooter did fix things! I did not know about the Troubleshooter until I ran into this article. Thank you Srikant!
its glad to hear you that your problem resolved
It worked with the commands and cleaning out the files. Thanks!!
ok have done all your suggestions on my laptop running Windows 10 Home edition and even when I download and tried to install update manually I get an error that the download is not applicable to my computer. I went so far as to download all the available downloads except for the Windows Server ones and nothing installed. Which makes me believe this update is either installed or is not for 64 bit AMD cpu’s . More help would be helpful with my problems. I ran through all your suggestions here and nothing changed. I still get “2018-07 Update for Windows 10 Version 1803 for x64-based Systems (KB4100347) – Error 0x800703f1”
I was getting “We couldn’t complete the updates. Undoing changes” for KB4487017 with Windows Update on Windows 10 laptop. So I ran the Windows Update troubleshooter and then installed the update manually, but after lapstop restart I still get “We couldn’t complete the updates. Undoing changes”. Please advise, thank you.
This updated on my desktop just fine but it is causing a black screen for my laptop why and can you help me?
Hi check with updateing display driver on your laptop.
Most of the times corrupted or outdated display driver causes black screen issue at startup.
I tried everything in this article without success and then managed to install using the following procedure:
1) Initiated the update.
2) Waited until it had almost finished downloading (100%).
3) Disabled Kaspersky Total Security for 15 minutes.
4) as soon as the update started installing, I disabled my ethernet connection as a precaution – this step probably isn’t necessary, but I didn’t want my PC exposed to the internet without a firewall.
5) The system rebooted and the update has now installed.
Hi i tried everything out here and it didn’t work here is the update name:
2019-07 Cumulative Update for Windows 10 Version 1903 for x64-based Systems (KB4505903)
Can someone help me?
the update Cumulative Update for Windows 10 Version 1903 for x64-based System just seems to be a pile crape no way to install it it seems not even manual form save file all it does is say it cant be installed and errors..
on top of that 1903 may update keeps causing my system to fail and It came included with the download install file for fresh installs via usb or cd-rom so there no way now to get older 1800 verison
Hi
I have the problem described in the article. Windows10 1903 update KB4515384 stuck during download at 99%
I tried all the suggestions mentioned and the problem is still there
Any other idea?
Thanks
Well I have tried every suggested fix in this article for:
2021-02 Cumulative Update for Windows 10 Version 20H2 for x64-based Systems (KB4601319)
I get the following error:
There were some problems installing updates, but we’ll try again later. If you keep seeing this and want to search the web or contact support for information, this may help: (0x8000ffff)
services.msc restart windows update fails
Clean boot, restart, windows update fails
Clearing of buggy update files, run windows troubleshooter (finds pending restart), restart, windows updates fails
Run DISM fails at 60% and sfc /scannow fails because of pending restart
I already have my DNS address set to one of the suggested ones
Manual install of the update fails with no reason given
All Windows 10 Home and 3rd party drivers are up to date
I am open to any other suggestions and any help would be greatly appreciated.
My PC: Windows 10 Home x64, AMD Ryzen 3800X, RTX 2080 TI, 16 GB DDR4 3600 ram, 1 TB Samsung 970 EVO M.2
Had this problem with KB4601319 and it gave me hell…tried everthing, nothing worked. Update still failed at 99% and did a rollback. Finally the CBD.log gave me a hint: Services “AppXDeployment” and “AppReadiness” were disabled (don’t even ask me why). Restartet and put them to “Manual” -> Update runs smoothly!