New on Windows 10 or Recently upgrade your PC to Windows 10 version 22H2? Have Some Queries In Mind such as How to Change the user password, manually check and install updates, Speed up Windows 10 or Where to get my Windows product key. And how to fix common problems, boot into safe mode, Perform System restore etc. Here we have collected some Windows 10 Common Queries and Answers Which may help you to make Windows 10 version 22H2 a better experience.
Windows 10 22H2 update is far from the most straightforward operating system. The most basic settings can be elusive, and even the simplest of tasks can be confusing, to say the least. If you are also having some unanswered questions on your mind? Here are some of the most common Windows 10 22H2 Update questions with Answers.
Contents
- 1 How to Change User Account Password
- 2 How To Install the Latest Windows Updates
- 3 How To Uninstall Programs and Applications
- 4 How to Take a Screenshot in Windows 10?
- 5 How to Enable Bluetooth in Windows 10
- 6 How To Check Windows 10 Product Key?
- 7 How to Optimize Windows 10 Performance
- 8 How to Boot Into Safe Mode in Windows 10?
- 9 How To Enable System Restore in Windows 10
- 10 Rollback Windows 10 To the previous build
- 11 How to Reset Or Refresh Windows 10?
- 12 Where to Get Help Fix Problems in Windows 10?
How to Change User Account Password
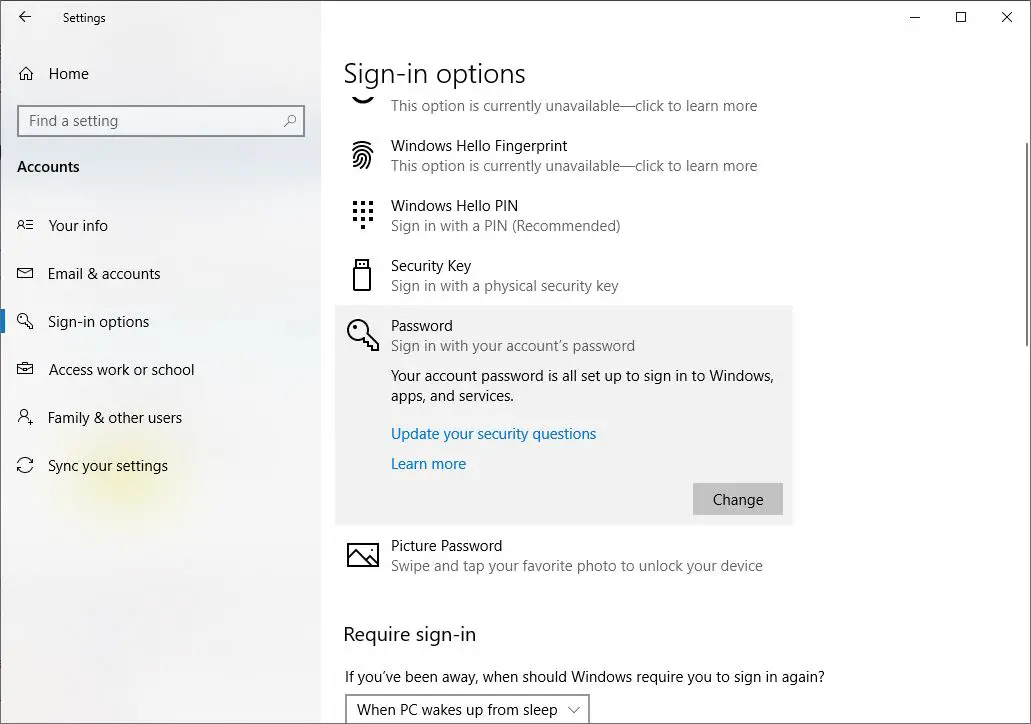
Windows 10 has two types of User accounts (Local user accounts and the second one is Microsoft accounts). If you are looking to change your local user account password in Windows 10, Then follow the steps below.
Change the password for the local user account
- Click on the Start menu followed by Settings then Accounts,
- Now click on the Sign-in options.
- Scroll down to the section labeled Password and Click the Change button.
- When prompted, confirm your current password, and enter your new desired password and hint.
- That’s all click Finish to make save changes.
Now Press Win + L to lock windows and try to log in with the newly created password.
Again if you configured Microsoft Account on your Windows 10 PC. Follow the below steps to change your Microsoft account password in Windows 10.
Change the password for the Microsoft account
- First, open sign-in options from settings followed by Account
- Then Scroll down to the section labeled Password.
- Here click on the change button, Put your current password when prompted for it.
- Next, confirm the last four digits of the phone number tied to your Microsoft account.
- Wait for the SMS code and then enter the code.
- When prompted, confirm your current password and then type in your new desired password twice.
- That’s all Click Finish to make save changes.
How To Install the Latest Windows Updates
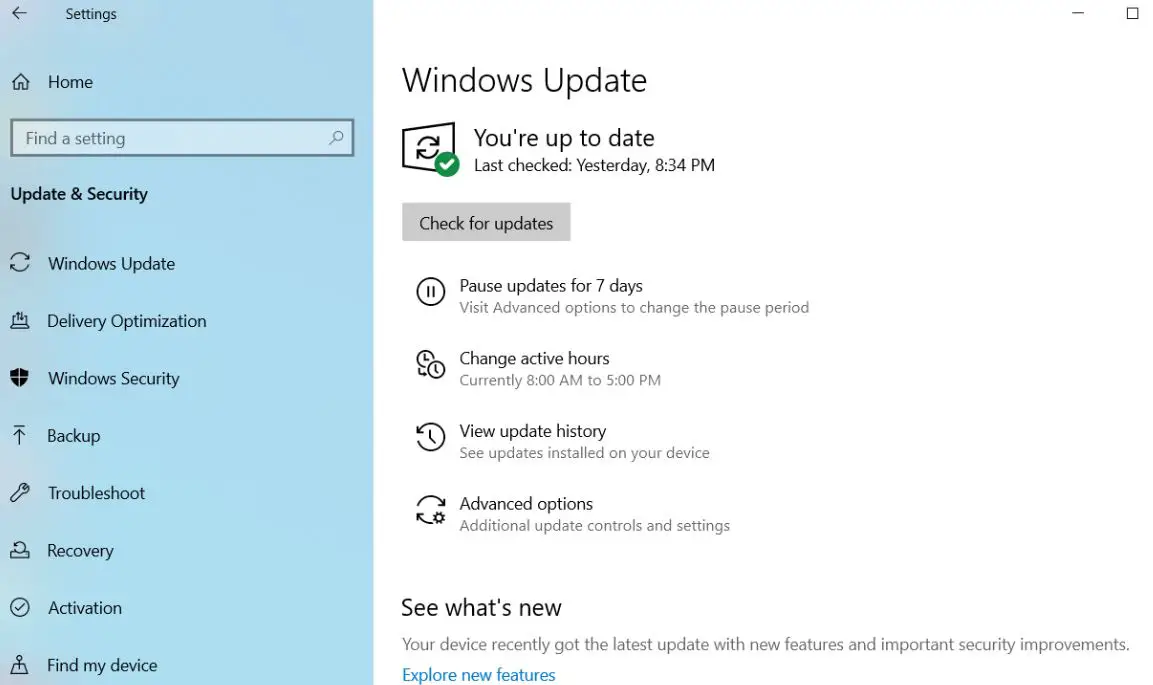
Windows 10 is set to Automatically download and install the latest Windows updates. But for some reason, if the latest updates not installed then you can manually check for the latest updates and install them by following the steps.
- Open the Settings app using the Windows + I keyboard shortcut,
- Click on Update & Security then Windows updates.
- Now on the middle pane Under Update status click the Check for Updates button
- This will check for the latest Windows updates.
- If updates are available, it will automatically begin downloading and applying them, and then prompt you to restart your computer when finished.
How To Uninstall Programs and Applications
To uninstall apps and programs in Windows 10,
- Open the Settings app,
- Click on Apps then Apps & Features,
- Now scroll down and select the app you want to uninstall,
- Click the Uninstall button to completely remove the app or program,
- Again Repeat for all undesired apps and programs to uninstall them.

Also, you can remove third-party installed programs from the control panel
- Press Windows + R, type appwiz.cpl and hit the enter key.
- This will open the program and Features window,
- Right-click on the application which you want to remove and select uninstall.
How to Take a Screenshot in Windows 10?
If you are looking for an option on how to take a screenshot of the current screen on Windows 10. There are different options available such as you can use the Print Screen option, Snipping Tool, or the new Snip and Sketch tool that allows you to take a print screen easily.
Take a Screenshot using Print Screen
The Print Screen key (sometimes abbreviated as PrtScr) captures the entire screen and saves it to the clipboard. You can then paste it into an image editor like Paint, GIMP, or Photoshop and then save it as an actual image file. Use the Alt + Print Screen keyboard shortcut to only capture the currently focused window instead.
An alternative to this is the Windows key + Shift + S keyboard shortcut, which allows you to capture a specific region of the screen and save it to the clipboard.
Snipping Tool
The Snipping Tool is a utility app that’s built into Windows. You can launch it by opening the Start Menu and searching for the snipping tool. It’s fairly easy and straightforward to use,
- Choose a snipping mode: Alt + M (Use the arrow keys and enter to make your selection)
- Create a new snip in the same mode as the last one: Alt + N
- Move the cursor to select a rectangular snip area: Shift + arrow keys. (If you move across then down, for example, once you stop moving the cursor, the Snipping Tool will take the screenshot)
- Delay capture by 1-5 seconds: Alt + D (Use the arrow keys and enter to make your selection)
- Copy the snip to the clipboard: Ctrl + C
- Save the snip: Ctrl + S
- Print the snip: Ctrl + P
- Create a new snip: Ctrl + N
- Cancel the snip: Esc
How to Enable Bluetooth in Windows 10
- Open the Settings app from Sart Menu then Select Devices
- Now in the left panel, you will see Bluetooth & other devices Click on it
- Now To turn on Bluetooth, toggle the Bluetooth slider to the On position.
- Your PC will start searching for other devices to pair up with.
- So make sure that you have turned on Bluetooth on your smartphone or another device.
- Once the device is found, it will be displayed there.
- Click on it to expand it, You will see a Pair button. Clicking on Pair will connect your PC to your other device.

You can also enable Bluetooth using the Action Center. To do this Open the Action Center with the Windows key + A keyboard shortcut. Click the Bluetooth icon to toggle it on.
How To Check Windows 10 Product Key?
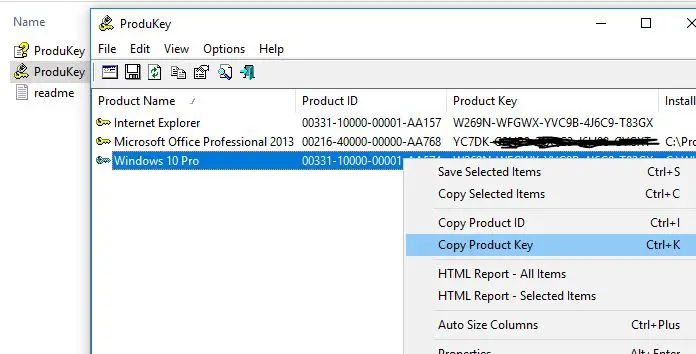
Microsoft doesn’t make it easy to find your Windows 10 product key. Fortunately, there’s a free third-party app that will dig it up for you in no time. It’s called ProduKey third-party application which enables you to find out your Windows 10 product key.
- First Download the ZIP version of ProduKey.
- Then Extract the ZIP file using 7-Zip, WinZip, or whatever other tools you use.
- Now Run the produkey.exe program.
- Look for Windows 10 (or a variant) in the Product Name column.
- The Product Key column next to it is your product key.
- Right-click and select Save Selected Items to save the product key to a text file.
- Otherwise, select Copy Product Key to save the product key to the clipboard.
How to Optimize Windows 10 Performance
If you found Windows 10 Running slow, the System Not responding at startup or PC shutdown takes a long time to turn off the computer. You can tweak some system settings to speed up Windows 10 Performance such as
- Disable Startup Running Apps
- Turn off Windows Tips and Suggestions
- Disable Background Apps
- Disable Effects & Animations
- Disable transparency
- Remove Bloatware
- Run Performance Monitor
- Optimize Virtual Memory
- Use High-Performance Mode
- Turn On Fast Startup and Hibernate option
- Disable Search Indexing
- Run Disk Cleanup Tool
- Check Disk Drive Error
- Run system file checker
Again if you are looking to optimize Windows 10 performance for gaming, You can check and tweak some advanced options to Optimize Windows 10 Performance For Gaming.
How to Boot Into Safe Mode in Windows 10?
Now come to the troubleshooting part. Windows 10 Safe mode boot, allows the system to start with minimum system requirements. And allows you to perform troubleshooting steps to fix most of the Startup problems and BSOD errors.
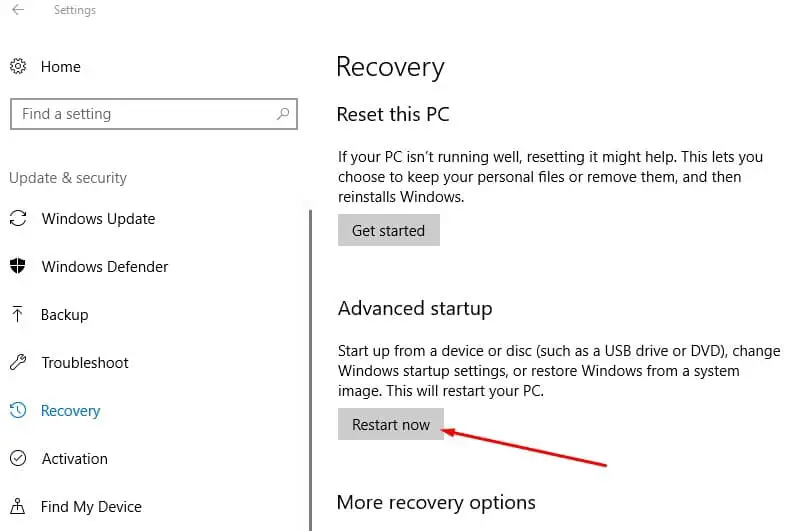
In order to start Windows 10 into Safe Mode, navigate to Advanced Startup Options. You can do this from settings -> Update & Security -> Recover. Here on the middle pane Scroll down to the section labeled Advanced startup. Click the Restart now button.
A quicker way to do this is to open the Start Menu, click the Power icon, then click Restart while holding the Shift key. This will restart Windows select Troubleshoot -> advanced options. If due to some startup problem windows is unable to start cause you can Access Advanced options using installation media.
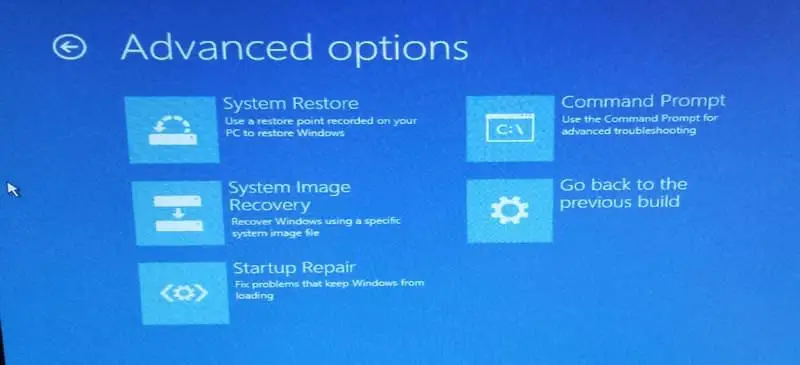
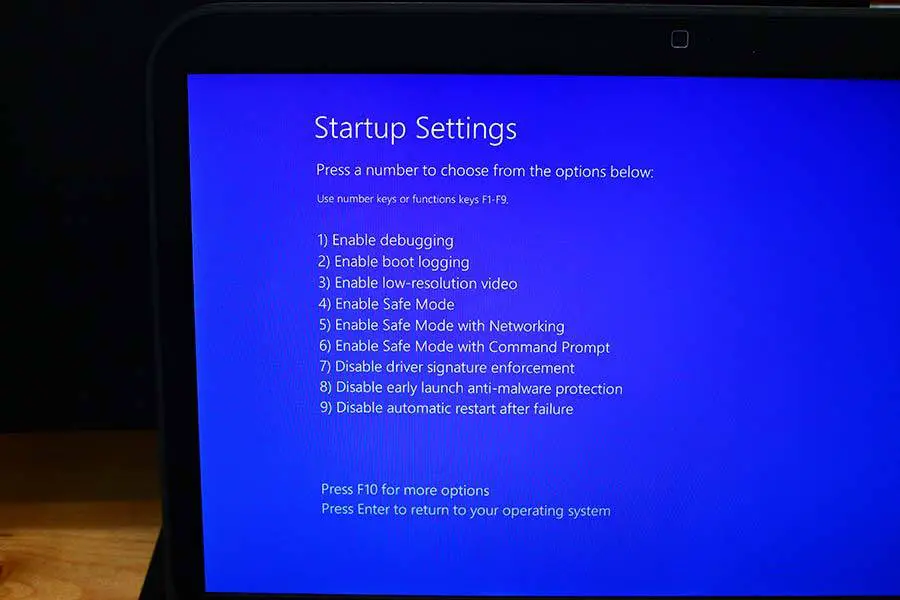
Now select Startup Settings -> restart now. After Restart this will represent the startup settings windows with the number of choices. Here press 4 to Boot into safe mode. To reboot in Safe Mode with Networking, press the ‘5’ key. To reboot in Safe Mode with Command Prompt, press the ‘6’ key. it will restart Windows and load in safe mode.
How To Enable System Restore in Windows 10
The System Restore feature allows you to revert back system settings to the previous working state without affecting any files and data. By default system protection (restore) Feature is turn off on Windows 10. And You must enable this feature to perform a System Restore and revert back to the previous working state.
Enable System Protection
- Open the Start Menu.
- Search for restore and select Create a restore point.
- Under the System Protection tab, click Configure…
- Under Restore Settings, select Turn on System Protection.
- Under Disk Space Usage, adjust how much disk space you want to dedicate for storing restore points. We recommend at least 1GB.
Perform system restore
- Open the Start Menu.
- Search for restore and select Create a restore point.
- Under the System Protection tab, click System Restore…
- Follow the wizard, select the restore point you want to use when prompted, then keep going through the rest of the wizard.
You can check out our Full Guide about the Windows 10 System restore feature and how to fix different Windows problems by performing the system restore.
Rollback Windows 10 To the previous build
If you have experienced any problems or issues After downloading and installing the major Windows 10 Update, And looking for a way to revert back to previous windows. Then you can roll back & uninstall the Windows 10 2022 update to fix different issues that started after the recent upgrade. This means If after installing Windows 10 version 22H2 you are facing problems and issues with it, you can uninstall it and go back or roll back to the previous Windows 10 version 22H2.
Note: Windows 10 22H2 update delivered by way of an enablement package. If you have upgraded Windows 10 22H2 from Windows 10 2004 or 20H2 you need to uninstall the enablement package from the Windows update.
If you have upgraded Windows 10 22H2 from the older version 1909 or 1903 follow the steps applicable to roll back Windows 10 22H1.
Only you need to use the recovery settings to uninstall the Windows 10 May 2021 Update,
- Press the keyboard shortcut Windows + I to open the Settings app
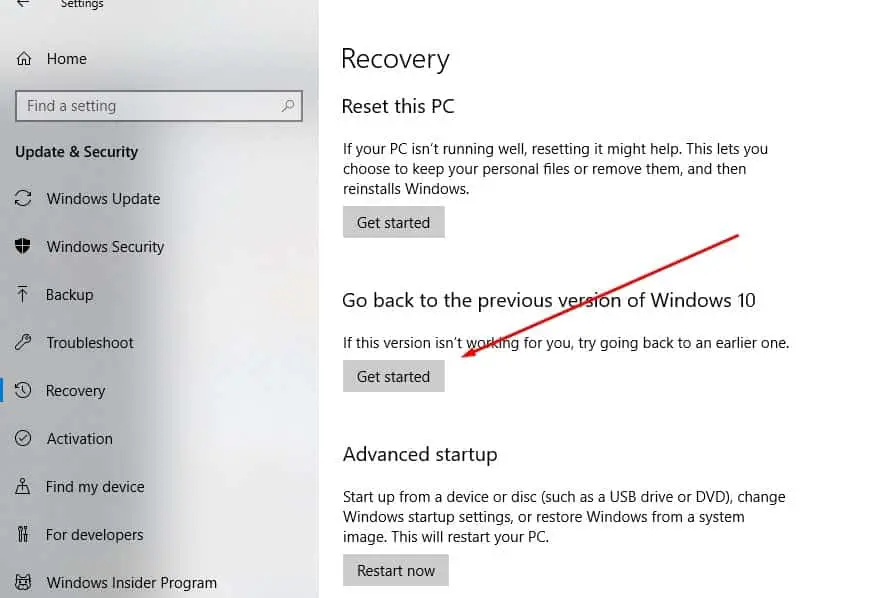
- Click on Update & Security then Recovery on the left
Now you need to click on Get Started under ‘Go back to the previous version of Windows 10 and follow on-screen instructions to Roll Back Windows 10 to the previous build.
How to Reset Or Refresh Windows 10?
Also if you found major problems and after performing different troubleshooting steps still have problems. Then you can Reset Windows to its Default setup to fix most of the problems.
- To Refresh or Reset Windows 10 Open Settings
- Click Update & Security then Recovery.
- Now Scroll down to the section labeled Reset this PC, and click the Get Started button.
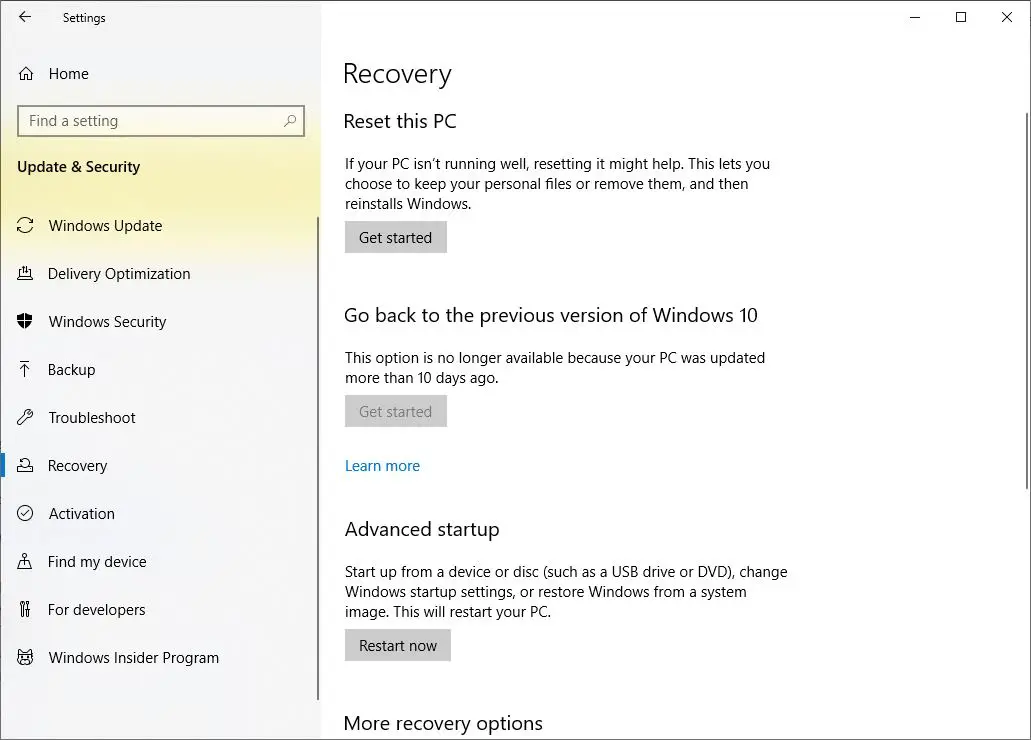
- Next, To refresh Windows 10, click Keep my files and To reset Windows 10, click Remove Everything.
- When prompted, review the list of apps that will be removed during this process, and if you’re okay with it, click Next Click Reset.
- Not only are these options useful for troubleshooting issues and boosting performance, but they can help you eliminate clutter and reclaim disk space.
Where to Get Help Fix Problems in Windows 10?
If you’ve come this far and still have unanswered questions, your best bet is to consult Microsoft’s official source of help and support for Windows 10 users. The Virtual Agent is like online chat support that’s completely automated. It’ll feel like you’re speaking to someone on the other end, but it’s literally just a bot. You can ask for help on whatever topic you want as long as you phrase it as a question, and the Virtual Agent will reply with relevant Microsoft articles.
To access the Virtual Agent:
- Open the Start Menu.
- Search for help and select Get Help. This will open the Virtual Agent.
Also read
- How to Fix Printer in Error State on Windows 10
- 5 solutions to fix page fault in nonpaged area Windows 10 boot loop
- Laptop freezes randomly after installing the Windows 10 update? Try these solutions
- Solved: Feature update to Windows 10 version 22H2 failed to install
- Solved: “No Audio Output Device Is Installed” Windows 10

