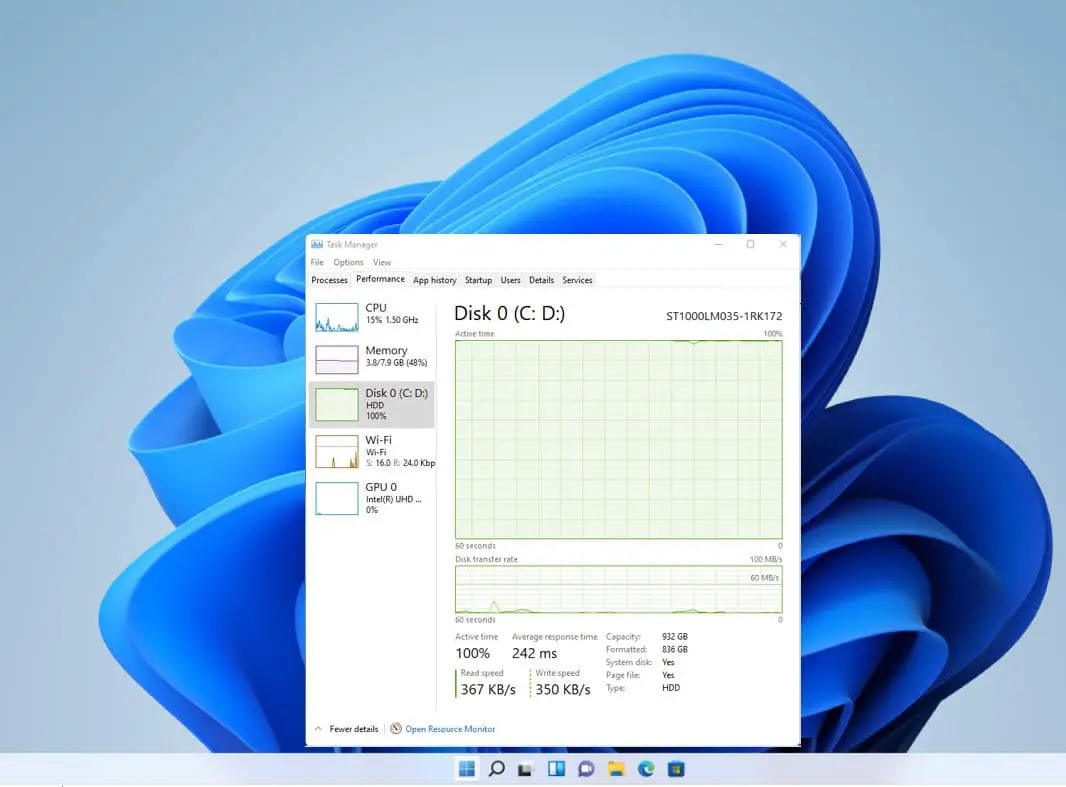
Microsoft regularly updates the Windows 11 Operating system with the latest bug fixes, security enhancements, and new features. Recently the company released, feature update Windows 11 23H2 with new features and changes, including improvements for the Start menu, design tweaks, Settings changes, and more. Few users report, after the Windows 11 version 23H2 update, the computer responds slow and freezes, whereby task manager shows that 100% disk is being used constantly. Sometimes you may notice 100% disk usage even when the PC is sitting idle. There are multiple reasons cause this problem, here in this article, we have detailed the most effective solutions to fix the 100% disk usage problem in Windows 11.
How to Fix 100% Disk Usage in Windows 11
The possible reason for Windows 11 100 disk usage is many it might be a problem with the disk drive to background app activities. Sometimes critical system services like Windows Search, prefetch, or SysMain also been found the reason behind high disk usage problems. Problems with OS installation or Windows file corruption also cause such problems on your computer.
- If Windows 11 not responding or it’s very slow, performing a clean boot to disable third-party apps has proven very effective get rid of this issue.
- Another effective solution is run the CHKDSK command and repair drive errors and bad sectors.
- Open Windows services using services.msc and disable the Sysmain and prefetch service to reduce the disk usage problem on Windows 11.
- Perform a full system scan for virus or malware infection with the latest antivirus program and run SFC command that fixes if Windows file corruption freezes the computer.
Let’s first reboot your computer, this will refresh the OS, restart all running services and clear temporary glitches that may be causing Windows 11 slow or 100% disk usage.
Update windows 11
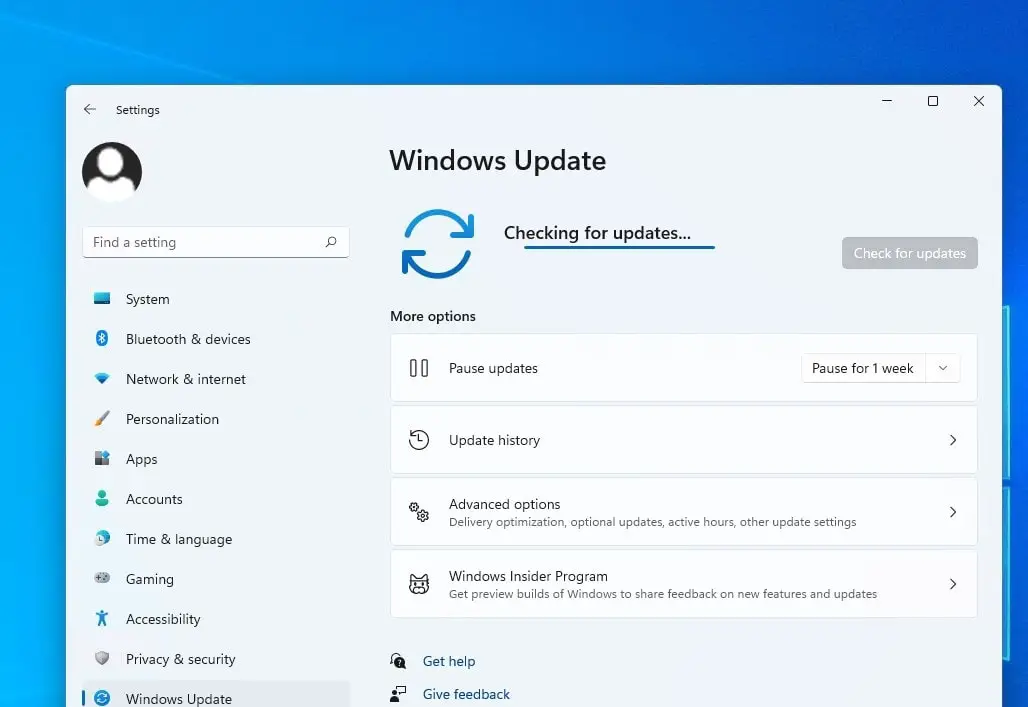
Microsoft time to time updates Windows 11 OS which includes the latest security and bug fixes. If the problem started after a recent Windows 11 update, Microsoft may be aware of this bug and bring a fix for this problem with recent Windows updates. Let’s first check for and install the latest Windows update.
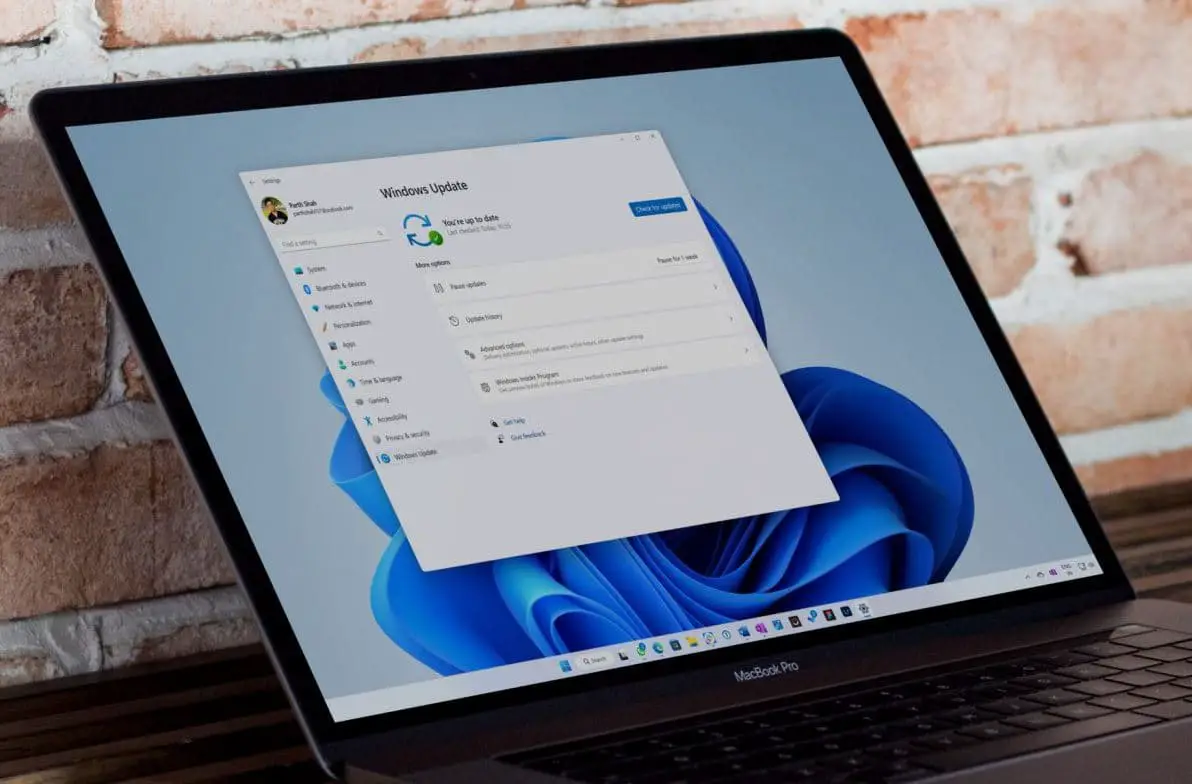
- Press the Windows key + X and select settings,
- Navigate Windows Update and hit the check for updates button,
- If new updates are available or pending there, allow them to download and install on your PC,
- In addition click n advanced options, then optional update and install if any optional updates are available.
- Once done, reboot your computer to apply the changes.
Disable SysMain (Superfetch) Service
The SysMain is previously known as Superfetch service on windows 11 preload apps into memory before you launch it. It makes open programs as quickly as possible, but sometimes this service is the reason behind high disk usage problems on windows 11.
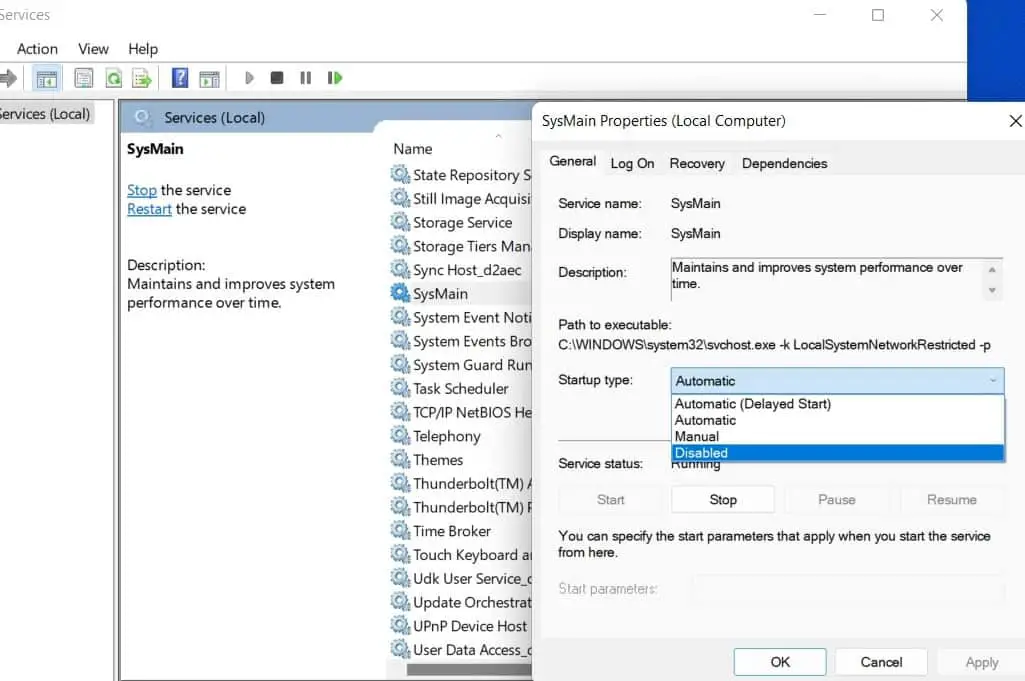
Let’s disable the SysMain service and check the disk usage comes down.
- Press Windows key + R, type services.msc and click ok
- Scroll down and look for SysMain service, right-click on it select properties.
- Here change the startup type to Disabled, and click on “Stop” to immediately halt the service. Now, click on Apply -> OK.
Same way Disable Windows Search and Connected User Experiences and Telemetry service.
Connected User Experiences and Telemetry service run under svchost.exe and is might responsible for high disk usage in windows 11.
Now open the task manager and check if the disk usage is reduced. In addition, you can restart your PC and check whether Disk usage is still spiking or not.
Clean boot your computer
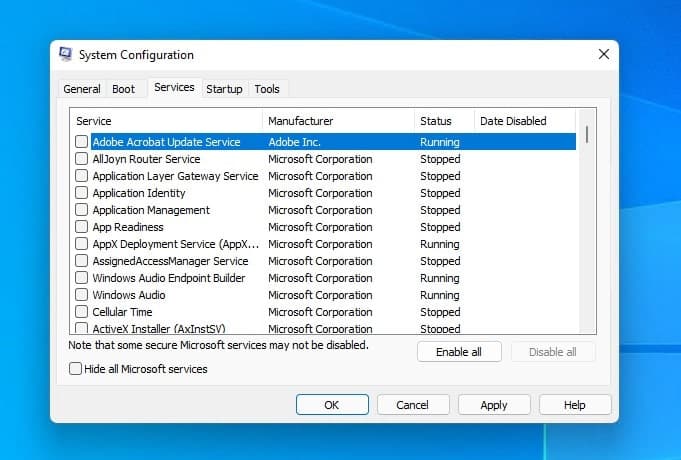
Sometimes you may experience 100% disk usage on startup due to the activities of startup apps and processes. Perform a clean boot disable these apps and start Windows 11 only with needed Microsoft services.
- Press Windows + R, type msconfig and click ok,
- The system configuration window opens, move to the services tab check the Hide all Microsoft services check box and click Disable all.
- Now Go to the Startup tab and click Open Task Manager, Here Right-click each startup item, and click Disable.
- Return to the System Configuration window, click Apply, then OK, and restart your PC.
Check Your Hard Disk for Errors
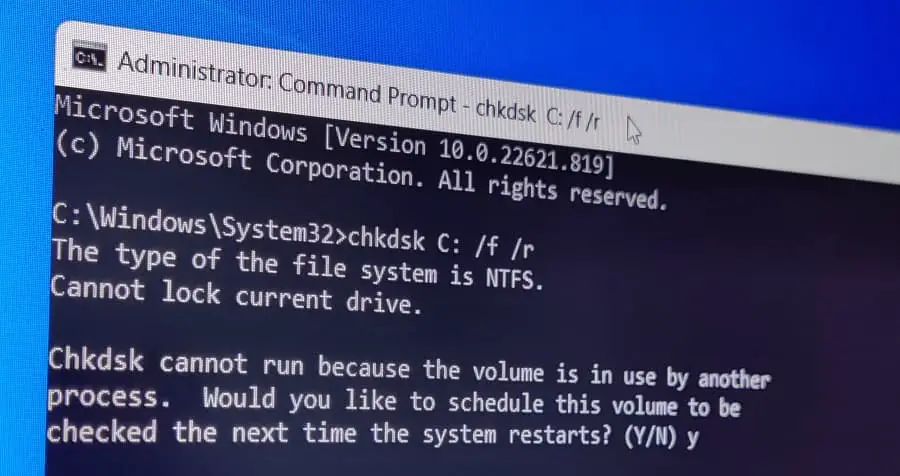
Disk drive errors or bad sectors in hard disk also slow down the Windows performance and cause 100% disk usage problems. If the above solutions didn’t fix the problem, you need to repair disk errors using chkdsk command.
- Press Windows key + S type cmd, right-click on the command prompt select run as administrator,
- Type chkdsk /r /f and press enter key to execute the command,
- You’ll be prompted to schedule the scan the next time you reboot your PC—type Y and press Enter.
- Close the command prompt and reboot your computer to scan the disk drive errors and fix them.
Rebuild Search Index
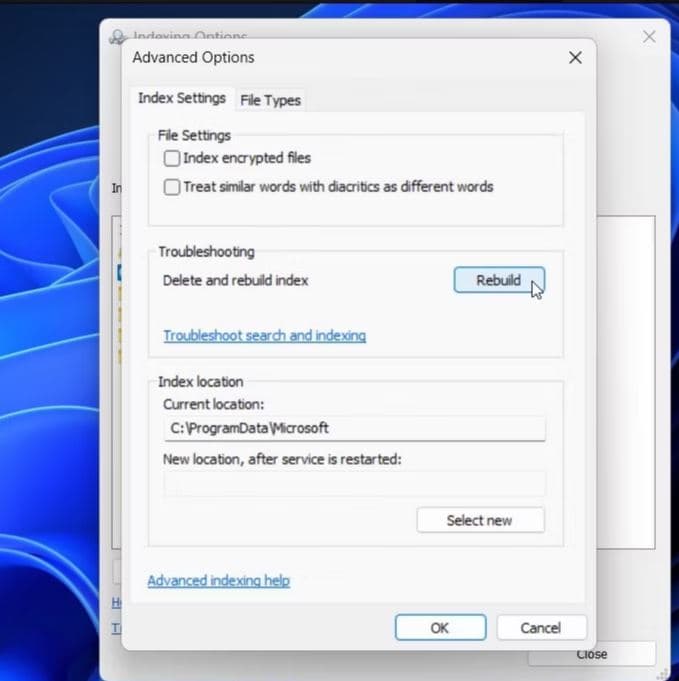
Another common reason for High disk usage is search indexing on Windows 11. The search indexing option scans files, emails, photos and other system files on your PC to help return search results faster. But if something goes wrong it can lead to an indefinite search loop and result high disk usage in Windows 11.
- Press Windows key + R, type control.exe srchadmin.dll and click ok to open Indexing options,
- Click the Advanced button and Click the Rebuild button in the Troubleshooting section and click OK to verify
Note – This process can take a while, and vary based on the amount of data on your drive and its speed, i.e., SSD vs. HDD.
Disable MSI Mode for the Default AHCI Driver
Sometimes, 100% disk usage actually stems from Advanced Host Controller Interface PCI-Express (AHCI PCIe) controllers that have firmware incompatibility. Especially Computers using the “StorAHCI.sys” driver, are most likely affected with this issue. And Microsoft even states, disable Message Signaled Interrupt (MSI) mode reduces disk usage drastically.
- Press the Windows key + X and select the device manager
- Expand “IDE ATA/ATAPI controllers” and right-click on STAT AHCI controller. Now, select “Properties” from the context menu.
- Move to the Driver tab then click on Driver details, If you find “StorAHCI.sys” under the path, means your PC using the default AHCI driver and that may cause 100% disk usage. And follow the next steps to disable the MSI mode in Windows 11.
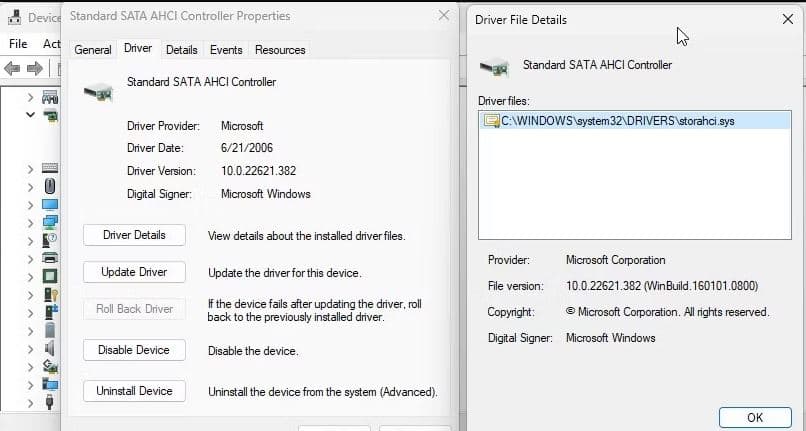
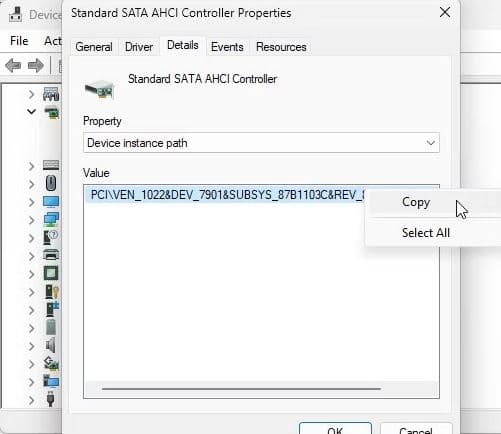
- Click ok and go back to the properties dialog then move to the details tab
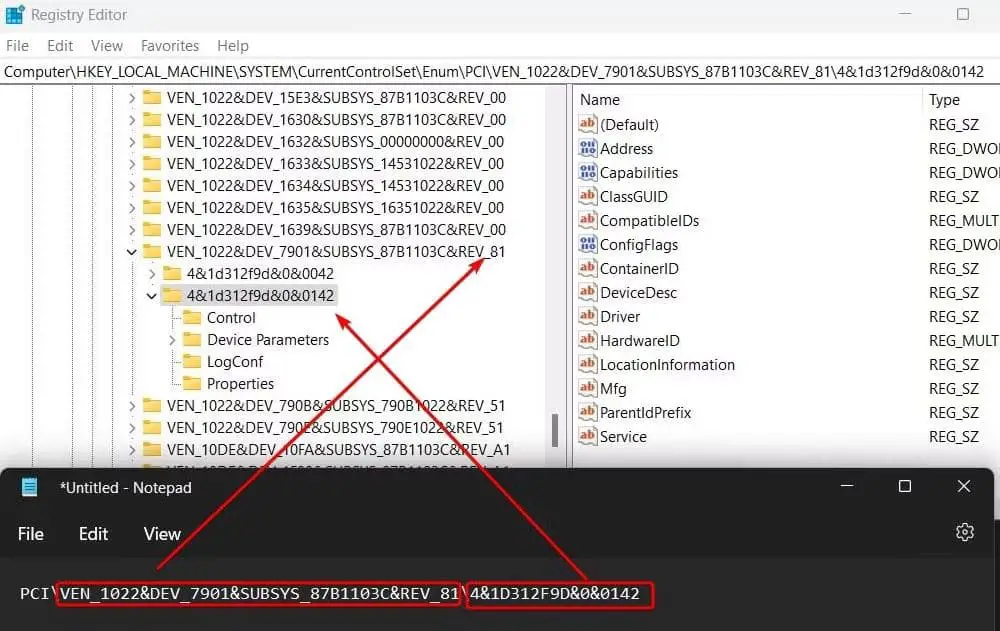
- Here under the property section select the Device instance path and copy the path under the value section and paste it into Notepad.
- Now close the device manager, press the Windows key + R, type Regedit and click ok to open the registry editor,
- Navigate the following path Computer\HKEY_LOCAL_MACHINE\System\CurrentControlSet\Enum\PCI\
- Now, match the entry with the one you pasted in the Notepad file and expand it.
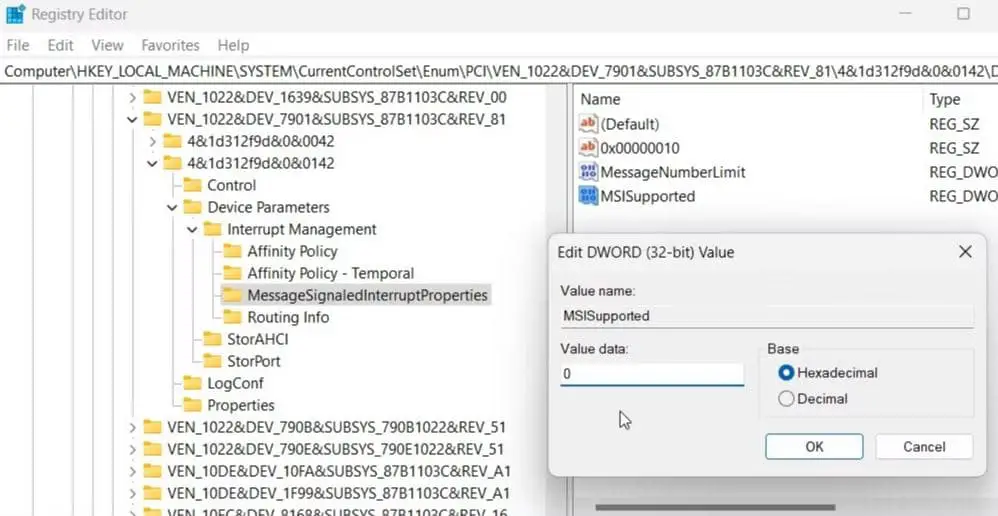
- Further, move to Device Parameters -> Interrupt Management -> MessageSignaledInterruptProperties.
- On the right pane, look for “MSISupported“, Open it and change the value data to 0.
- Close the Registry Editor and restart your PC, Now check if the disk usage comes down.
Check for malware infection
Virus or malware infection is another common reason why disk usage is very high on Windows 11. Run the built-in Windows security (formerly Windows Defender) or use third-party antivirus programs to scan and remove virus malware from your computer.
- Click Start or press the Windows key, type Windows Security, and select the top result
- Select Virus & Threat Protection on the left and click the Quick Scan button.
- If nothing is detected and you’re still getting 100 percent disk usage, try a deeper scan.
- To do this, click the Scan options link and select a Full scan or Microsoft Defender Offline scan.
Note – In some cases, the antivirus software will take too much disk usage. You can disable the software for a while to fix the issue.
Reset Virtual memory
When Windows 11 is short of RAM, it sometimes utilizes hard disk memory (virtual memory) as a swap to hold programs and files in memory. If you have recently customized virtual memory for better performance, we recommend reset it following the steps below.
- Press Windows key + R, type sysdm.cpl and click ok to open system properties,
- Move to the Advanced tab and click on settings under the performance section,
- Again under the performance options window, move to the Advanced tab then click on Change,
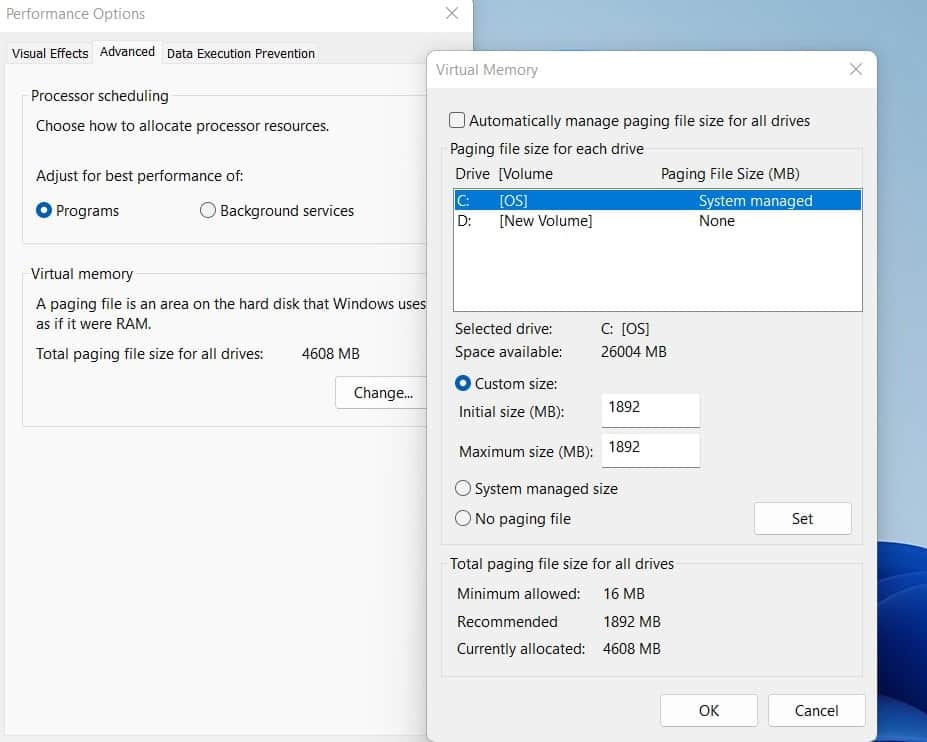
- Here, untick the “Automatically manage paging file size for all drives” checkbox and choose “Custom size“.
Now, enter the “Recommended” size into the Initial size field. And in the Maximum size field, enter the amount (in MB) 1.5x times your RAM size. For example, my RAM is 8GB, so I have entered 1024 x 8 x 1.5 = 12288. Finally, click Set -> OK. Now, restart your PC, and the disk usage should be significantly reduced.
In addition press the windows key + r, type %temp% and click ok, this will open all temporary files on your PC, here press ctrl + A to select all and hit del key.
Run SFC scan command
Corrupted Windows files also slow down the system performance or cause a high disk load as your PC tries to compensate. Run the system file checker utility that helps you scan for bad files and replace them with good ones.
- Again open the command prompt as administrator,
- First, run DISM restore health command DISM /online /cleanup-image /restorehealth
- Next, run the system file checker command sfc /scannow
- Once the scanning completes, reboot your PC and check if this help fix the 100% disk usage problem on Windows 11.
Did the above solutions help fix 100% disk usage problem on Windows 11? Let us know in the comments below.
Also read:
- 6 ways to fix Firefox not working or loading on Windows 11
- Microsoft Teams not open or Crashes on Windows 11 (7 solutions)
- High CPU or 100 Disk Usage after Windows 10 update (7 working solutions)
- Laptop sound not working (No Sound) after the Windows 11 update
- Laptop won’t turn on after update. Here’s How To Fix It
- Solved: Images not Loading in Chrome browser Windows 11

